A registration form is often the first interaction users have with your website. Whether you're building a membership site, an online community, a vendor marketplace, or a client portal, a well-designed registration form helps you collect the right information while providing a smooth onboarding experience.
With WP User Frontend Pro, you can create fully customizable registration forms that allow users to sign up and build rich profiles directly from the front end of your WordPress website.
Unlike the default WordPress registration page, WP User Frontend Pro gives you complete control over the fields, user roles, workflows, notifications, and overall user experience.
In this guide, we'll walk you through the complete process of creating and publishing a registration form.
How to Create and Publish a Registration Form in WordPress
Registration features are only available in the paid version. If you haven't installed the plugin yet, see our guide to installing WP User Frontend Pro first. The Pro version requires the free WP User Frontend base plugin to be active.
Step 1: Create a New Registration Form
Before you begin, make sure you're using WP User Frontend Pro, as registration forms are available in the Pro version. If you're not sure which plan you're on, check our pricing page.
To create a new registration form:
- Log in to your WordPress admin dashboard.
- Navigate to User Frontend → Registration Forms.
- Click Add New to create a form manually, or use the AI Form Builder to generate a registration form in seconds.
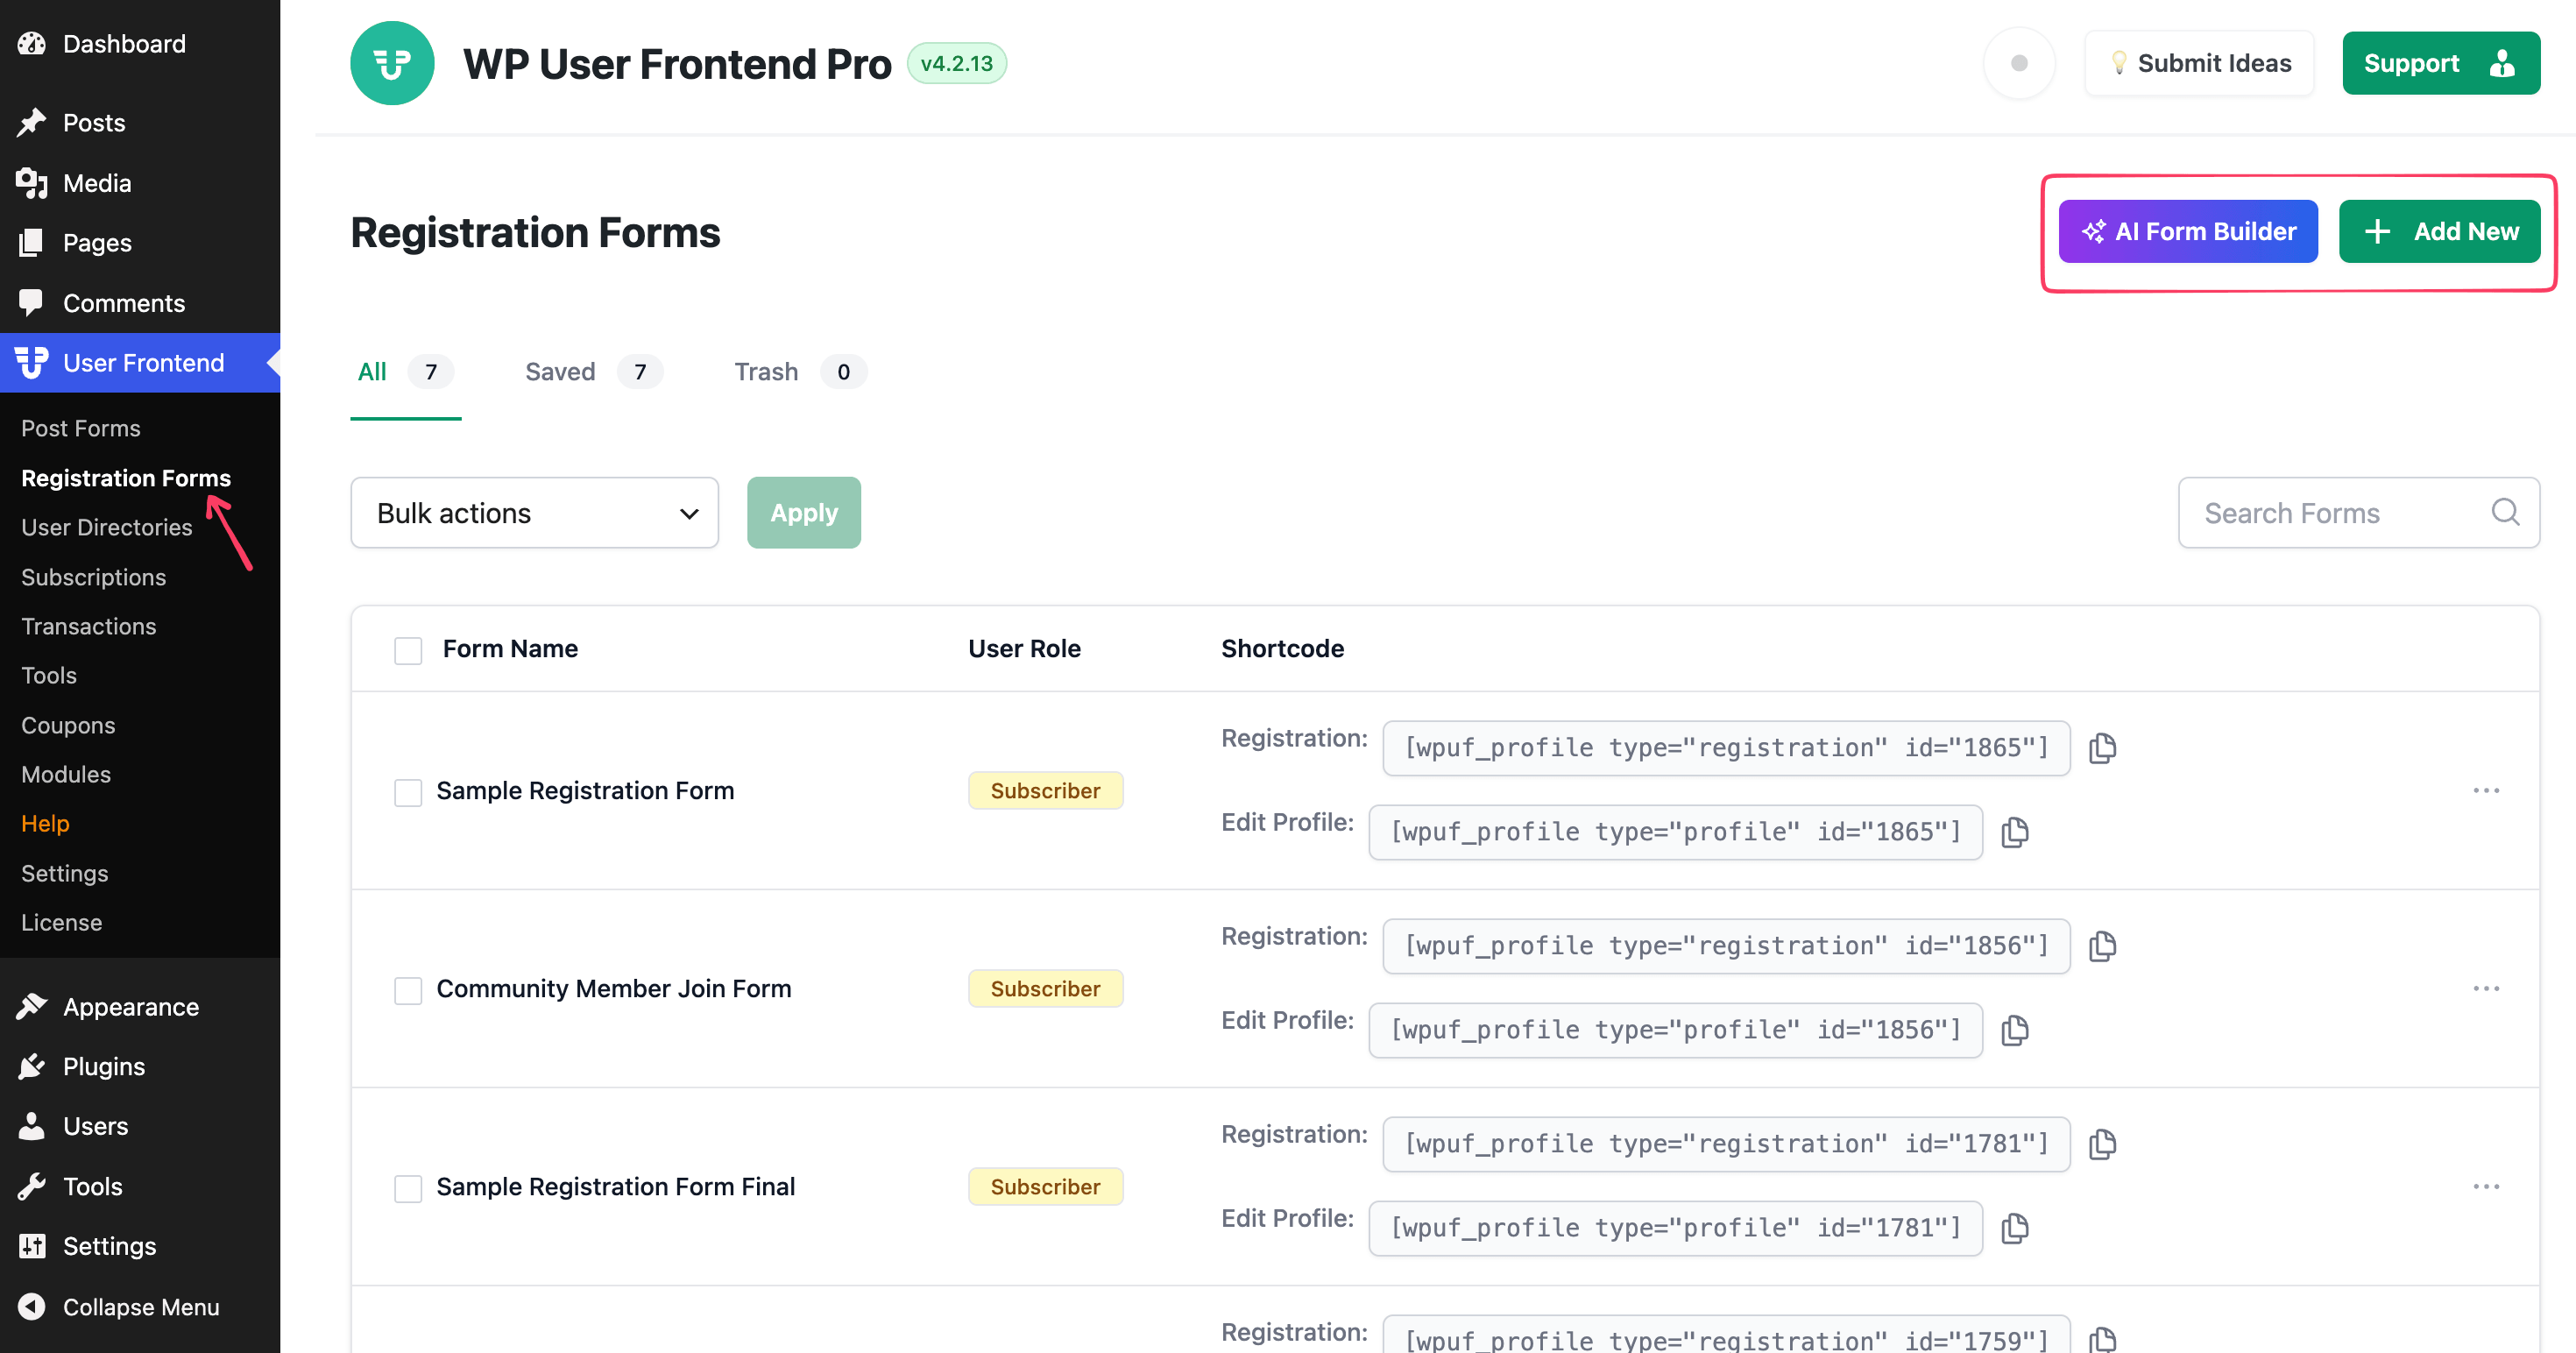
If you don't want to start from scratch, WP User Frontend Pro also includes ready-made templates for common use cases, such as Dokan Vendor Registration and other marketplace and membership layouts. You can select a template or start with a blank canvas and customize everything yourself. See our registration forms documentation for the full walkthrough.
Finally, give your registration form a descriptive name so it's easy to identify later.
Step 2: Build Your Registration Form
WP User Frontend Pro includes a drag-and-drop form builder, making it easy to design your registration form without writing any code.
Every registration form should include the essential user account fields:
- Username
- Email Address
- Password
- Confirm Password
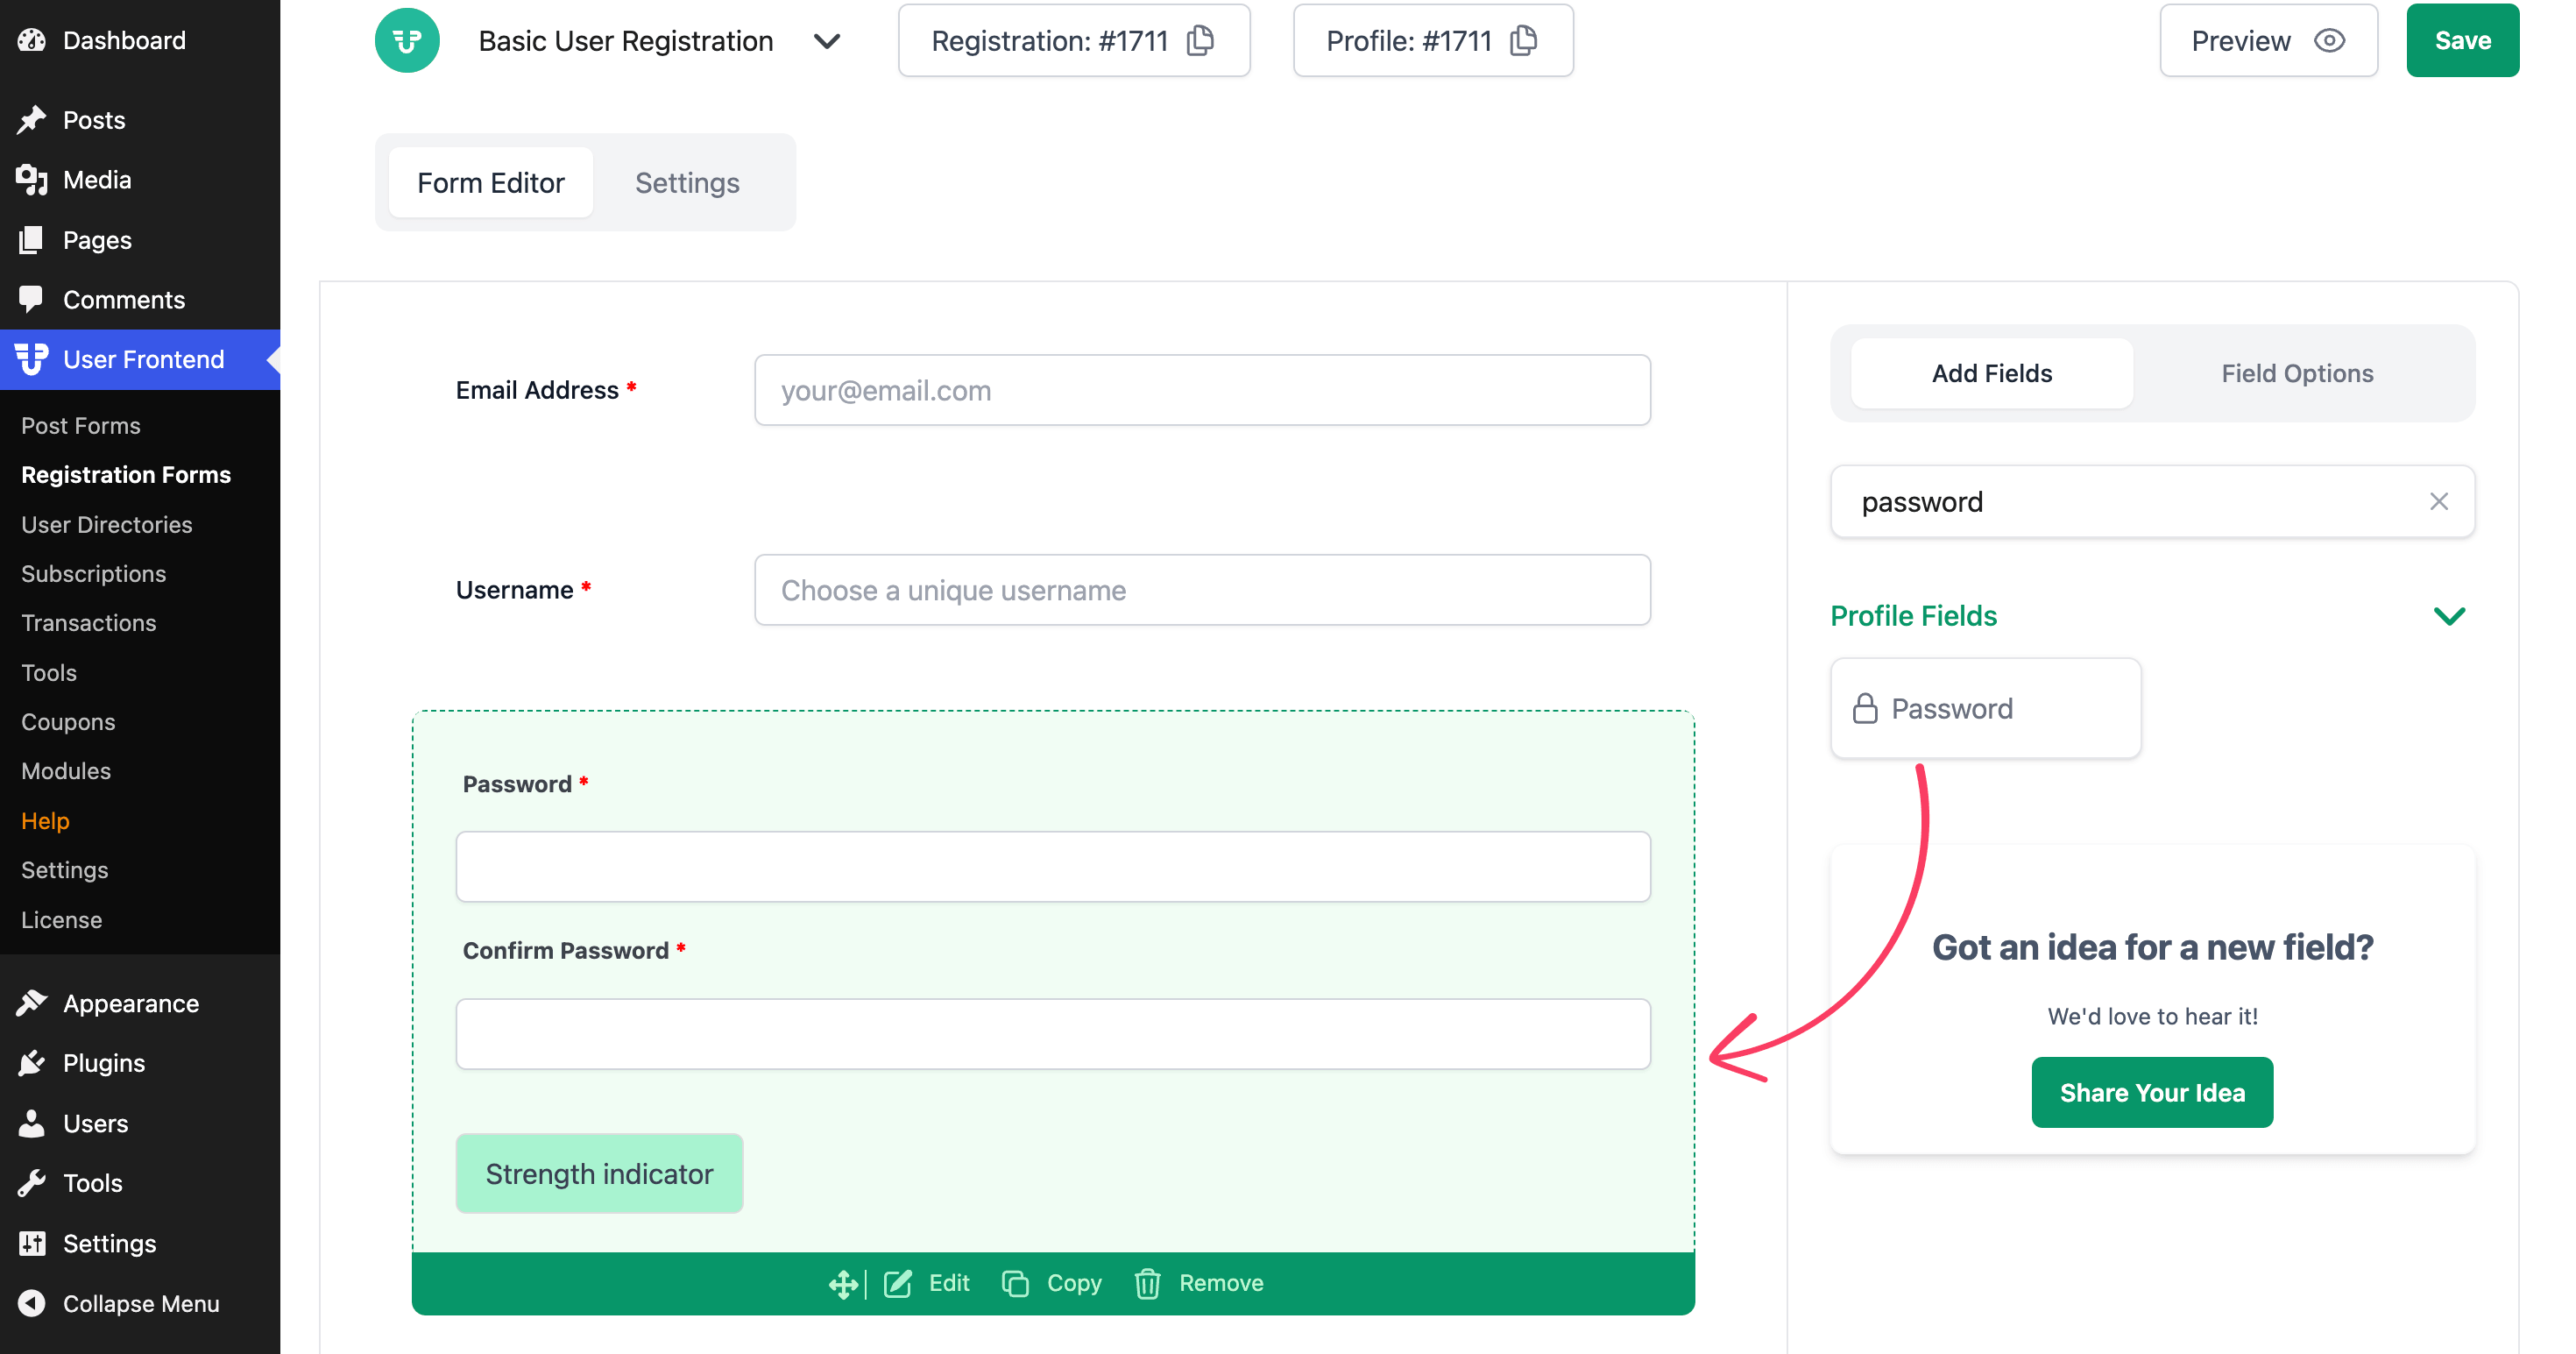
Depending on your website, you can collect much more information during registration. Simply drag additional fields into your form, such as:
- First Name
- Last Name
- Nickname
- Biography
- Profile Photo
- Date of Birth
- Website
- Phone Number
- Address
- Country
- Date Picker
- Dropdowns
- Radio Buttons
- Checkboxes
- File Uploads
- Custom Fields
- And many more
For the complete rundown of every available field type, check our available user field elements guide.
Once you've added the required fields, arrange them by dragging and dropping them into your preferred order. This allows you to create a clean and intuitive registration experience for your users.
Step 3: Customize Form Fields
Every field in your registration form comes with its own configuration options, allowing you to tailor the form to your specific requirements.
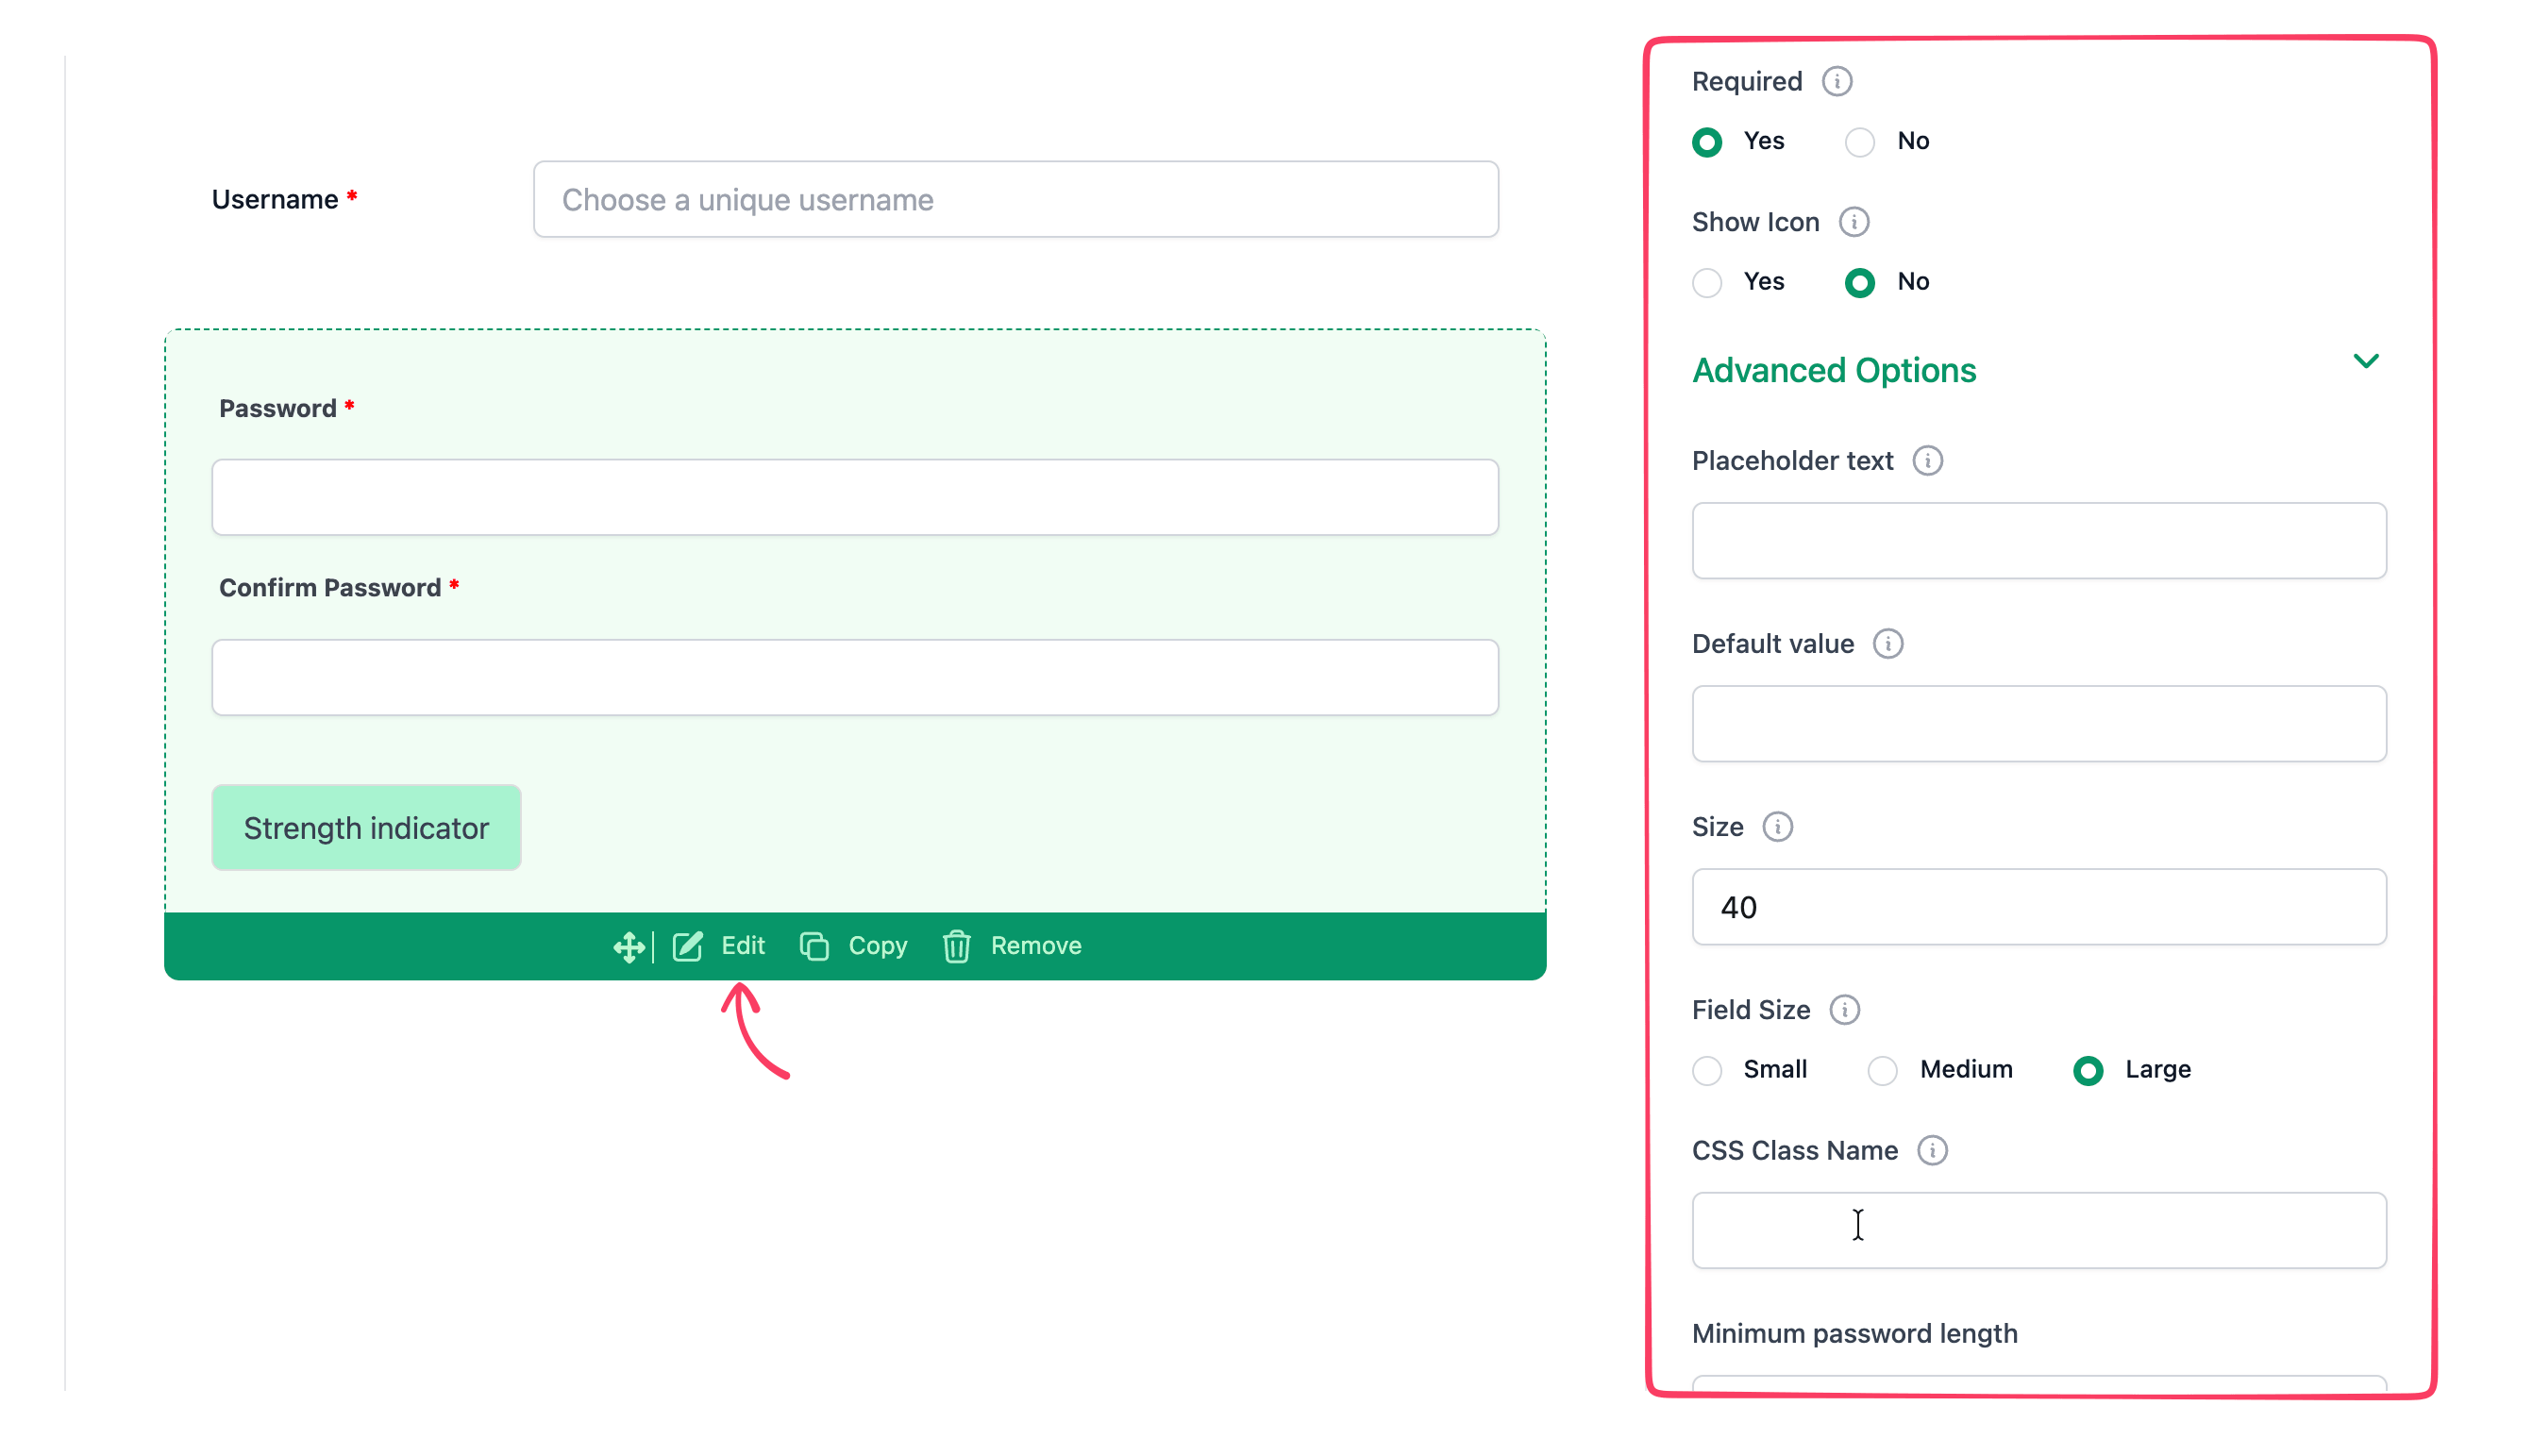
For each field, you can configure options such as:
- Whether the field is required or optional
- Read-only mode
- Field icons
- Placeholder text
- Help text
- Default values
- Character limits
- Validation rules
- Conditional logic
- And many more customization options
These settings help you build forms that are both user-friendly and capable of collecting accurate information.
For example, you can display additional fields only when users select a particular option, or require certain information based on their registration type using Conditional Logic. Learn more in our conditional logic guide.
Step 4: Configure Form Settings
Once your fields are ready, it's time to configure how the registration form behaves.
Open the Settings tab to access the form settings.
General Settings
The General Settings section controls what happens when someone registers through your form.
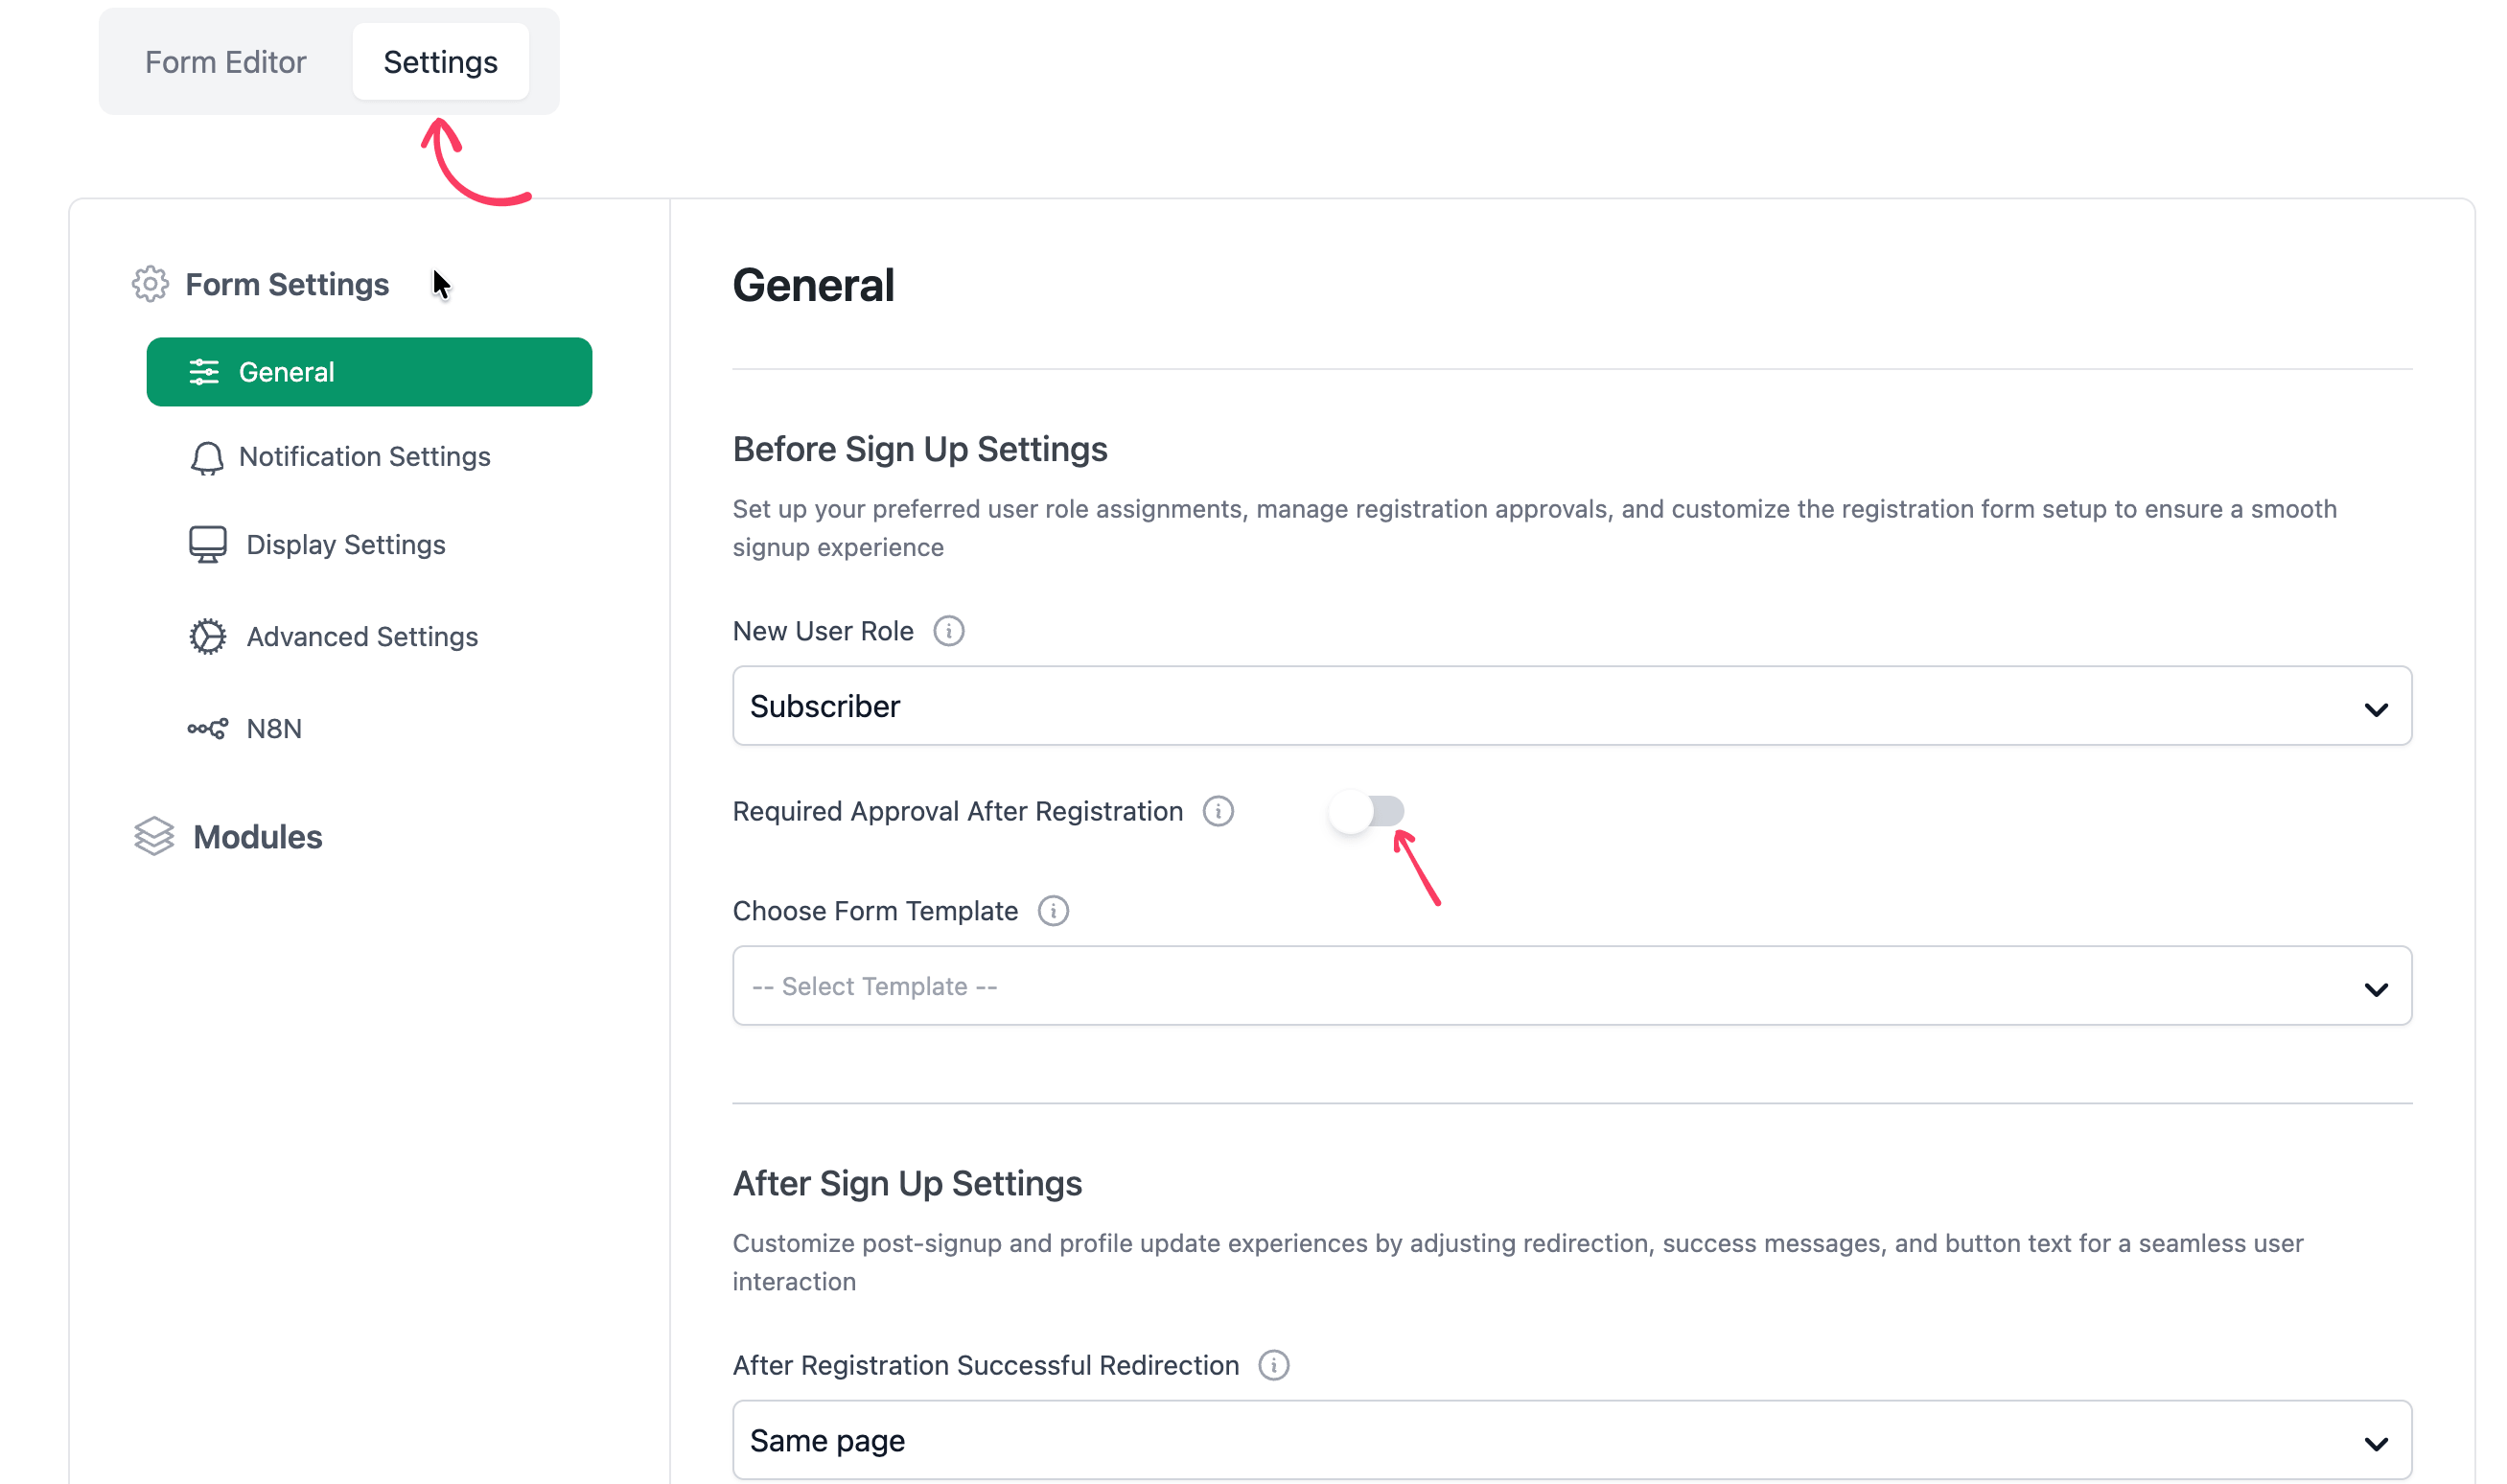
Here you can:
- Assign a default user role
- Require admin approval before users can log in
- Enable automatic login after successful registration
- Redirect users to a specific page after registration
- Customize the success message
- Change the submit button text
- Configure additional registration options
These settings let you tailor the registration workflow to suit your website's requirements.
Notification Settings
Keeping both users and administrators informed is an important part of the registration process.
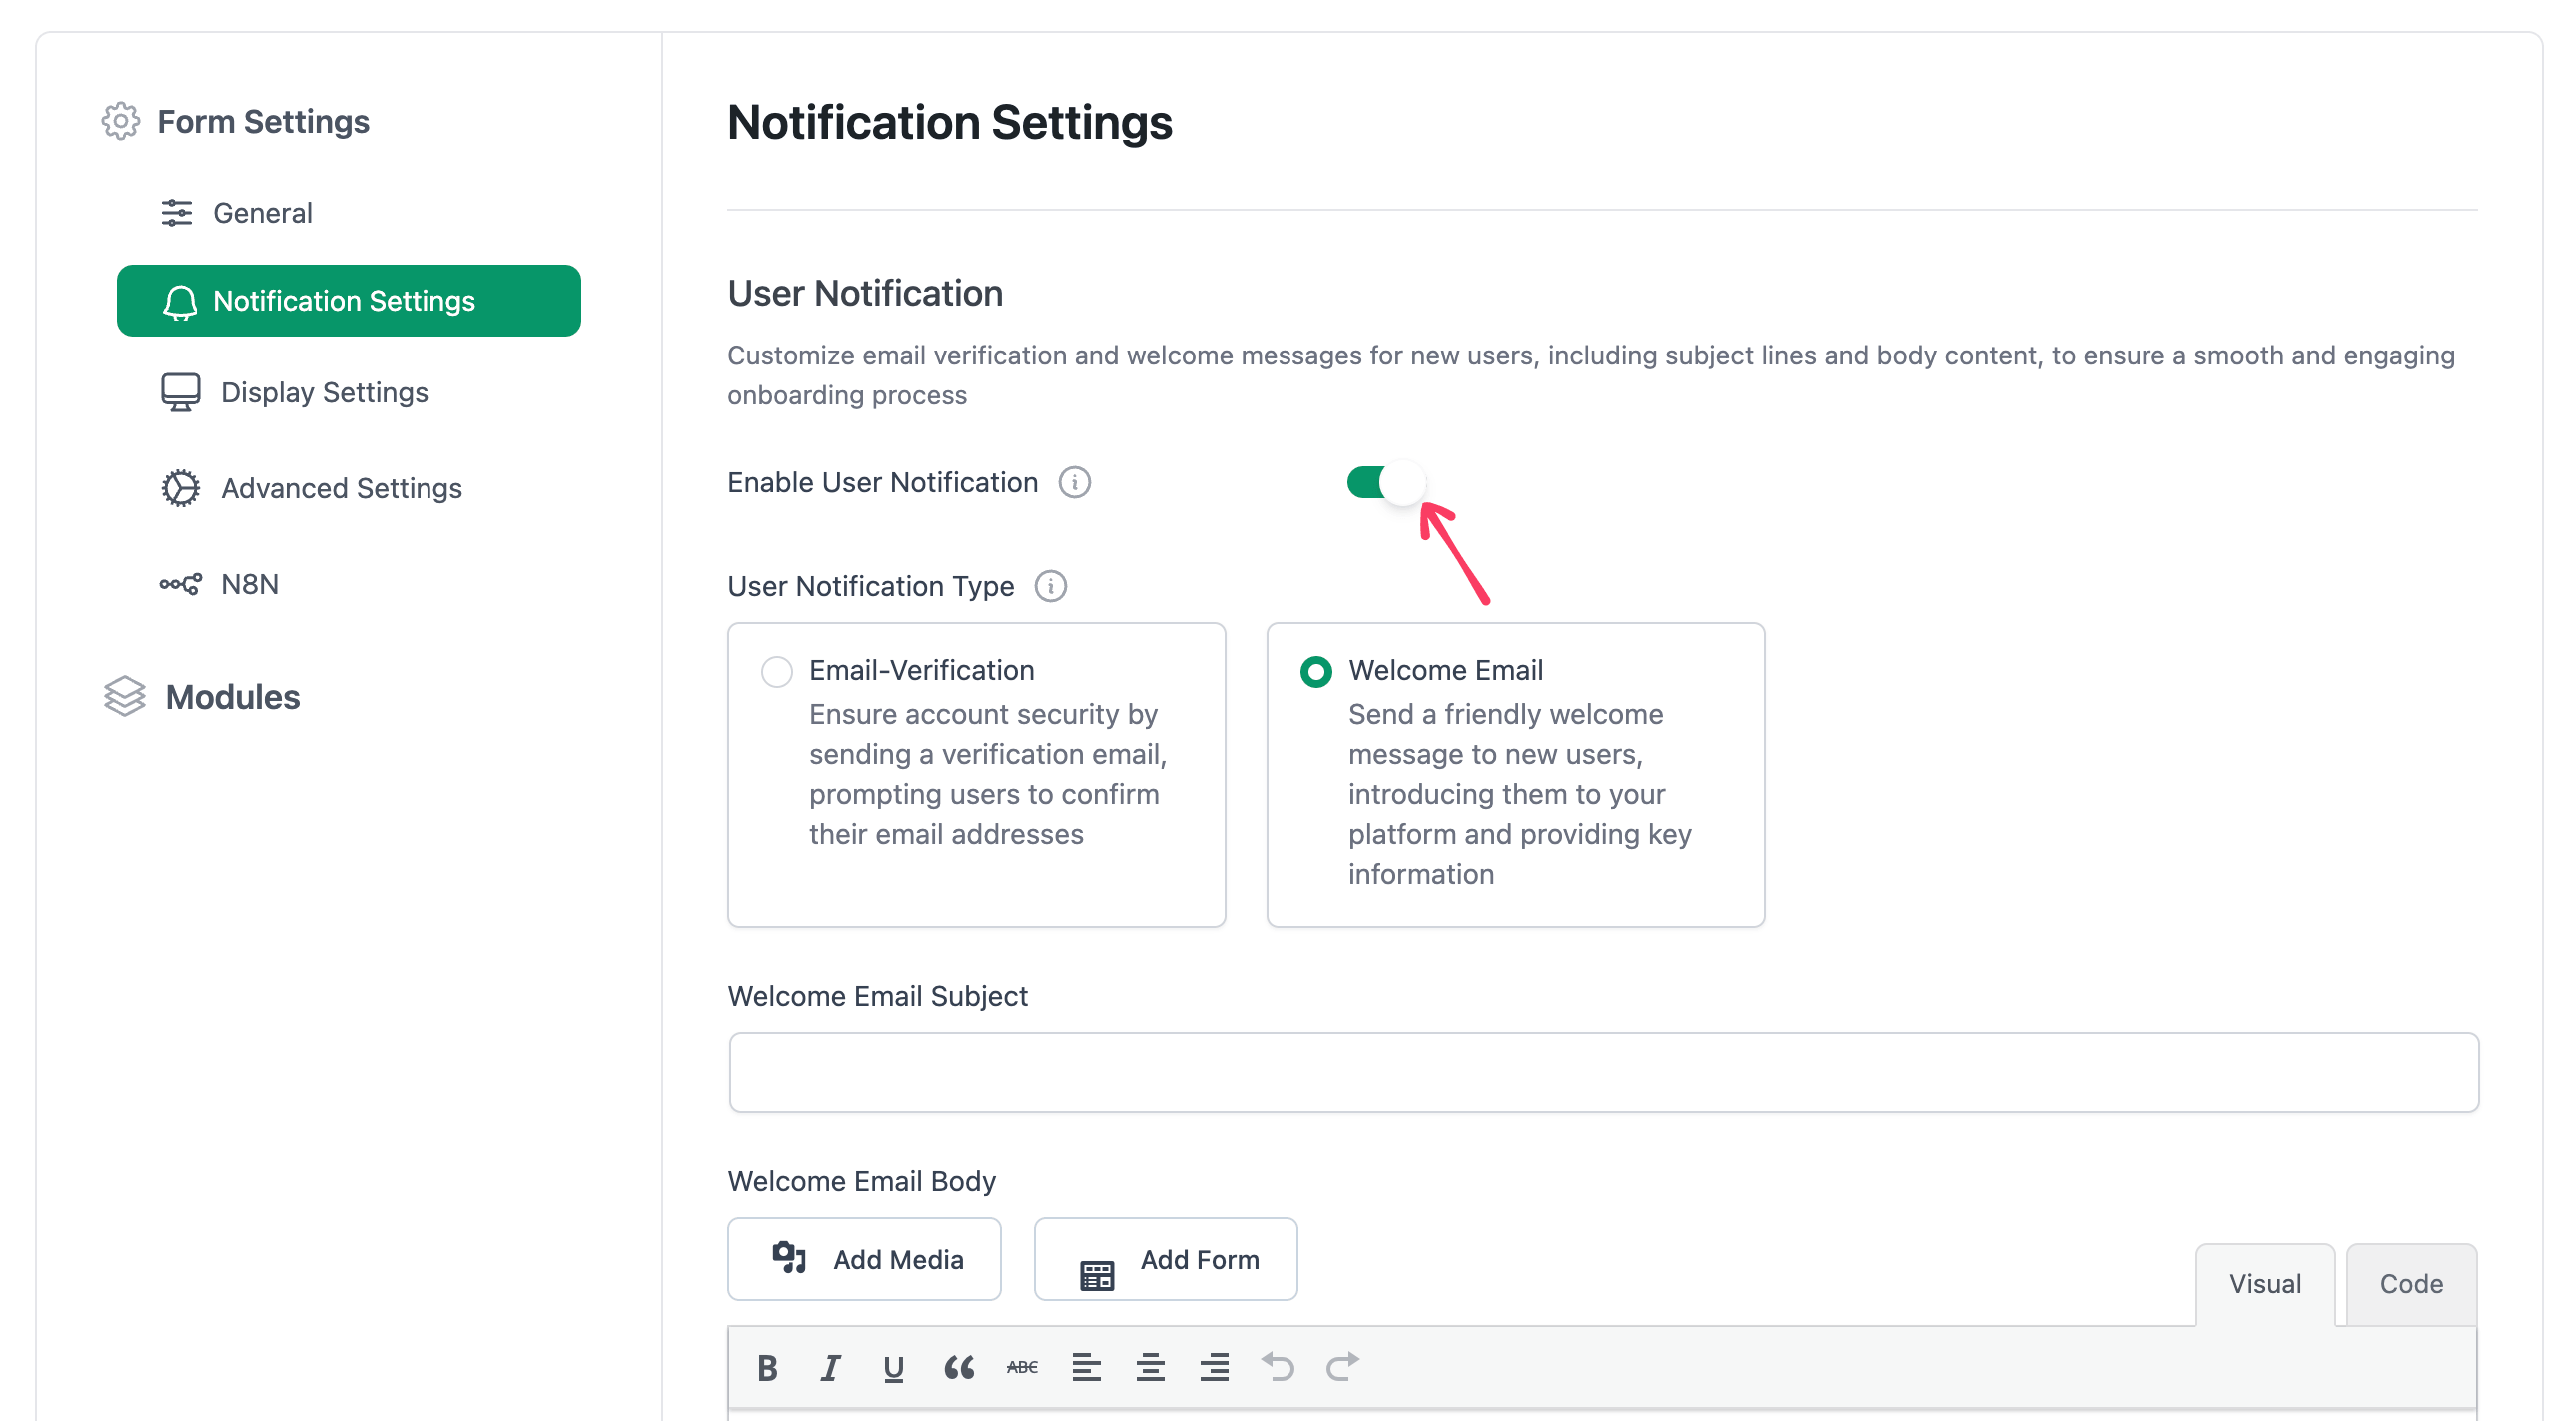
From the Notification Settings tab, you can:
- Send email notifications to users after registration
- Choose between Email Verification or a Welcome Email
- Notify administrators whenever a new user registers
These notifications help automate communication and improve the overall onboarding experience. For setup details, see our admin approval notification setup guide.
Display Settings
The Display Settings tab allows you to customize the visual appearance of your registration form, helping you create a cleaner and more engaging user experience.
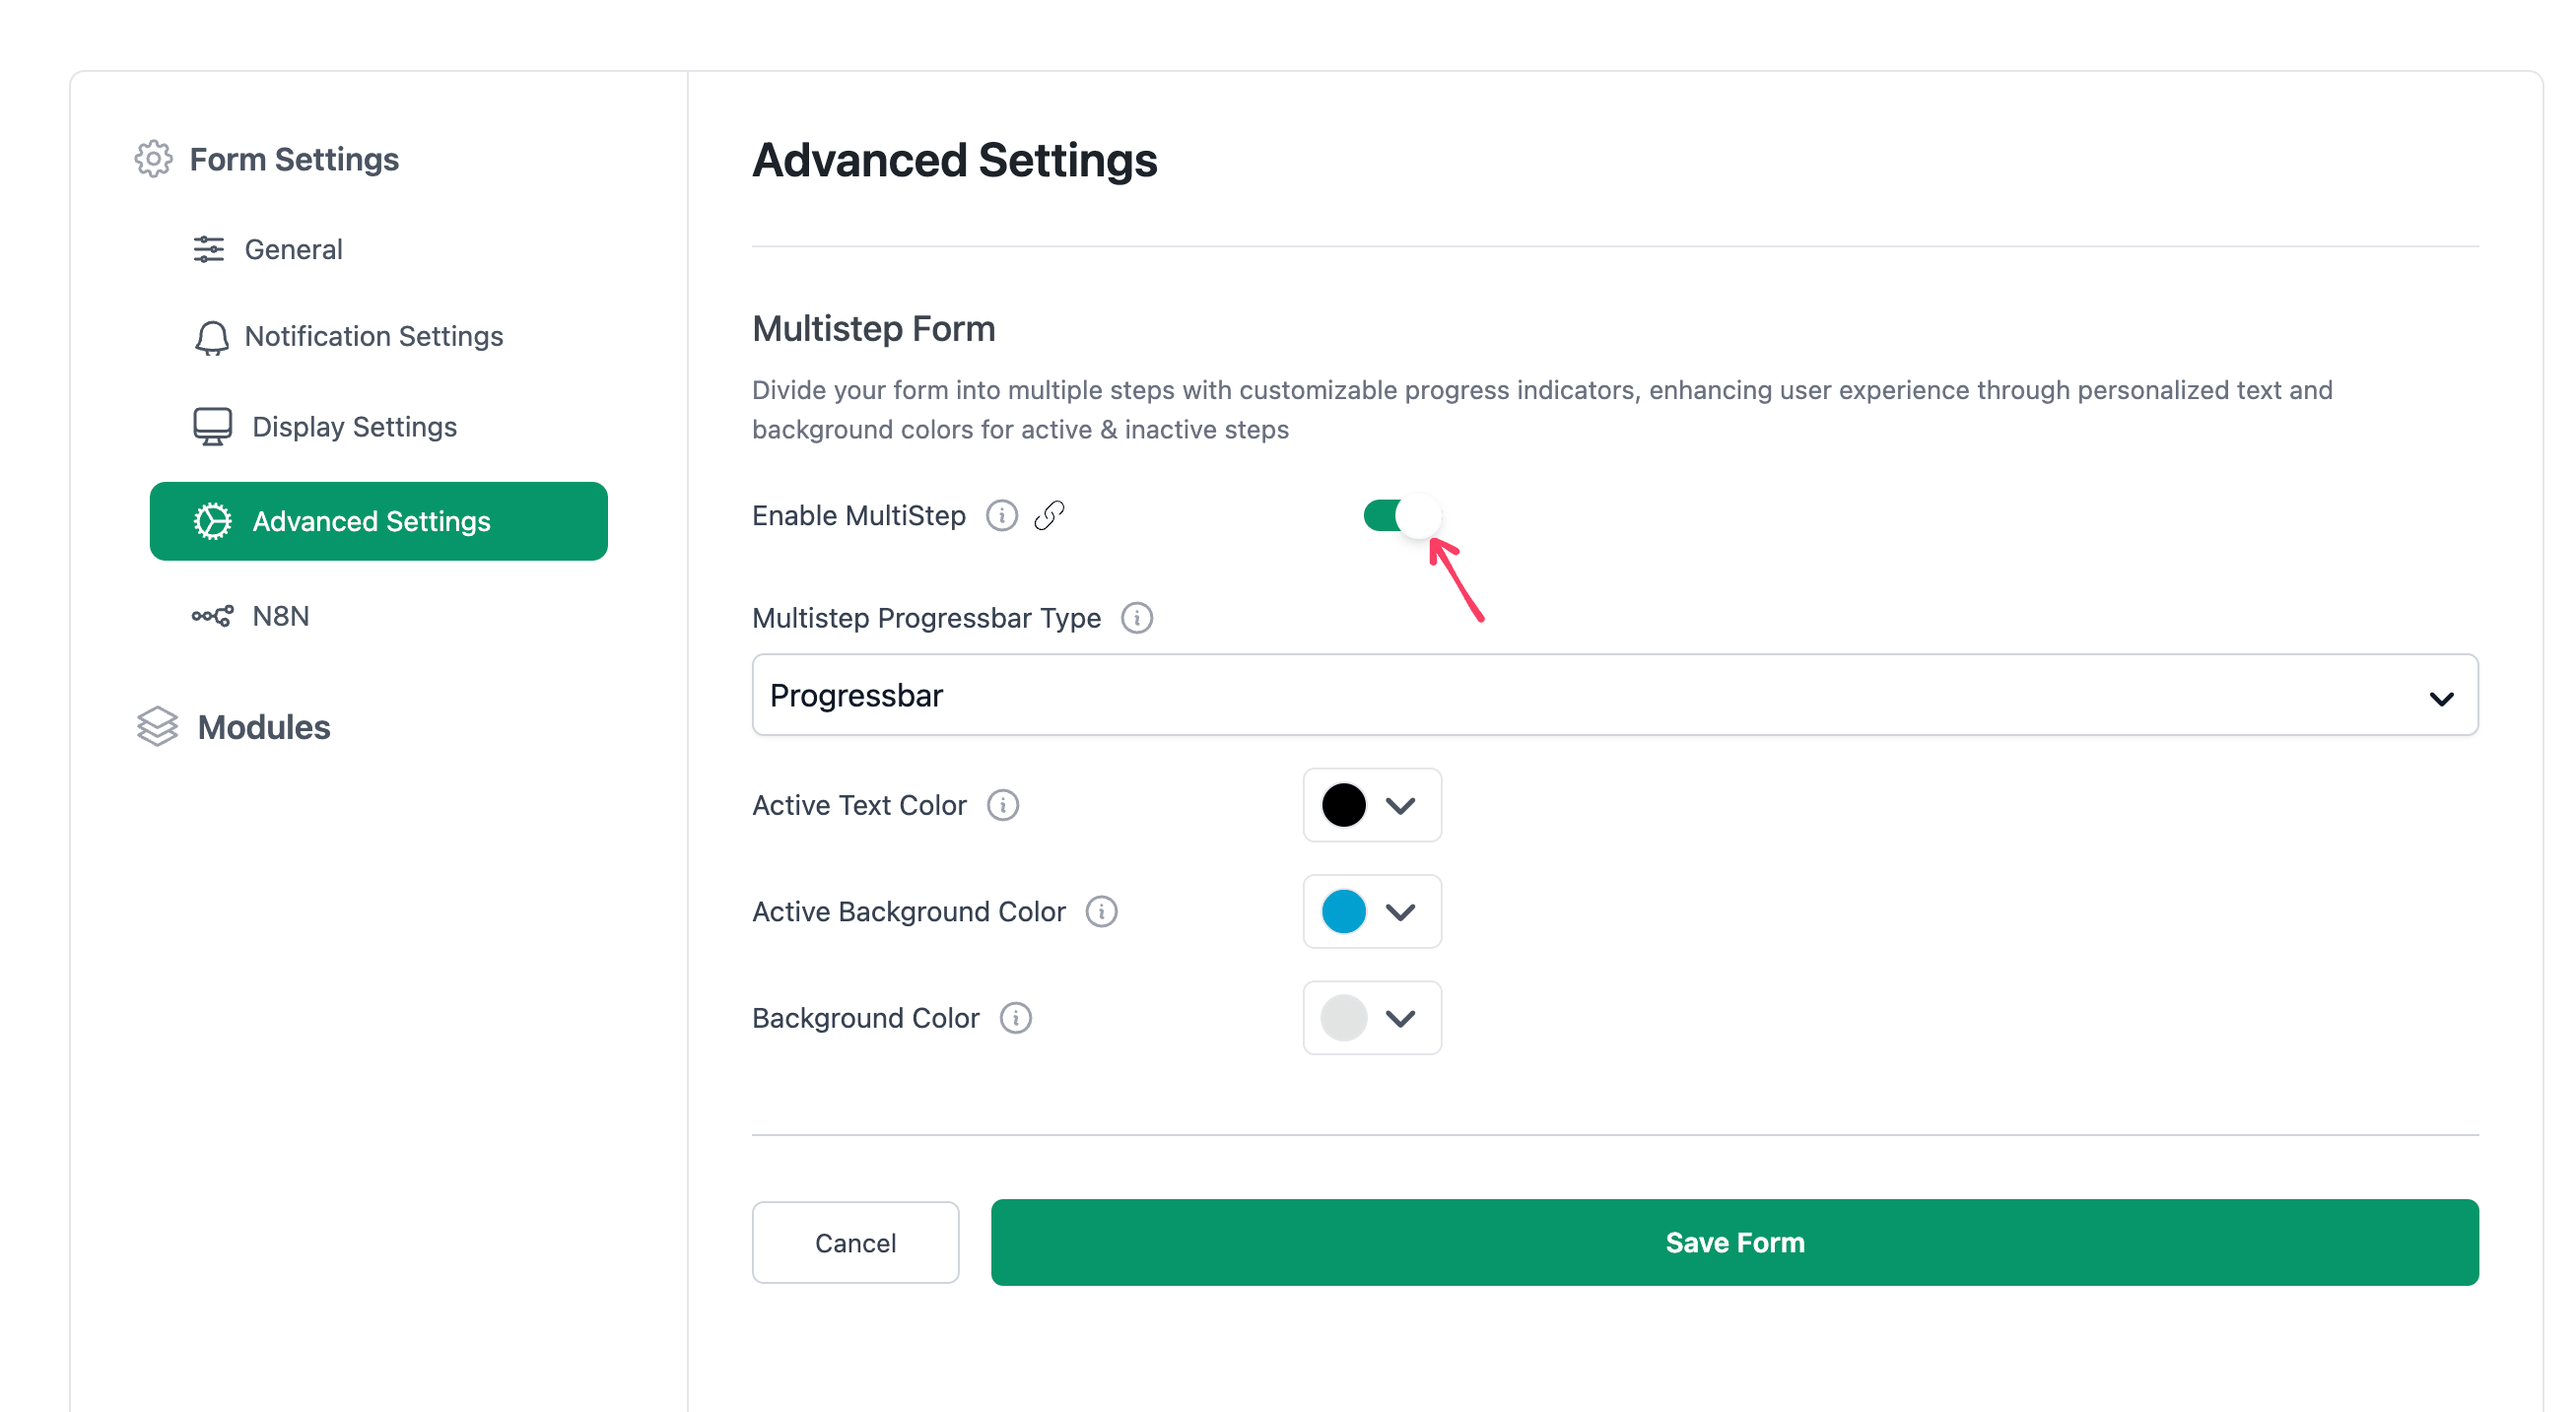
Advanced Settings
If your registration form is long, you can improve usability by enabling Multistep Forms. This divides the form into multiple sections, making it easier for users to complete.
WP User Frontend Pro also supports n8n Integration, allowing you to automatically send registration data to your n8n workflows for further automation. Read more in our n8n integration guide.
If you need additional functionality, visit the Modules page and activate any modules included with your Pro plan – see our complete modules directory for what each one does.
Once you're satisfied with the configuration, save your registration form.
Step 5: Publish the Registration Form
Publishing your registration form only takes a few moments.
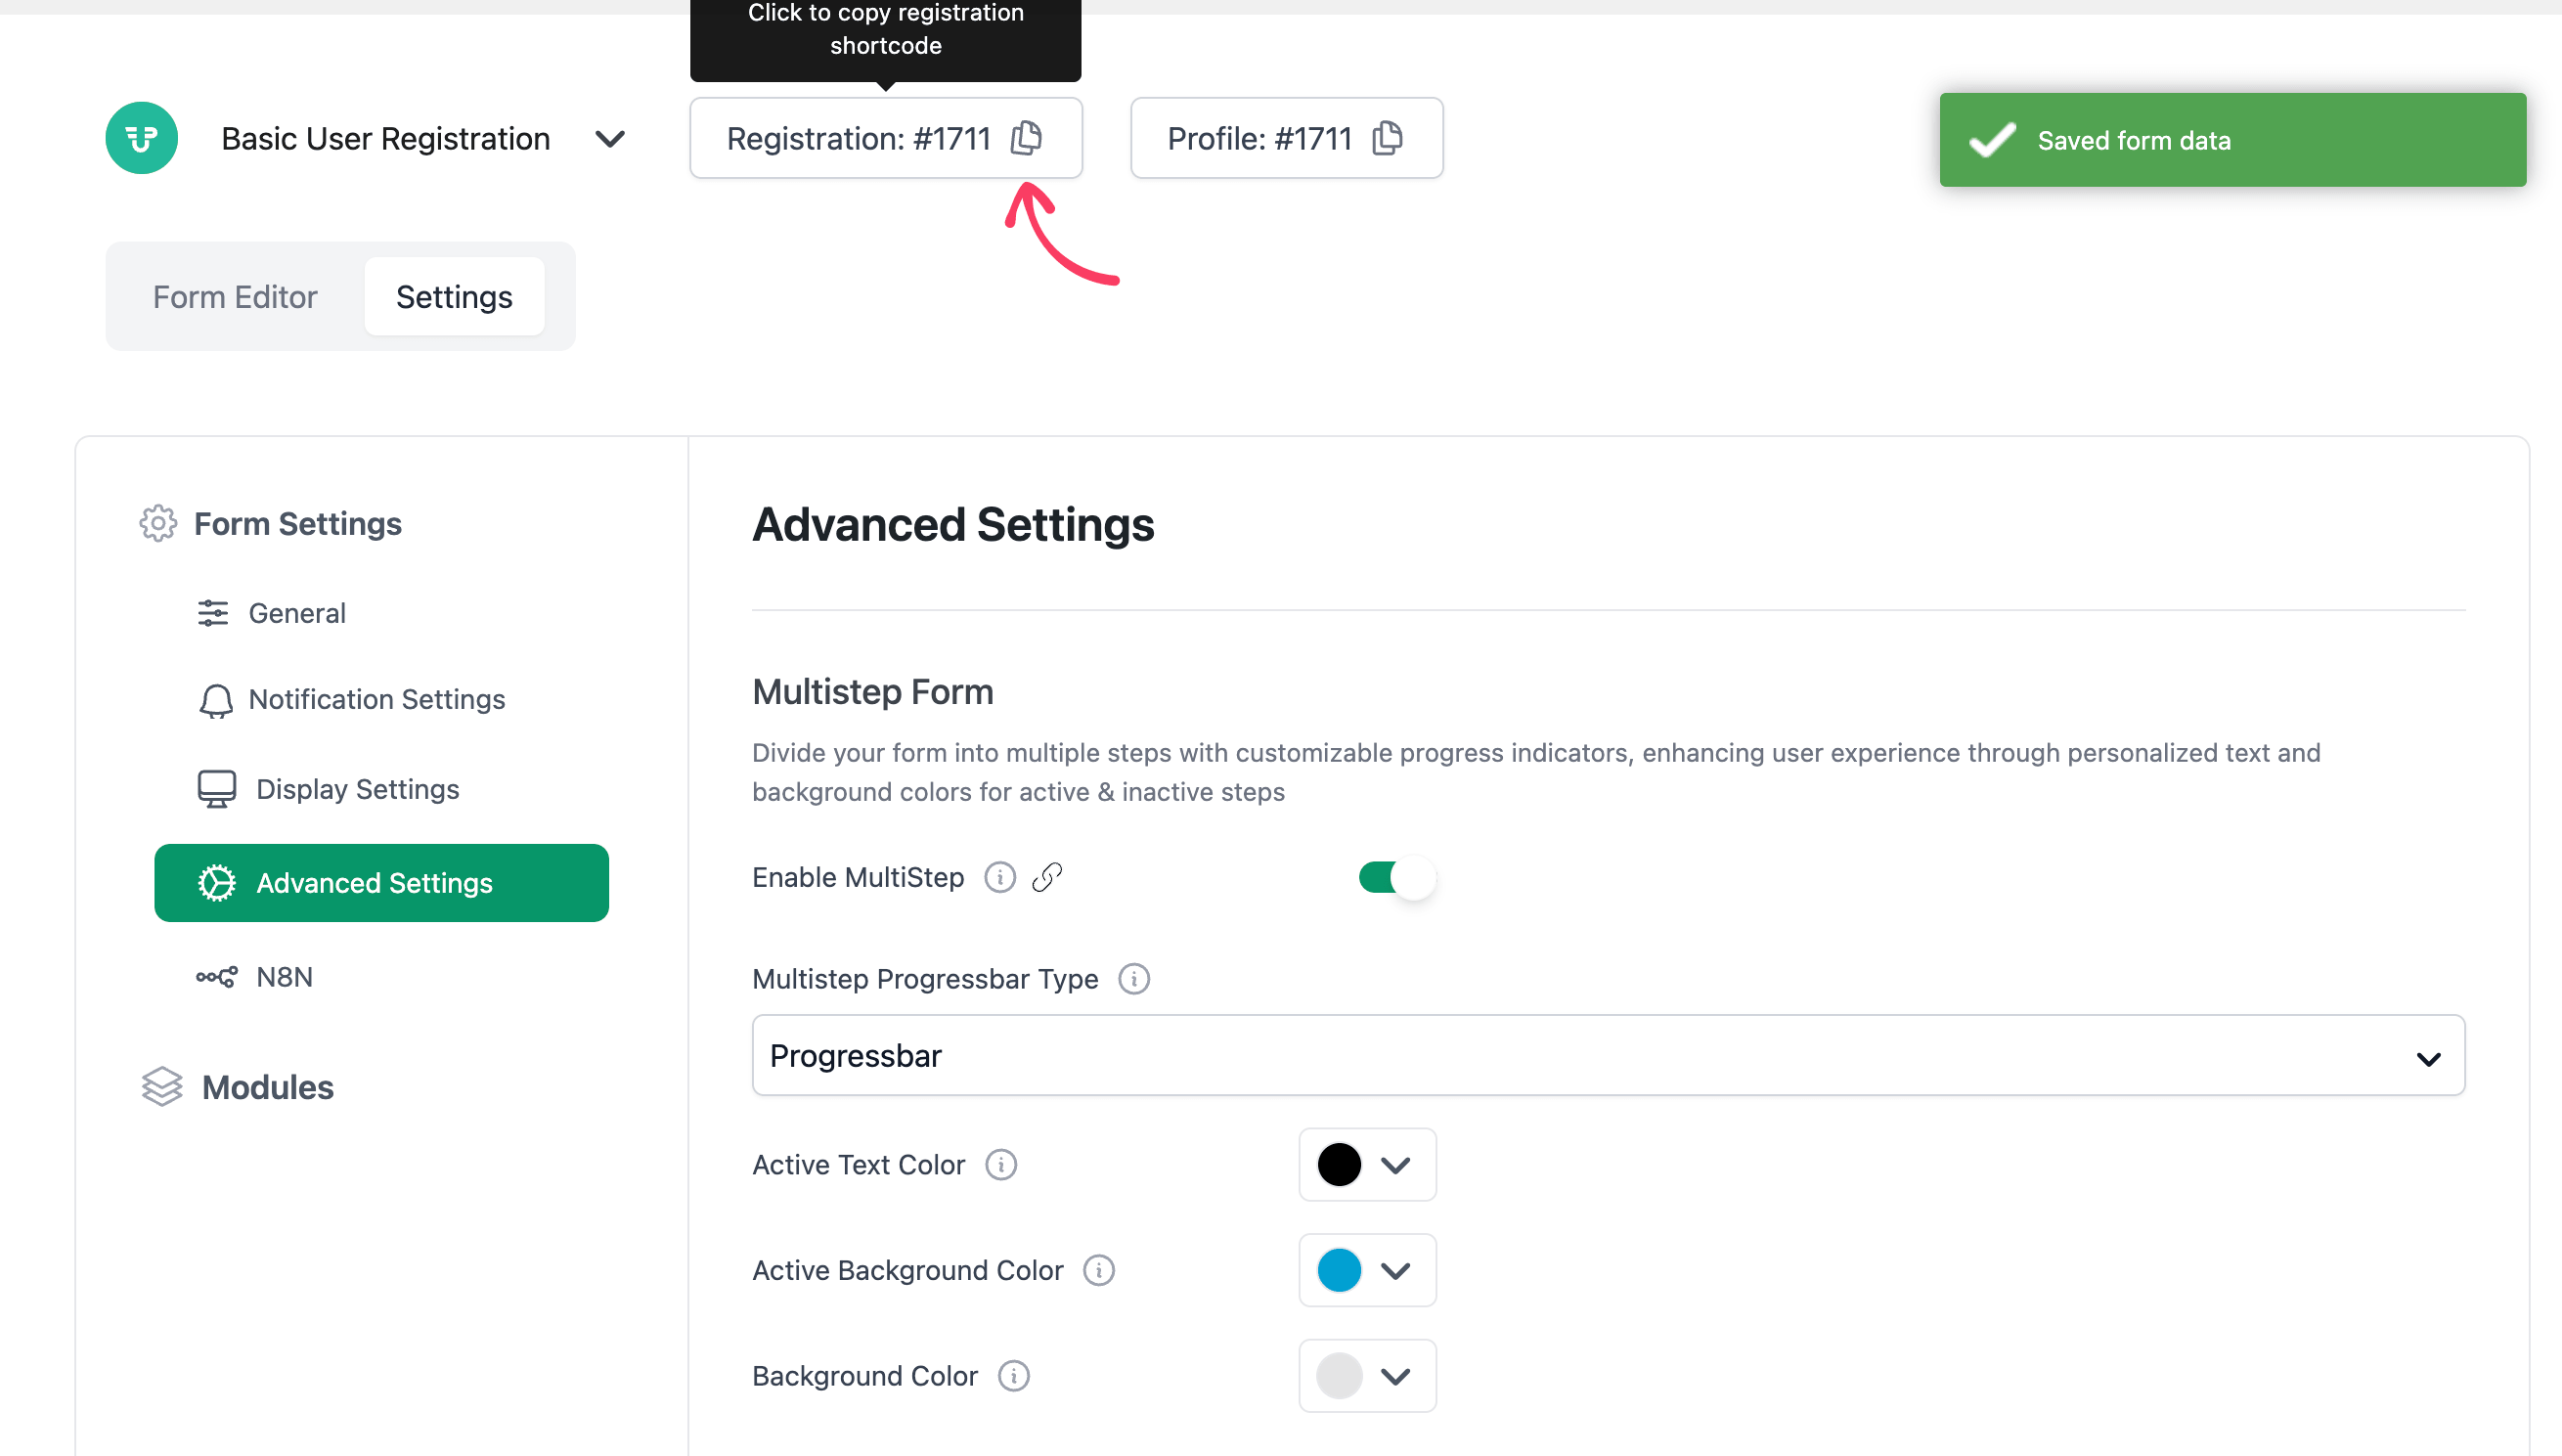
After saving the form:
- Copy the registration form shortcode generated by the plugin.
- Create a new page, for example, Register.
- Paste the shortcode into the page.
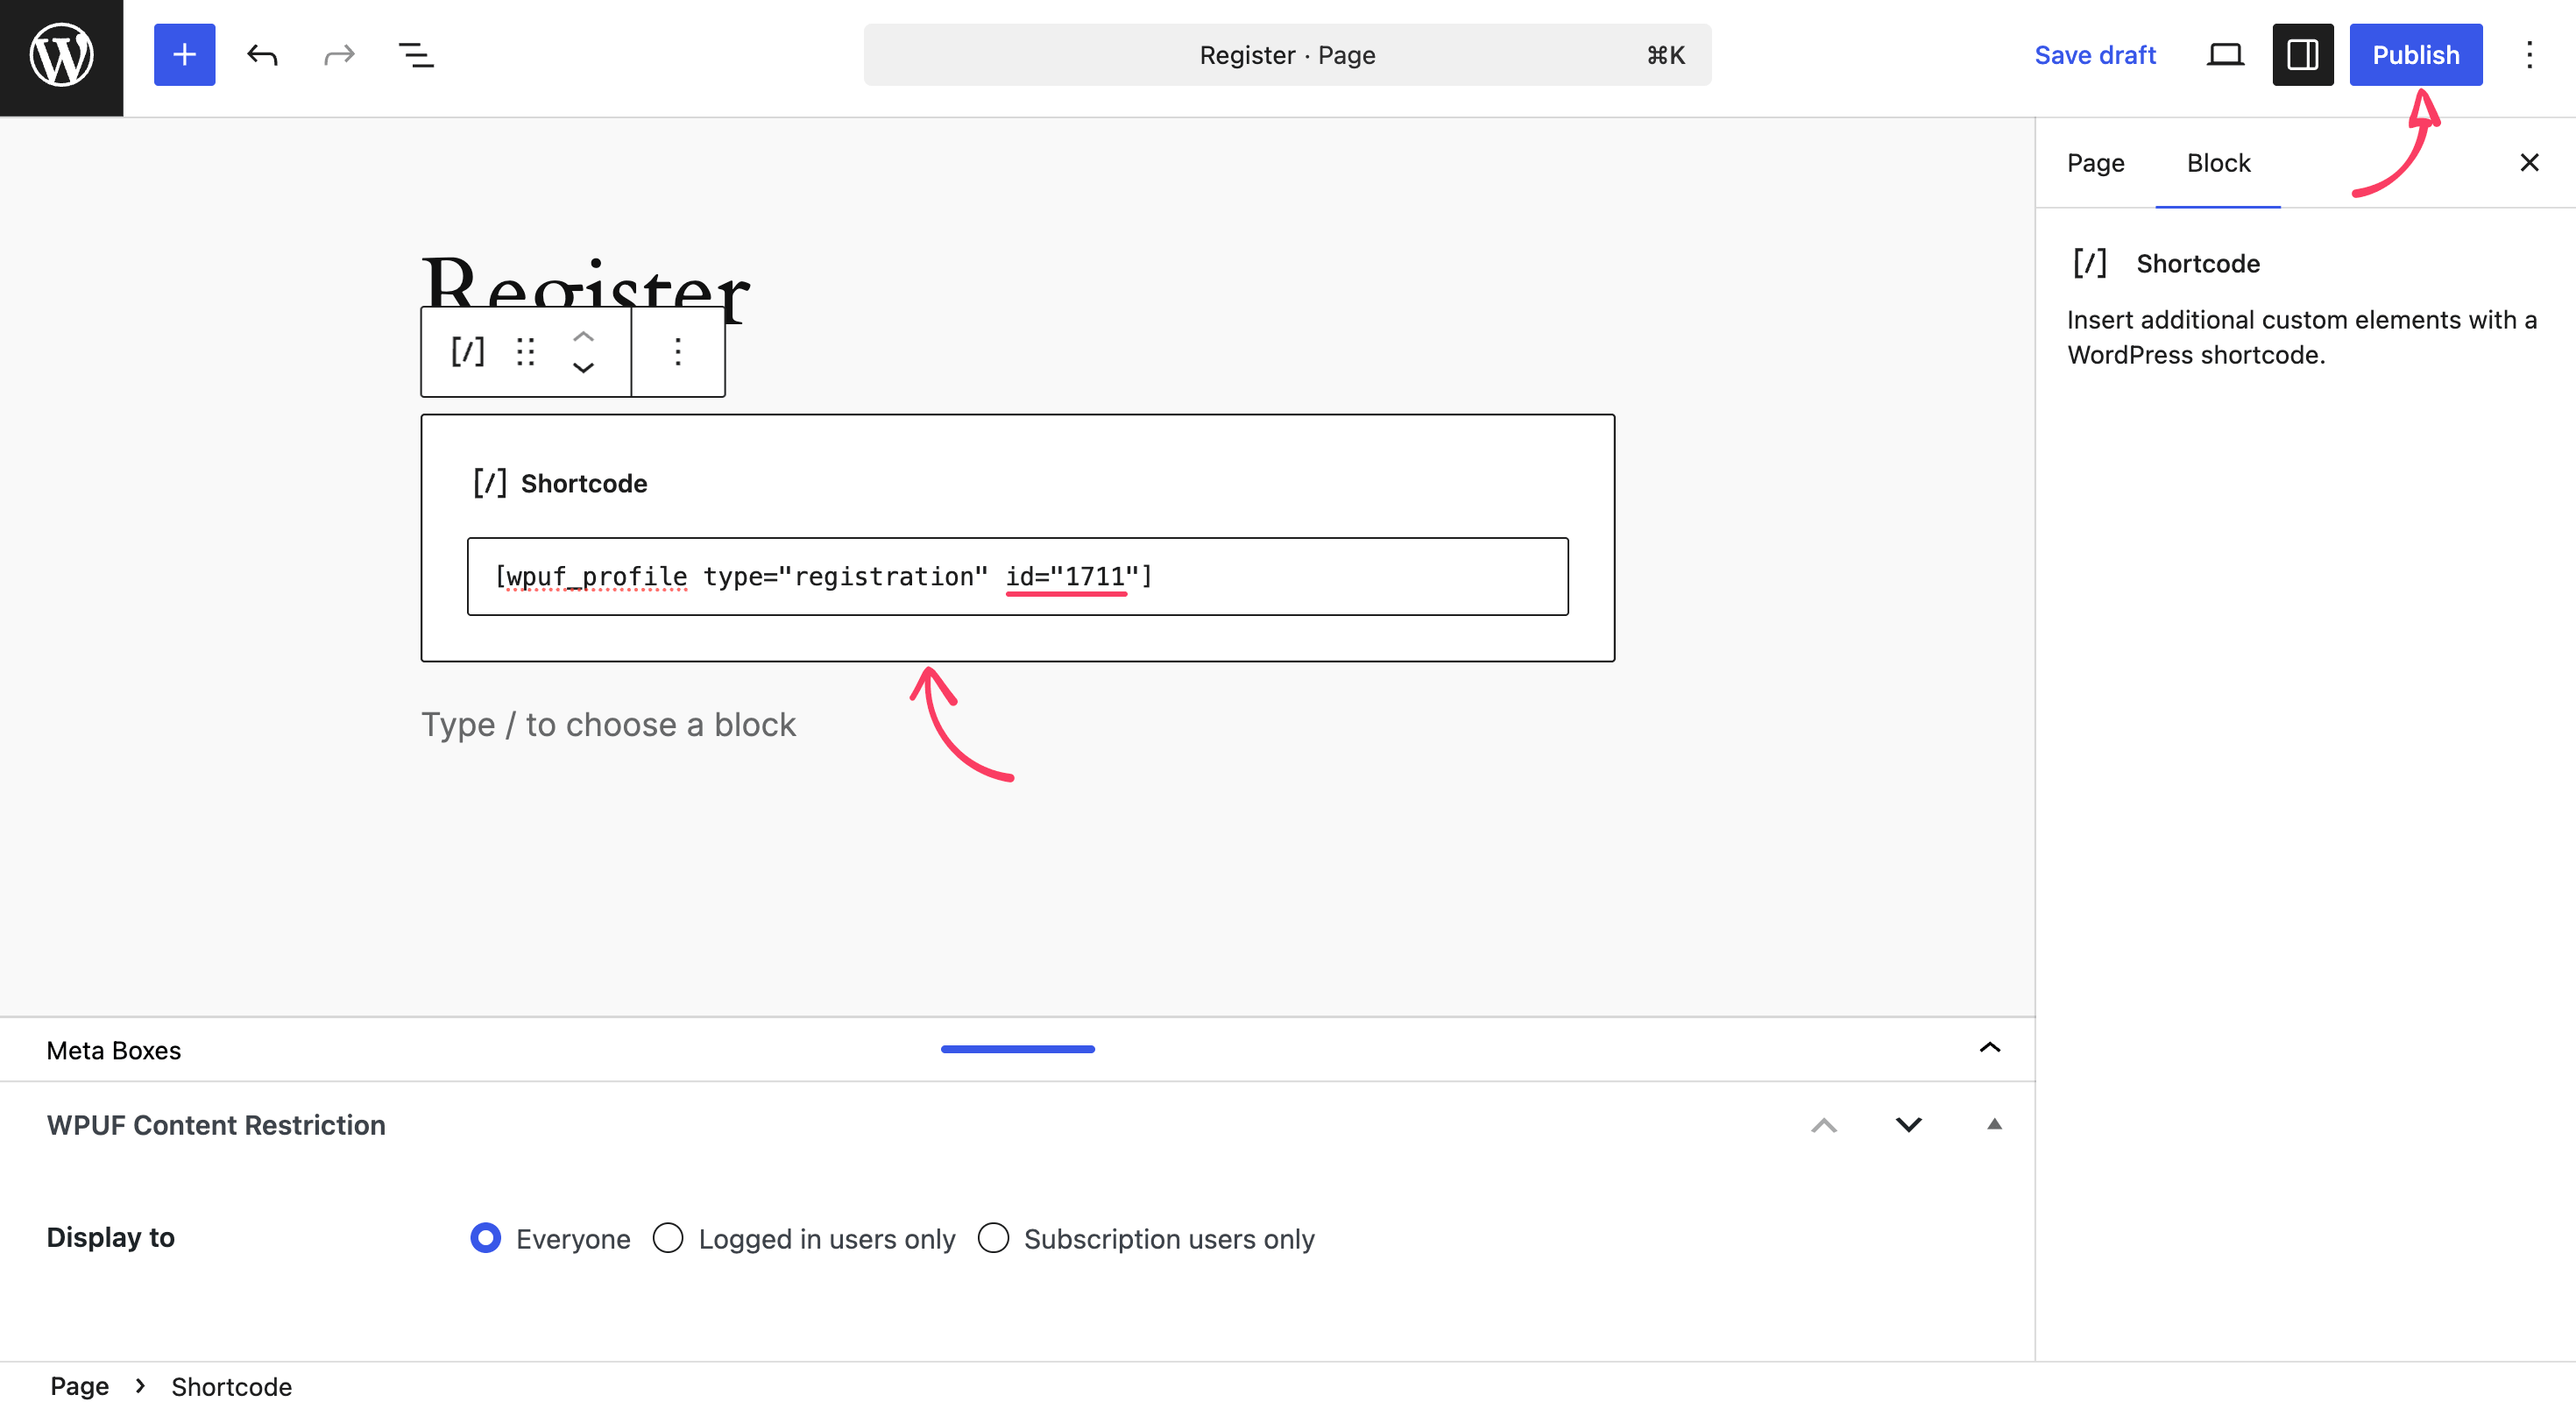
Finally, publish the page.
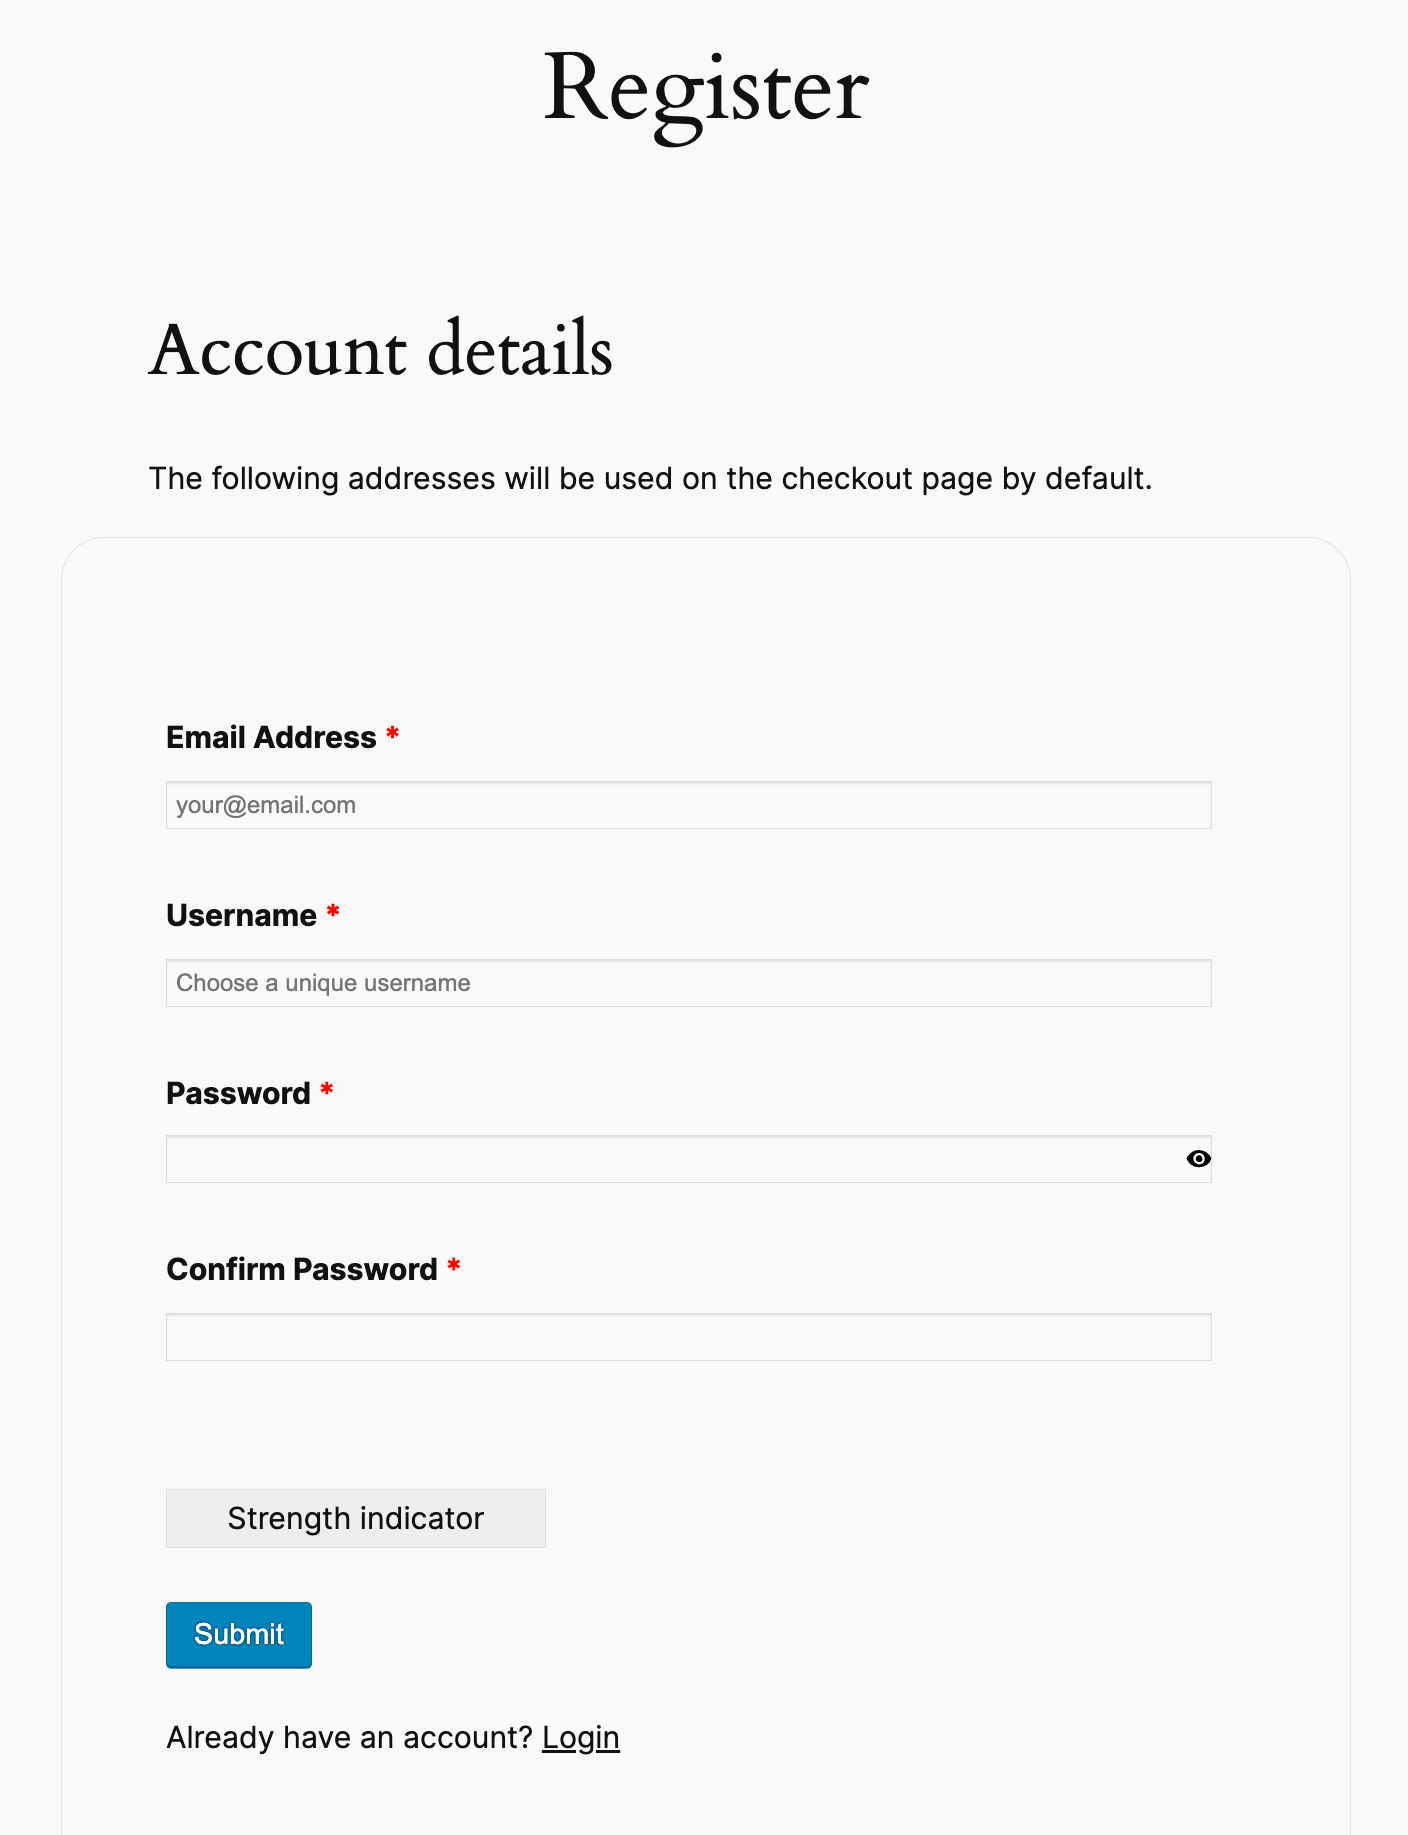
Your visitors can now register directly from your website's front end without ever accessing the default WordPress registration page. Here's the preview of the basic registration form we created here.
Advanced Registration Features of WP User Frontend Pro
Beyond basic user registration, WP User Frontend Pro includes several advanced features that help you build sophisticated registration workflows. Some of the key features include:
- AI-generated registration forms
- Drag-and-drop form builder
- Custom registration fields
- Conditional logic
- Profile photo and file uploads
- User role assignment
- Email verification and welcome emails
- Admin approval workflows
- Auto login after registration
- Multi-step registration forms
- n8n integration
- WooCommerce vendor registration templates
- Marketing integrations such as Mailchimp (with the appropriate module)
These features make WP User Frontend Pro suitable for everything from simple membership websites to large vendor marketplaces and online communities. Browse our full feature list for everything the plugin offers.
Best Practices to Follow When Building Registration Forms
A well-designed registration form not only improves the user experience but also increases registration completion rates.

Here are a few best practices to keep in mind:
- Keep your form as short as possible.
- Only collect information that you genuinely need.
- Enable email verification or admin approval to reduce spam registrations.
- Assign the correct default user role.
- Test the entire registration workflow before making the form live.
Small improvements to your registration process can significantly enhance both user satisfaction and site security.
Frequently Asked Questions About Creating a Registration Form in WordPress
Do I need the free WP User Frontend plugin to use registration forms?
Yes. WP User Frontend Pro is an add-on and requires the free WP User Frontend base plugin to be installed and active on your site.
Can users register without accessing the WordPress admin dashboard?
Yes. Registration forms built with WP User Frontend Pro run entirely on the front end, so users never need to see or log into the WordPress dashboard.
Can I require admin approval before new users can log in?
Yes. In the form's General Settings, you can enable admin approval so new registrations stay inactive until you manually approve them.
Does WP User Frontend Pro support email verification?
Yes. In the Notification Settings tab, you can choose between sending a verification email or a standard welcome email after registration.
Can I break a long registration form into multiple steps?
Yes. The Advanced Settings tab includes a Multistep Forms option that splits long forms into separate sections for a better user experience.
What user roles can I assign to new registrants?
You can assign any default WordPress user role to new registrations directly from the form's General Settings, including custom roles created by other plugins.
Can I send registration data to other tools automatically?
Yes. WP User Frontend Pro includes an n8n integration that sends registration data to your n8n workflows automatically, as well as modules for Mailchimp and other marketing tools.
Get Full Control Over Your Registration Workflow
WP User Frontend Pro gives you complete control over the user registration experience on your WordPress website. From building custom forms with drag-and-drop fields to configuring user roles, notifications, approvals, conditional logic, multi-step forms and and multi-step forms, the plugin provides everything you need to create a professional front-end registration system.
Whether you're building a membership site, vendor marketplace, online community, learning platform, or client portal, WP User Frontend Pro makes it easy to create registration forms that fit your exact requirements – all without requiring users to access the WordPress dashboard.
If you found this tutorial helpful, subscribe for more WP User Frontend tutorials and let us know how you're using registration forms on your website.