Introducing the New Dokan Razorpay Payment Gateway Integration to Handle All Your Transactions Smoothly
Dokan has introduced another payment gateway to its rich collection. Now, marketplace owners can use the Razorpay payment gateway to complete their marketplace transactions. Today we will show you how to integrate Razorpay Payment Gateway in Dokan.
Integrating a payment gateway is very important for eCommerce stores. Otherwise, it would be quite difficult to manage transactions worldwide. You can't use COD (cash on delivery) or bank transfer for every transaction. For that, you need to do business locally.
Having payment gateways not only ensures you can do business globally but also give you other benefits as well. Like,
- Increases customer satisfaction. Having payment gateways can build trust between customers and business owners. Because it takes care of the payments and refunds smoothly.
- Boost sales. With payments gateways collecting money from different regions is not a problem. You can integrate the popular payment gateway from the region that will help customers pay for their orders easily.
- Runs the payment processes smoothly. Managing transactions and refunds are very tricky in any eCommerce store. Also, distributing the vendor commission is also complicated in marketplaces. Payment gateways handle these automatically.
- Gives Data insights. With payment gateways you will get a dashboard will all the transaction history. From there you can analyze your data to make creative decisions.
In Dokan, you can add multiple payment gateways like Stripe, Paypal, and Wirecard, along with all the WooCommerce-supported payment gateways. Now we have added the Razorpay payment module to that list.
Let's see how to use the Dokan Razorpay Payment Gateway.
How to Integrate RazorPay Payment Gateway in Dokan
When you are running a marketplace where there are third-party vendors are involved, you have to be very careful about payment methods. You need to provide payment gateways that are suitable for all types of customers.
That is why Dokan has integrated with so many payment gateways and working on including more in the future. In that process, the Razorpay Payment gateway has been introduced. This payment gateway has features like,
- Smart payment methods. Customers can choose different international payment modes like credit cards, debit cards, and net banking. It also has smart payment modes like UPI (Google Pay, PayTM, PhonePe), Paylater, and Indian e-wallets – JioMoney, Mobikwik, Airtel Money, FreeCharge, Ola Money, PayZapp.
- This payment gateway also supports multiple payment options like instant payment, delay payment, and confirmed payment.
- It supports a split payment system. Admin can easily split payments & refunds, transfer the funds into multiple linked accounts, and also add & manage those linked accounts.
- Last but not least this payment module has an automated refund system. The customer receives the refund instantly or within an hour, depending on their payment methods.
So, let's see how to set up and use this module on your marketplace.
We are hoping you already have a marketplace with WooCommerce, Dokan, and Dokan Pro set up.
Now you need to follow these steps,
- Step1: Activate the Razorpay Payment Module
- Step2: Configure the Razorpay Settings
- Step3: Collect Razorpay API Credentials
- Step4: Add Credentials to the Dokan Razorpay Settings.
Let's see the details of these steps.
Step 1: Activate the Razorpay Payment Module
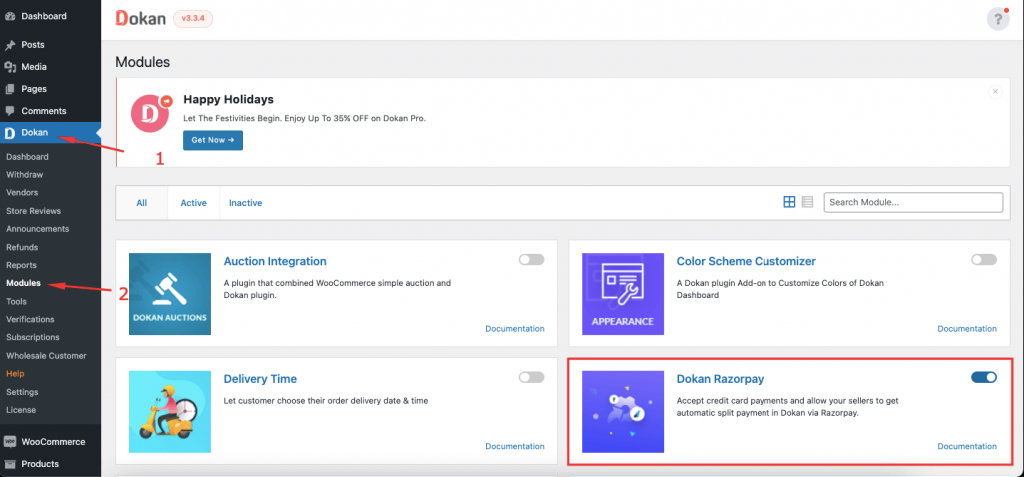
To activate a module you need to navigate to WP-Admin–> Dokan–> Modules, where all the Dokan modules are present. Find the Razorpay payment module and toggle the button to activate it.
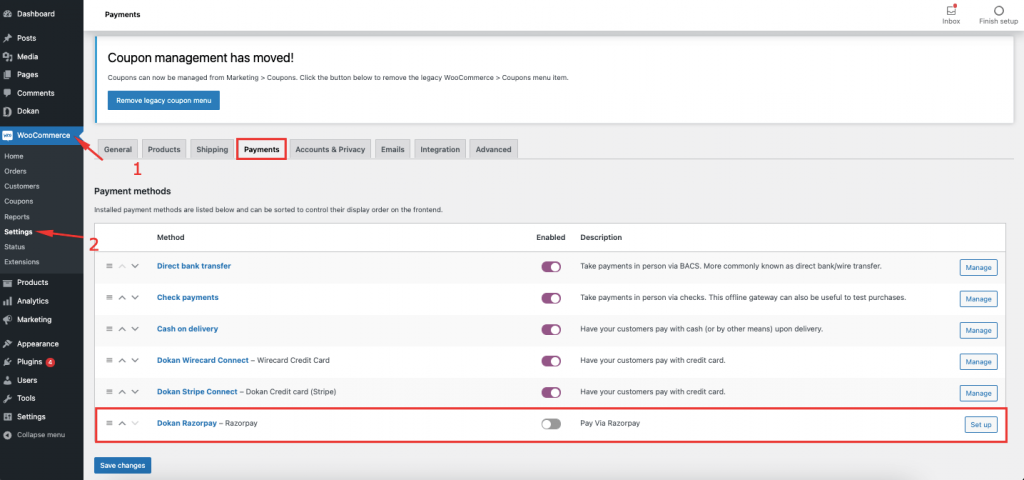
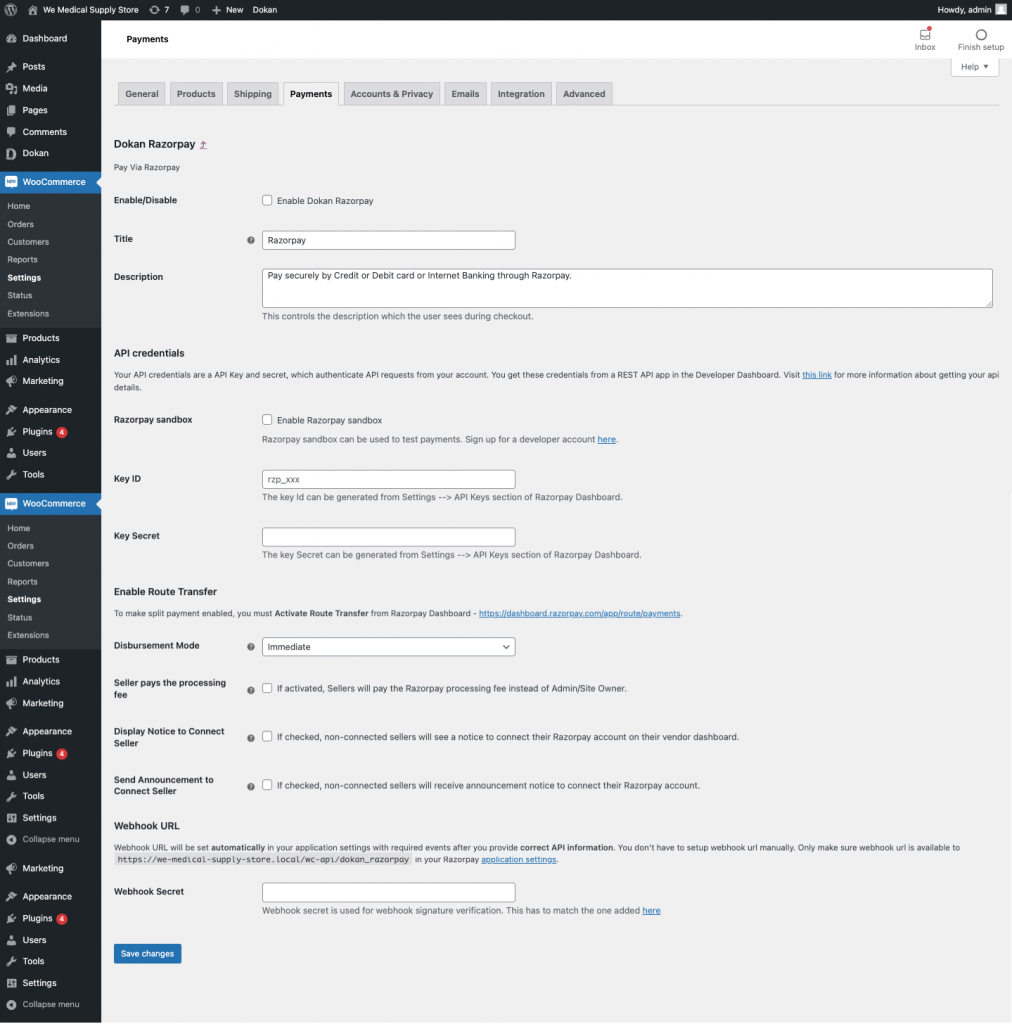
After activating the module you need to configure its settings from WooCommerce–>Settings–>Payments.
Step 2: Configure the Razorpay Settings
When you click on the Set up button, you will find all the options regarding the Razorpay settings. There you will have to add the API credentials (which we will show you how to collect in the later steps), Enable Route Transfer to support split payments and the Webhook URL that will be set automatically.
Step 3: Collect Razorpay API Credentials
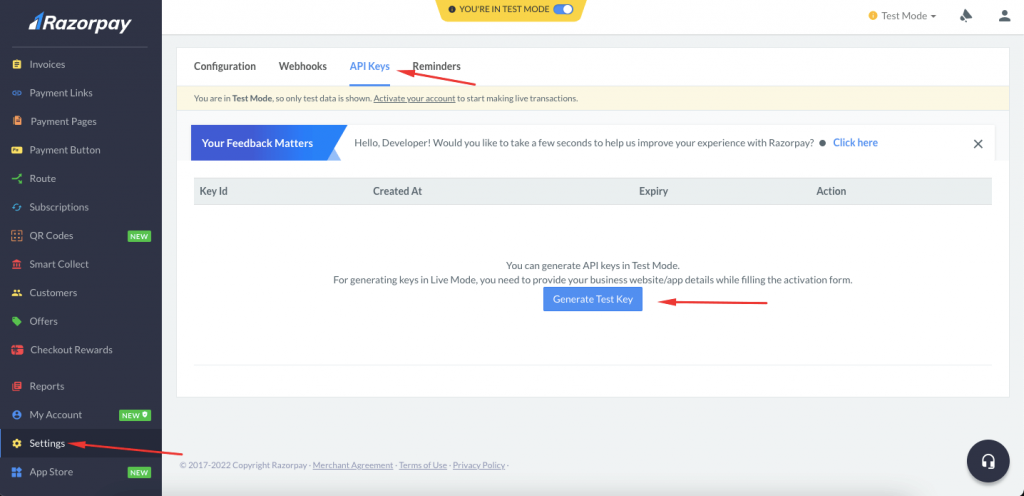
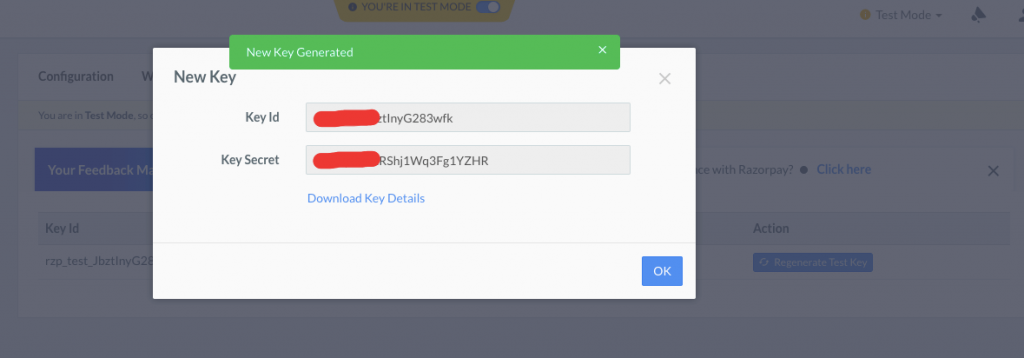
Now, it is time to collect the Razorpay API credentials. In order to connect your Razorpay account to your marketplace, you need to add the Test Key ID (key Id for the live site) and Test Key Secret (key Secret for the live site) from your Razorpay account.
Go and log into your Razorpay account. From there navigate to the Settings–> API Keys option. There click on the Generate Test Key button.
You will see a pop-up containing the necessary credentials. Copy them.
Step 4: Add Credentials to the Dokan Razorpay Settings
You have successfully collected the API key. Go back to WooCommerce–>Settings–>Payments and add the credentials. Then hit the Save changes button to finish.

You are done connecting the Razorpay payment gateway to your marketplace.
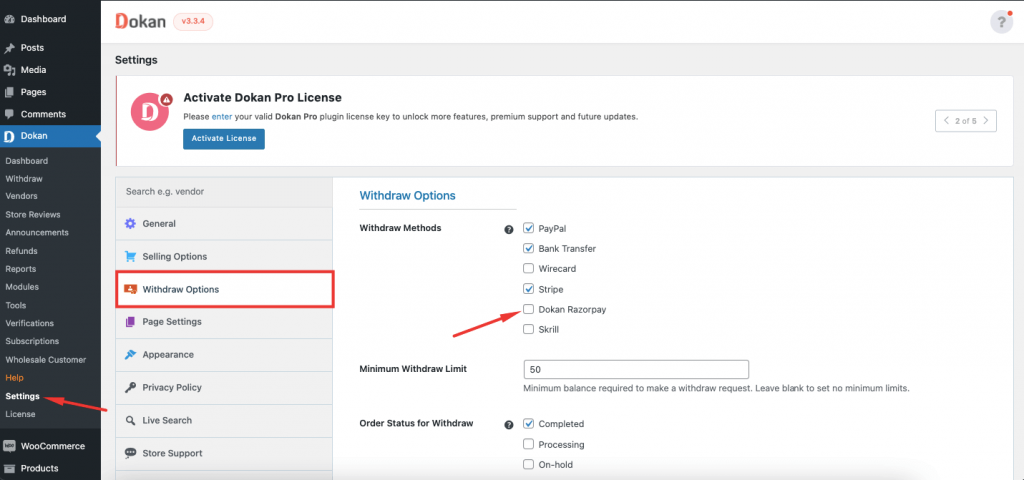
Now you need to enable the Dokan Razorpay gateway from Dokan–> Settings–> Withdraw so that vendors can connect their accounts to Razorpay.
How Vendors Will Connect Their Account to Razorpay
Vendors need to connect their accounts to Razorpay in order to complete transactions through this payment gateway.
Vendors will see the option “Connect to Dokan Razorpay” account when they navigate to Vendor Dashboard–> Settings–> Payments. They need to hit the Sign Up button to create an account in the Razorpay payment gateway.
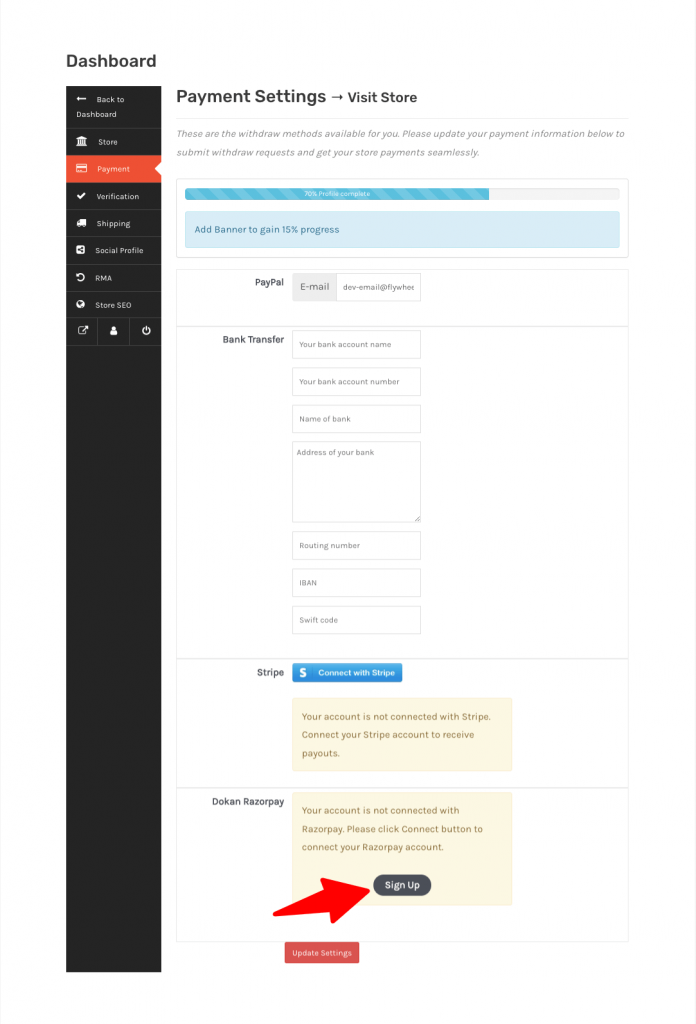
When they hit the Sign Up button, a pop-up will appear where the vendors need to add their information like account name, account email, bank name, account number, etc.
Note: If the vendors already have an account with Razorpay, just click the “I” ve already an account”. Then they need to add your account number and click on Connect.
After the successful connection, the vendors will be able to see their merchant id and receive an email to access their merchant account.
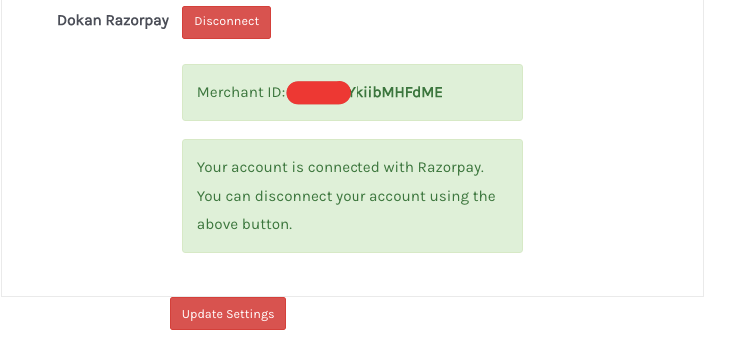
How to Complete Payment Using Razorpay
So, when the customers buy products from the marketplace and proceed to checkout, they will see the Razorpay option and use that to pay the amount.
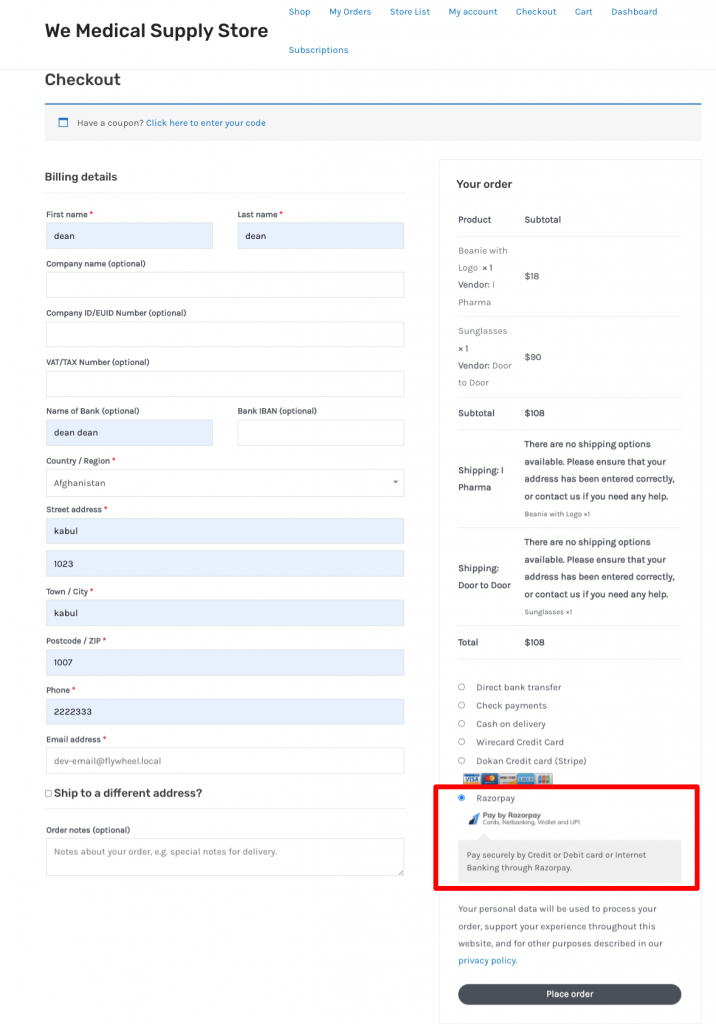
They can use Cards or Paytm, GooglePay, PhonePe to finish their transaction.
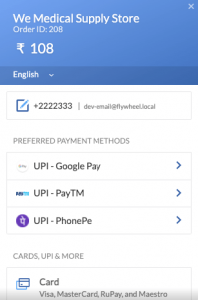
When they hit the Pay Now button, they need to hit the Success button to finish.
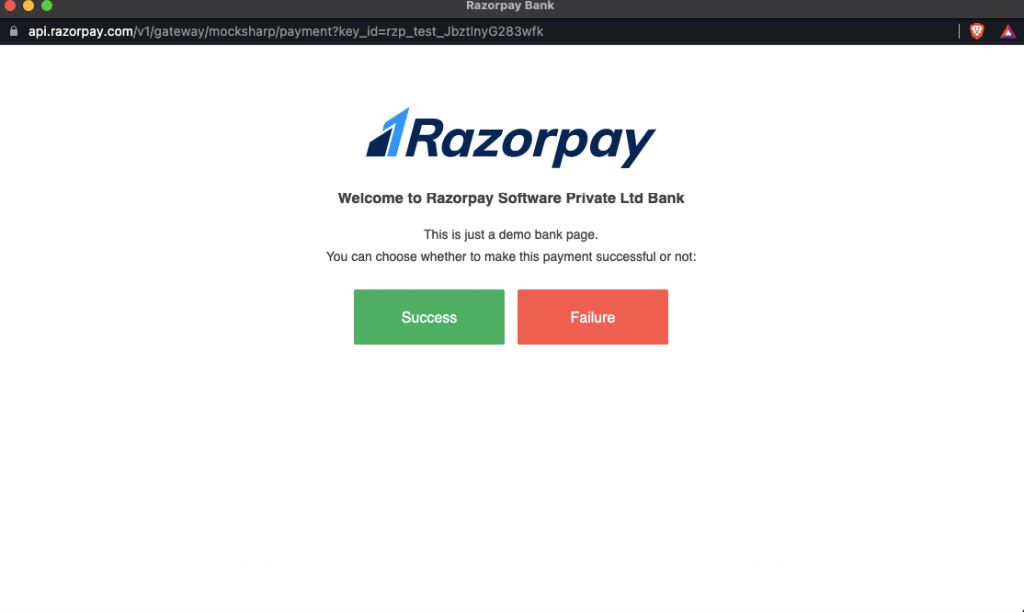
This is how customers can pay using the Razorpay payment gateway.
How to Refund Order Using Dokan RazorPay Payment Module
With the Dokan Razorpay payment gateway, handling the refunds is easy as well. Navigate to Vendor Dashboard–> Orders and select any order. Click on the Refund $X via the Dokan Razorpay button to refund an order.
Note: The order has to be complete in order to refund process to work.
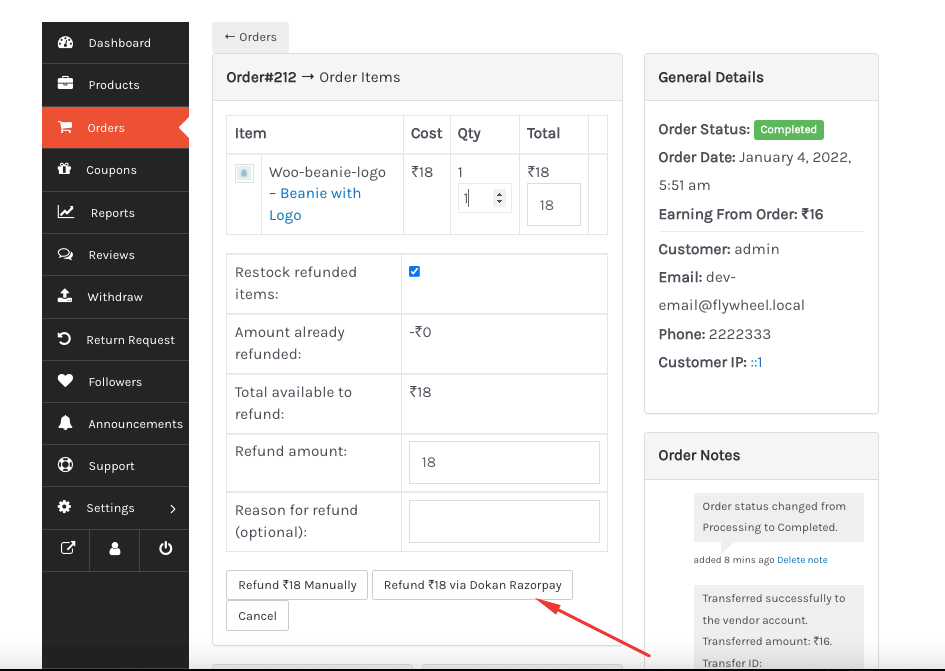
The order will be refunded. You can see the refunded order from the Razorpay Account. Go to the Transfers section and there you will see that the order is refunded automatically to the customer account.
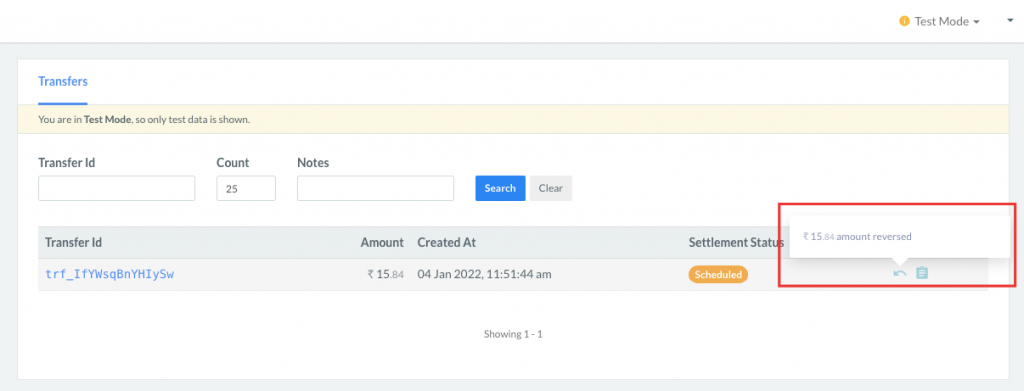
You can also see the details of the refunded order,
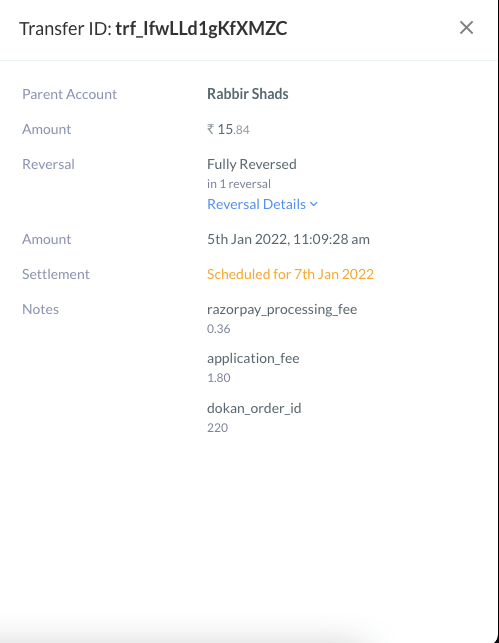
So, when you go to the backend, here’s what the backend looks like for the refunded order,

This is how you can set up and use the new Dokan Razorpay Payment gateway module on your marketplace.
5+ Reasons Why RazorPay Payment Gateway is Right for Your Marketplace
Now that you know how to integrate Razorpay Payment Gateway in Dokan, let's see the benefits you will get with this payment gateway.
Razorpay is one of the best payments solution companies in India that allows your business to accept, process, and disburse payments via its product suite. You will have access to multiple payment modes including credit and debit cards, UPI, and popular mobile wallets.
Here are some reasons why you should include the Razorpay payment gateway on your marketplace,
1. Seamless Checkout Experience
The Razorpay payment gateway is designed to handle end-to-end payment seamlessly. The system is very easy and you can go live in minutes. The payment gateway is build-for developers, so the APIs, plugins, and libraries are very dev-friendly.
Moreover, it supports multiple payment modes. From domestic and international credit/debit cards to UPI and mobile wallets it covers almost everything.
2. Ready to Handle Subscription Business
Razorpay payment gateway has the ability to support versatile businesses including subscription business. You can offer your customers plans with automated recurring transactions on many payment modes.
With Razorpay payment module,
- You can easily automate your fixed price recurring charges to your customer around a fixed schedule
- Also, you have the flexibility to charge your customer based on the number of users or quantity per billing cycle
- You can charge your customer only for what they consume in a billing cycle.
3. Data and Insights
Decision-making is very important for any kind of business. And data plays a huge role in that. With the right data, you can predict future trends and optimize your current efforts.
Razorpay’s dashboard is one of the most comprehensive, data-driven, and analytical dashboards that serve your purpose.
The dashboard helps you evaluate real-time data and draw insights from the extensive reports, so you make better and informed business decisions.
4. Manage and Track Money Movements
With Razorpay, you can keep an eye on every aspect of your financial operations. Like, accepting payments and managing cash flow to reconciling transactions and flexible payouts.
This payment gateway also provides you with a unified platform that helps you make, control, track, and analyze all forms of money movement from its powerful dashboard.
Moreover, you will be able to track and manage the money movements of vendors, customers, employees, etc.
5. Customer Support System
Razorpay has a remarkable support system. you don’t have to worry about clarifying any payments-related setbacks to your customers. their support system will solve all the problems for you, and in turn, help you serve your customers better.
Your customers spend less time on hold and have their problems solved at lightning speed.
6. Reliable Fraud Prevention and Security
Most customers have security concerns while making online transactions. However, Razorpay maintains a strict “Payment Compliance”.
Created, mandated, and registered by the branded cards and Payment Card Industry Security Standards Council (PCI SSC), the Payment Card Industry Data Security Standard (PCI DSS) is the set of rules that makes sure that every transaction is safe and no data is lost.
All of Razorpay’s products are secured by an industry-standard 100% PCI DSS compliant and certified solution.

So, you can see that when you include Razorpay in your payment gateways, you will get benefits. And these benefits will help you improve the customer experience. Improving the customer experience means increasing the conversion rate.
What are you waiting for? Add Razorpay to your list of payment gateways now.
Integrate The Razorpay Payment Gateway and Handle Your Marketplace Transactions Easily
We are at the end of our article and hopefully, now you know how to integrate Razorpay Payment Gateway with Dokan and use it to your advantage. Before implementing the gateway here is a little note:
- Unregistered Business or SandBox Mode Per Transaction Limit is = 40,000/= Rupee
- Live Mode or Registered Business e Per Transaction Limit is = 5,00,000/= Rupee.
- But Admin Can increase the limit by talking to the Razorpay support.
If you have any more queries regarding this module then do let us know in the comment section. And if you want to receive more informative articles like this one, do subscribe to our blog.