How to Customize a Vendor Registration Form in Dokan
You need a vendor registration form for your eCommerce marketplace. With a seamless registration process, more vendors are intended to sign up to your site, and it allows you to do more business. Luckily, Dokan has a smart-looking optimized vendor registration form so that vendors can easily register to your marketplace and start selling.
However, every marketplace doesn't operate the same way. In order to maintain the rules and regulations of their region, some marketplace wants to register vendors with their TAX and GST number as well as other information. Using Dokan you can easily customize the default vendor registration form according to your needs.
Today we will go over the process of adding extra fields to your vendor registration form.
As an added bonus you'll also get to know-
- How to create a separate registration form for vendors
- How to show the vendor's name on the single product page.
Let's get on it, shall we?
How to Add Extra Fields to Your Vendor Registration Form
In order to add extra fields to the WordPress registration plugin, you need to follow the below steps. We are going to go over them and make sure you follow them to the T.
- Step1: Create a child theme
- Step2: Create a folder named “global” in the child theme
- Step3: Use the customization code in order to add an extra field
- Step4: Save the added field value in the backend.
Let's get into the details.
Step 1: Create a Child Theme
When you are looking to make adjustments to the files of your theme, then you need to create a child theme. It helps you maintain the parent theme's design and codes while you modify the files. In order to make changes to the registration form which is a part of the theme, you need to create a child theme first.

Creating a child theme is very easy. You can follow this article to create a child theme. You will also find plugins in the WordPress repository to create a child theme.
Step 2: Create a Folder Called “Global” in the Child Theme
Next, you need to create a folder named Dokan into your child theme. Then, you need to create another folder in the Dokan folder with the name “global“. Now, copy the seller-registration-form.php file from your wp-content/plugins/dokan-lite/templates/global folder and paste it to your child theme like below-

Step 3: Use the Customization Code to Create Extra Fields
You need to add the customization code in the registration file. Open the seller-registration-form.php file from the child theme folder and copy the code from below-
<p class="form-row form-group form-row-wide">
        <label for="shop-phone"><?php esc_html_e( 'GST Number', 'dokan-custom-codes' ); ?><span class="required">*</span></label>
        <input type="text" class="input-text form-control" name="gst_id" id="gst_id" value="<?php if ( ! empty( $postdata['gst_id'] ) ) echo esc_attr($postdata['gst_id']); ?>" required="required" />
    </p>
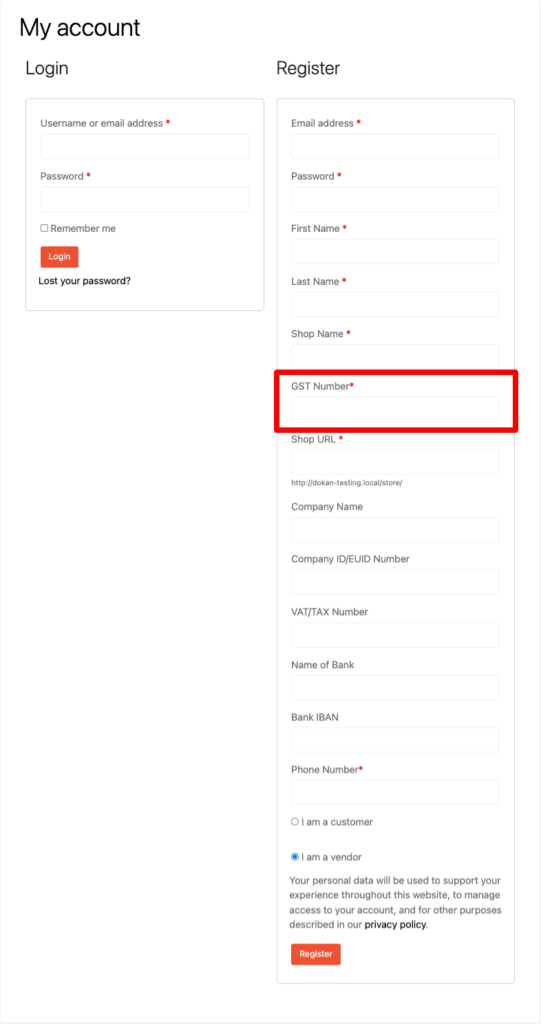
The above code will add a GST number field in the vendor registration form. You can see the newly added field below-
Step 4: Save the Added Field Value in The Backend
You have added a new field, but in order to use that data, you need to save the contents of that field. To save the data in the backend and show it on the backend user profile, open your functions.php file and copy the code below-
function dokan_custom_seller_registration_required_fields( $required_fields ) {
    $required_fields['gst_id'] = __( 'Please enter your GST number', 'dokan-custom' );

    return $required_fields;
};

add_filter( 'dokan_seller_registration_required_fields', 'dokan_custom_seller_registration_required_fields' );


function dokan_custom_new_seller_created( $vendor_id, $dokan_settings ) {
    $post_data = wp_unslash( $_POST );

    $gst_id =  $post_data['gst_id'];

    update_user_meta( $vendor_id, 'dokan_custom_gst_id', $gst_id );
}

add_action( 'dokan_new_seller_created', 'dokan_custom_new_seller_created', 10, 2 );

  /* Add custom profile fields (call in theme : echo $curauth->fieldname;) */

add_action( 'dokan_seller_meta_fields', 'my_show_extra_profile_fields' );

function my_show_extra_profile_fields( $user ) { ?>

    <?php if ( ! current_user_can( 'manage_woocommerce' ) ) {
            return;
        }
        if ( ! user_can( $user, 'dokandar' ) ) {
            return;
        }
         $gst  = get_user_meta( $user->ID, 'dokan_custom_gst_id', true );
     ?>
         <tr>
                    <th><?php esc_html_e( 'Gst Number', 'dokan-lite' ); ?></th>
                    <td>
                        <input type="text" name="gst_id" class="regular-text" value="<?php echo esc_attr($gst); ?>"/>
                    </td>
         </tr>
    <?php
 }

add_action( 'personal_options_update', 'my_save_extra_profile_fields' );
add_action( 'edit_user_profile_update', 'my_save_extra_profile_fields' );

function my_save_extra_profile_fields( $user_id ) {

if ( ! current_user_can( 'manage_woocommerce' ) ) {
            return;
        }
    update_usermeta( $user_id, 'dokan_custom_gst_id', $_POST['gst_id'] );
}
If you want to change the field name or meta key then you have to change the meta key or field name accordingly on every place. On this code, we have used the meta key for the field as dokan_custom_gst_id and use the field id as gst_id
After saving the above code, you will be able to use the vendor GST Number on his/her user profile –

This is how you can add extra fields to the default vendor registration form.
Read More: Create Amazing Customizable Registration Forms for Dokan.
Now, let's see how you can create a separate vendor registration form in the marketplace.
Create a Separate Vendor Registration Form for Vendors
Marketplace owners use the “WooCommerce my-account” page to register both customers and vendors. However, we have had requests from some of the marketplace owners that they want separate registration for vendors rather than showing on one page.
Because they don't want to burden the customer with the load of the vendor registration form fields while he/she is not registering as a vendor.
To create a separate registration form in Dokan, you don't need to use any coding. You can use the Dokan Registration form Shortcode and place that shortcode on a new page to create an individual registration page.
Let's see the steps to get a more clear picture.
- Create a new page and give a title ”Vendor Registration”
- Use Dokan Shortcode to create a registration form
- Publish your page.
Step 1: Create a New Page
As you are looking to create a separate page for registration, you need to create a new page. To create a page, go to WP-Admin-> Pages–> Add New. Give a page title “Vendor Registration”.
Step 2: Add Dokan Shortcode
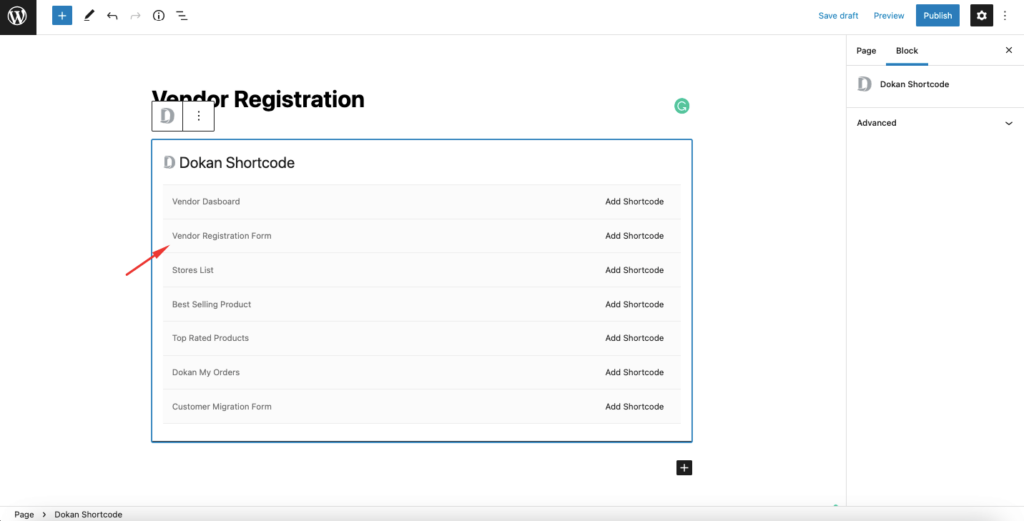
Dokan provides a set of shortcodes that you can use to create vendor dashboards, store lists, best-selling products, etc. Click on the “+” icon and type “Dokan Shortcode”. Then you will find all the Dokan shortcodes listed out beautifully.
Choose the “Vendor Registration Form” shortcode and add it to your page.
Step 3: Publish Your New Vendor Registration Page
After adding the shortcode, save your page. You are done! Now all you need to do is publish your page and you will see the Vendor Registration page on the menu.
Thus, your individual registration page is created.
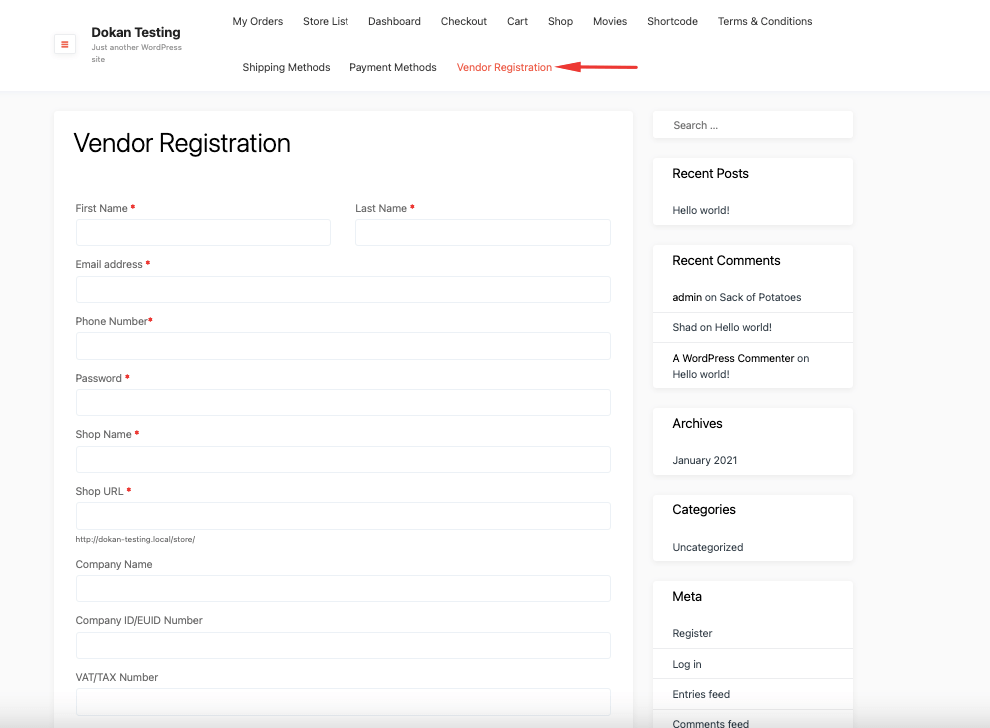
Note: To disable the vendor registration from the my-account page, make sure to uncheck the “Anyone Can Register” option from WP-Admin–> Settings–> General.
So, this is how you can customize the registration form for your multivendor marketplace. But wait, the article is not over. We have another trick to show you.
You can check out this video,
Bonus: How to Show Vendors Name in the Single Product Page
There are various ways to promote a vendor on your marketplace to increase the popularity of your website. One of them is showing the vendor's name on the single product page. There is a tab called “Vendor Information” to show vendor address, email, etc on the single product page.
You can add the vendor's name in that tab so that customers can know the original owner's name. Open your child-theme functions.php file and add the below code:
add_action( 'woocommerce_single_product_summary', 'seller_name_on_single', 11 );
     function seller_name_on_single(){
               global $product;
        $seller = get_post_field( 'post_author', $product->get_id());
        $author  = get_user_by( 'id', $seller );

        $store_info = dokan_get_store_info( $author->ID );

        if ( !empty( $store_info['store_name'] ) ) { ?>
            <span class="details">
                    <?php printf( 'Sold by: <a href="%s">%s</a>', dokan_get_store_url( $author->ID ), $author->display_name ); ?>
                </span>
            <?php
        }
It will show the Sold by tag on the single product page like the image below-
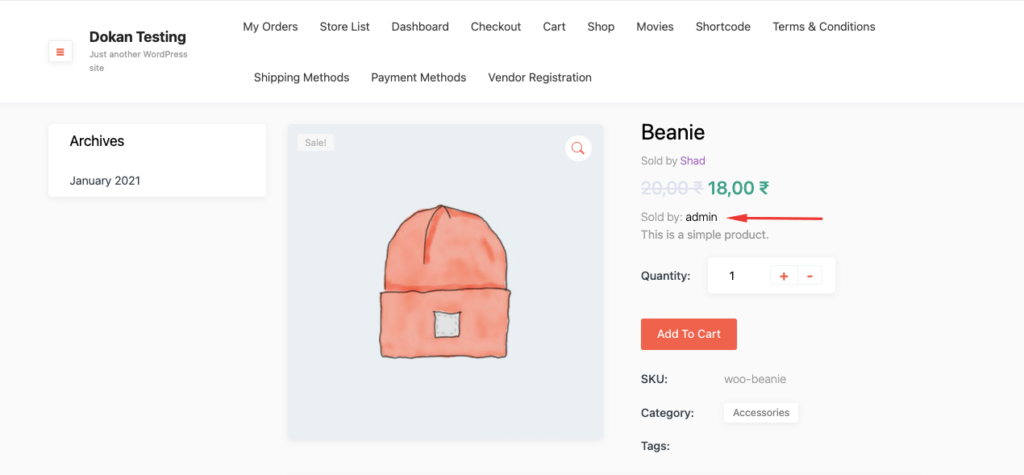
However, if you want to show the store name instead of the vendor's name then use the below code,
/*Show store name on single product*/

add_action( 'woocommerce_single_product_summary', 'seller_name_on_single', 12 );
     function seller_name_on_single(){
              global $product;
        $seller = get_post_field( 'post_author', $product->get_id());
        $author  = get_user_by( 'id', $seller );
        $vendor = dokan()->vendor->get( $seller );

        $store_info = dokan_get_store_info( $author->ID );

        if ( !empty( $store_info['store_name'] ) ) { ?>
            <span class="details">
                    <?php printf( 'Sold by: <a href="%s">%s</a>', $vendor->get_shop_url(),  $vendor->get_shop_name() ); ?>
                </span>
            <?php
        }
If you have built your single product page with Elementor then you need to use the below code,
/**
 * Show sold by on single product page made with Elementor
 * Add the shortcode [dokan_vendor_name] through a short-code widget on single product page
 */

add_shortcode( 'dokan_vendor_name', 'dokan_store_name_shortcode' );
function dokan_store_name_shortcode() {
	$seller	= get_post_field( 'post_author' );
	$author	= get_user_by( 'id', $seller );
	$vendor	= dokan()->vendor->get( $seller );
	$store_info = dokan_get_store_info( $author->ID );
	if ( !empty( $store_info['store_name'] ) ) { ?>
	<span class="details">
		<?php printf( 'Sold by: <a href="%s">%s</a>', $vendor->get_shop_url(),  $vendor->get_shop_name() ); ?>
	</span>
	<?php
Just add the code on your child theme functions.php and use the shortcode [dokan_vendor_name] through the short-code widget on a single product page.

This is how you can display the Vendor or Store's name on the single product page. Now you have a clear idea of how to add extra fields to the WordPress registration plugin.
Customize Dokan Vendor Registration Form & Invite More Vendors on Your Marketplace
So, we are at the end of our tutorial post, and hopefully, now you know how to-
- Add extra fields to the vendor registration form
- Create a separate registration page for vendors
- Show the original vendor's name in the single product page.
As WordPress is open-source software, there is a lot of scope for customizations. If you play your cards right then you can bring out the desired result from your website. And if you are a marketplace owner then the above customizations will help your cause.
Do you have any further queries in order to add extra fields to WordPress registration plugin? If you face any issues, don't forget to reach out to us in the comment section.
