
How to Add Custom Order Status to Your WordPress Multivendor Marketplace
Running an eCommerce store needs to maintain certain aspects. One such crucial aspect is managing customer orders. If your store is powered by WooCommerce, then you will have a ready-made order management system. But, what to do when adding custom order statuses are necessarry?
Why Do You Need Custom Order Status?
Usually, customization is essential to manage your order management flow in different situations. If you have a business that revolves around shipping, then you must add order statuses like “Awaiting shipment” or “Shipped“. And, these types of customization isn't available in WooCommerce.
That is where Dokan comes in. Not only it turns your marketplace into a multi-vendor marketplace, but it also gives you the flexibility to add custom order status. Hence, in this blog, we are about to show you the whole process. Let's follow-through.

How to Add a Custom Order Status to Dokan Orders
You don't need to do much in order to add a custom order status to your customer orders. You can add a little bit of a code that we will provide you and you can create as many order type you want.
To add custom order status, you need to open your Parent or Child theme folder. There you will find the Functions.php file. Open the file with the help of a text editor.
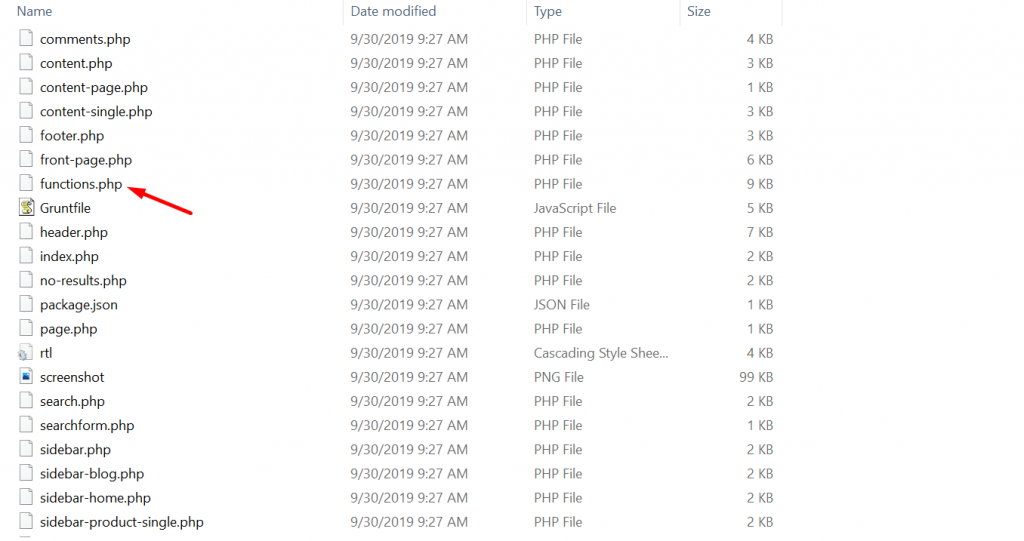
After opening the file, copy the below code anywhere you like in the editor.
/**
 * Add new custom status for WC order statuses
 *
 * @param array $order_statuses
 *
 * @return array $order_statuses
 */
function dokan_add_new_custom_order_status( $order_statuses ) {
    $order_statuses[ 'wc-rejected' ]           = _x( 'Rejected', 'Order status', 'text_domain' );
    $order_statuses[ 'wc-prepare-delivery' ]   = _x( 'Prepare For Delivery', 'Order status', 'text_domain' );
    $order_statuses[ 'wc-delivery-completed' ] = _x( 'Delivery Completed', 'Order status', 'text_domain' );
    return $order_statuses;
}
add_filter( 'wc_order_statuses', 'dokan_add_new_custom_order_status', 12, 1 );
/**
 * Add new custom status button class on order status
 *
 * @param string $text
 * @param string $status
 *
 * @return string $text
 */
function dokan_add_custom_order_status_button_class( $text, $status ) {
    switch ( $status ) {
        case 'wc-rejected':
        case 'rejected':
            $text = 'danger';
            break;
        case 'wc-prepare-delivery':
        case 'prepare-delivery':
            $text = 'info';
            break;
        case 'wc-delivery-completed':
        case 'delivery-completed':
            $text = 'success';
            break;
    }
    return $text;
}
add_filter( 'dokan_get_order_status_class', 'dokan_add_custom_order_status_button_class', 10, 2 );
/**
 * Custom order status translated
 *
 * @param string $text
 * @param string $status
 *
 * @return string $text
 */
function dokan_add_custom_order_status_translated( $text, $status ) {
    switch ( $status ) {
        case 'wc-rejected':
        case 'rejected':
            $text = __( 'Rejected Updated', 'text_domain' );
            break;
        case 'wc-prepare-delivery':
        case 'prepare-delivery':
            $text = __( 'Prepare For Delivery Updated', 'text_domain' );
            break;
        case 'wc-delivery-completed':
        case 'delivery-completed':
            $text = __( 'Delivery Completed Updated', 'text_domain' );
            break;
    }
    return $text;
}
add_filter( 'dokan_get_order_status_translated', 'dokan_add_custom_order_status_translated', 10, 2 );
This code will help you add custom order status to your customer orders. How? Let us tell you.
To add a order status, first visit this class, “dokan_add_new_custom_order_status( $order_statuses )“. There add the order status you want. For example, if you want to add an order status like “Awaiting Payment”, write the code like this,
$order_statuses[ 'wc-awaiting-payment' ] = _x( 'Awaiting Payment', 'Order status', 'text_domain' );
Now, you need to add a button for that order status. Go to the class “dokan_add_custom_order_status_button_class( $text, $status )” and add the code,
case 'wc-awaiting-payment':
        case 'awaiting-payment':
            $text = 'success';
break; 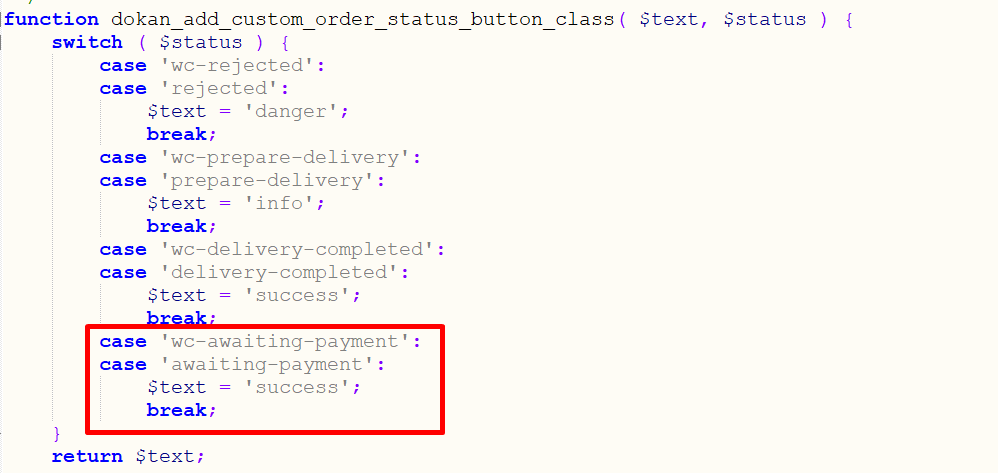
That's not all. You need to add the CSS for the button in order to be visible after the update. In the class, function “dokan_add_custom_order_status_translated( $text, $status )”, add the code,
case 'wc-awaiting-payment':
        case 'awaiting-payment':
            $text = __( 'Awaiting Payment Updated', 'text_domain' );
            break;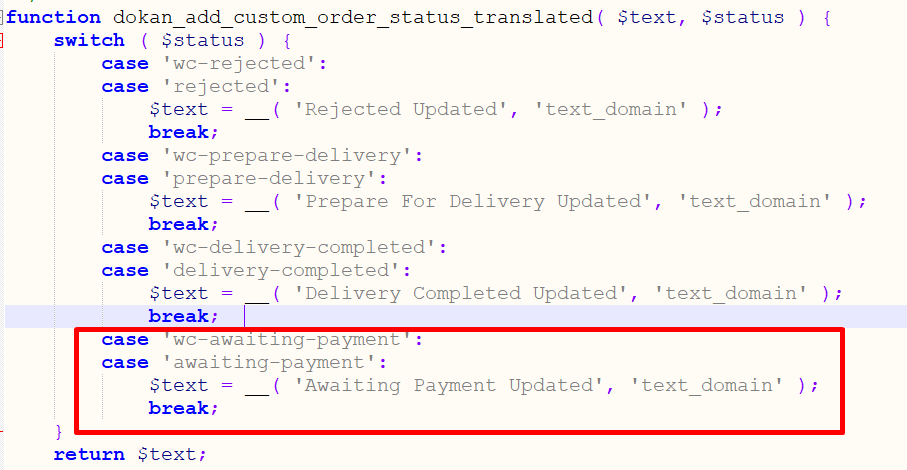
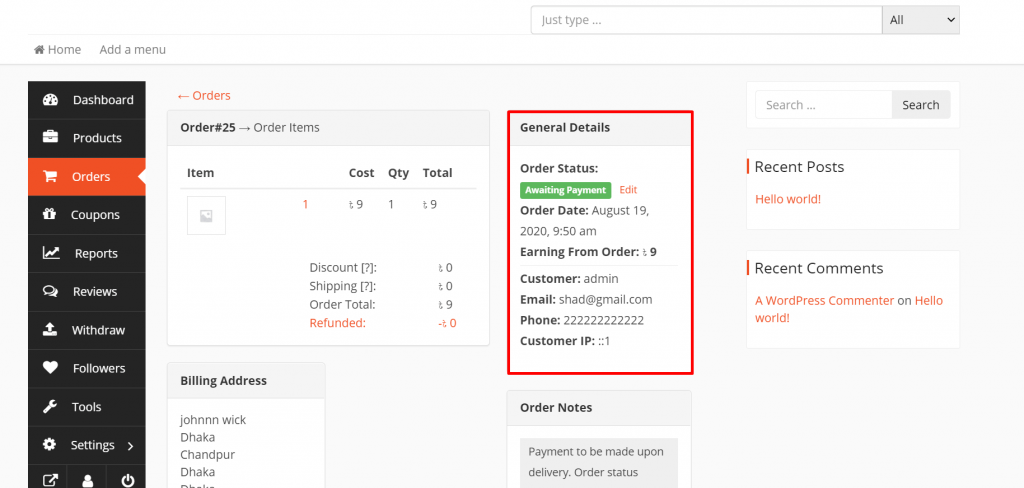
Save the code. Now, when you visit the Orders from your vendor dashboard, you will see the custom order status you have created in the drop-down box.
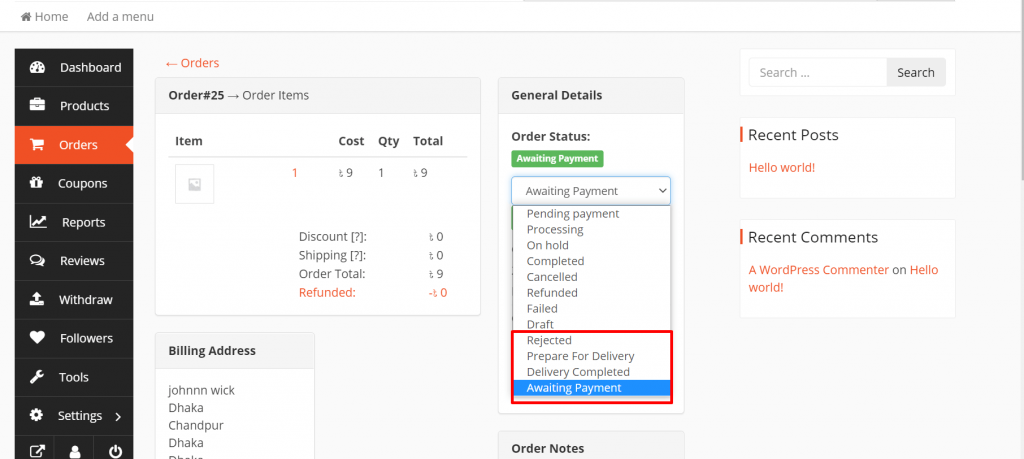
And when you choose this option, you will see the status button is perfectly visible.
Notice: If you are unfamiliar with code and resolving potential conflicts, select a service for assistance. We do not provide support for customizations under our Support Policy.
Dokan, Powering 70000+ Marketplaces Globally
Dokan is one of the most powerful multi-vendor plugins powered by WooCommerce. You can create any type of marketplace with its advanced and rich features. It will only take you 30 minutes!
Dokan provides a successful implementation of bringing WooCommerce capabilities to the frontend. It has features like,
- Multi-step setup wizard (signing up as a customer or a vendor is pretty easy)
- Store SEO ( for better search visibility)
- Professional storefront
- Earning, Sales reports and Vendor Statements
- A powerful and rich collection of add-ons
- Live search option
- Frontend widgets
- Integration with Contact forms
- Product customized shipping
- Flexible refund options
- Store support option
- Open-source and customizable
- And many more.
Read : Dokan’s Top Features & Modules at a Glance!
No wonder Dokan has raced ahead and already touched the milestone of 60000+ active installations. So, if you are thinking of starting a multivendor website then you should definitely go for Dokan and we assure you, it will not disappoint you.
Conclusion
So you can see it now. It's only a few steps away to add custom order status to your WordPress multivendor marketplace with Dokan.
WordPress is one of the best CMS in the world because it is an open platform and a rich collection of plugins. You can create any kind of website using those plugins.
Hence, when you have plugins like WooCommerce and Dokan, creating a multi-vendor website is a piece of cake. Moreover, you can easily add a bit of code and customization is barely an inconvenience.