
Top 20 Proven Tips To Master Yourself In WordPress Content Editor
You may already know it by all means that almost everyone disliked the idea when Matt Mullenweg introduced the block editor back in December 2018. But since then, the new and somewhat wired interface of WordPress content editor evolved a great deal.
With the new Gutenberg block editor, you can do magic. As a regular WordPress user, you spend a large portion of your time editing your content. So WordPress seems bound to make your experience easier and better every day.
However, to unleash all of the secrets of it, you need to keep your curious mind mode on. Apparently you can find new features each time you start to publish new content in Gutenberg.
Here in this blog, we will show you some of the best tips of the content editor for WordPress that can turn your content publishing journey suave and powerful.
Top 20 WordPress Content Editor Tips to Make You a Pro User
Right now, Gutenberg has 45+ million active installations. More than 92 million posts have been written with it.
Long gone are the time of classic editor. Time changes everything. Hence, we all are quite happy with the new Gutenberg editor on our WordPress site. Moreover, now you can use buttons, change the post background, use images with more enhancement options than before. You may even design a page without any page builder.
Let's learn all the lesser-known secrets to master the new WordPress content editor. Yes, let's do it one by one.
1. Explore the Basics of Your WordPress Content Editor
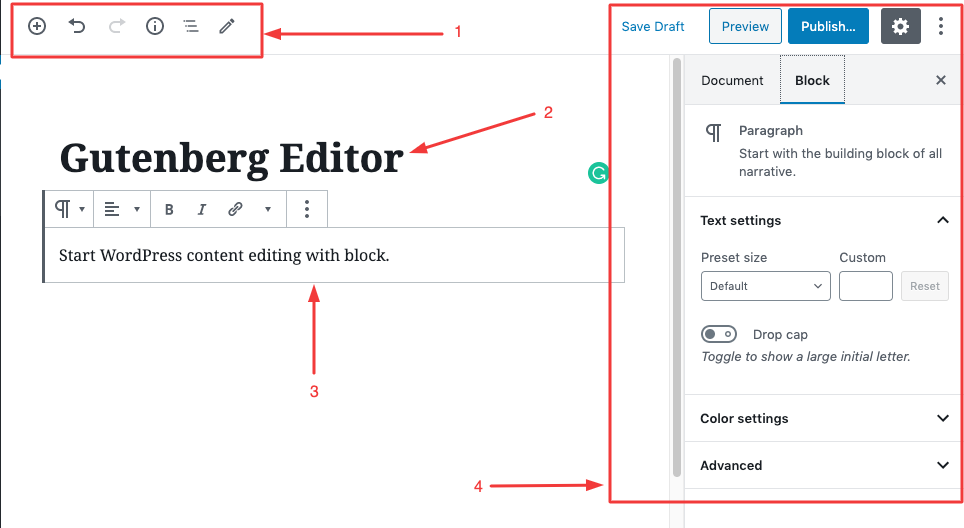
Before you start with the new Gutenberg block, it's necessary to explore all the primary & basic block features in the first place. In the number one section, you can see all the buttons that help you to apply different elements. Then, you can write your headline. Therefore, the block editing initiates in the next part.
You can edit and customize a single paragraph at a time. Change the preset size, customize the font, and use drop cap which we will show you in detail in the latter part of this content. Also, you can check the color settings too.
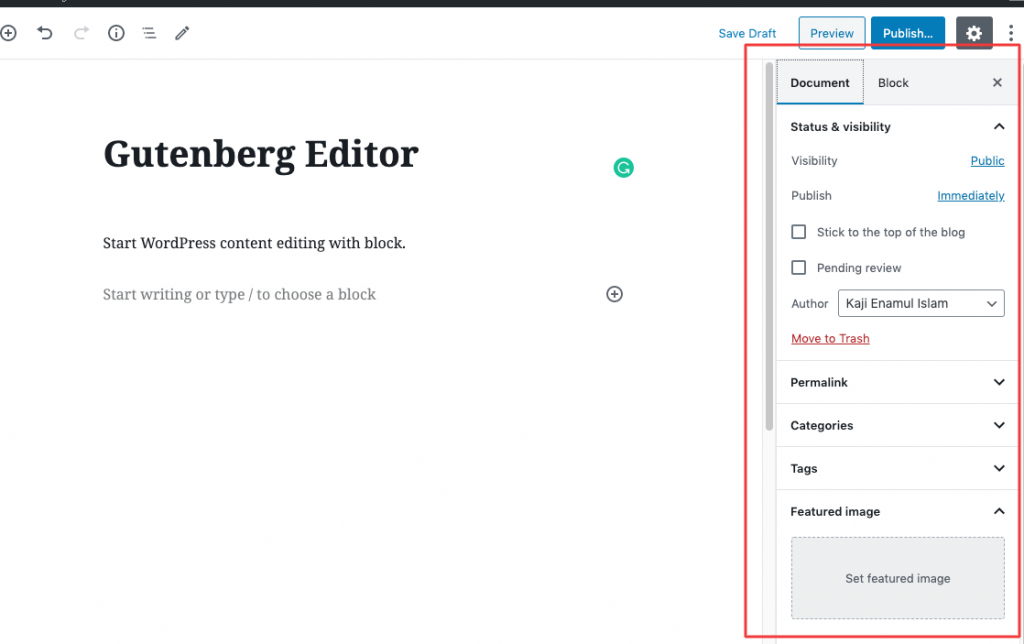
In the documents section, you can set the visibility status, set the date, or schedule content to be published. There are checkboxes to different post status. You can edit permalink, change categories, add tags, and set feature image from it. This process is fun rather than a hassle now. Clicking on every option and trying to explore the activities has never been so easier.
2. Learning the Common Blocks
By clicking the (+) button on the top left corner, you will find all the common blocks like a paragraph, heading, page break, images, lists, and buttons, etc. While writing, explore each one of them and find out how they work.
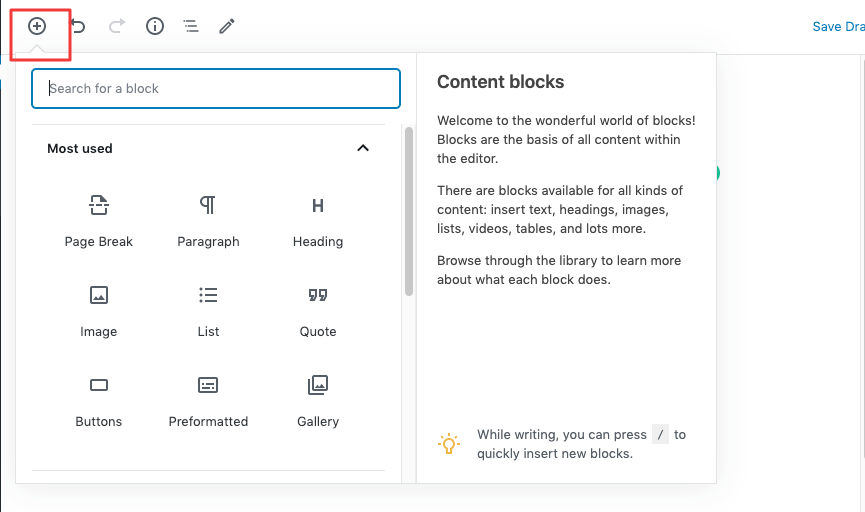
All of these common blocks are ready-made in your WordPress content editor. You can change your post design and overall layouts with them at ease. As all of your content elements will be made with these usual blocks and you can add new blocks to improve it further.
3. Using the “/” (Slash) Button to Insert New Blocks
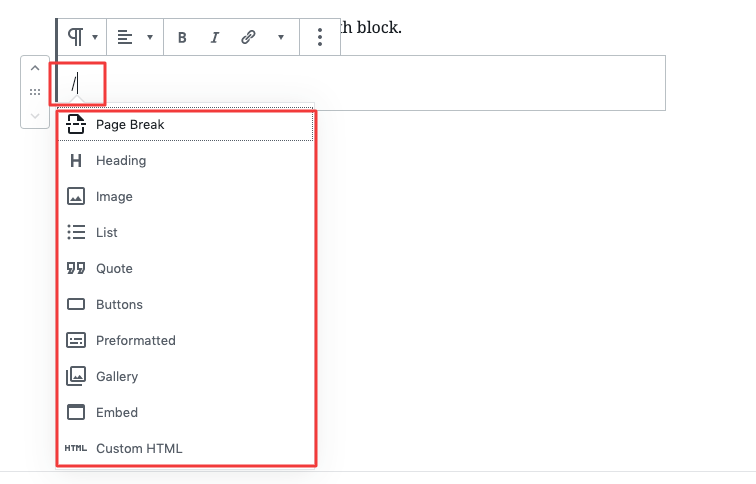
The first shortcut you may love to apply while using WordPress Gutenberg content editor is typing slash (/) instead of clicking the plus (+) button every time. Whenever you need to add a new block, you can just type “/”, and all the blocks will appear below it. Hence, this saves your time and effort.
One simple advice: You can start using this shortcut in full swing when you already know all the common Gutenberg blocks well enough. So this means, any person can be benefitted by the tips with the primary knowledge of the block editor.
4. Keyboard Shortcuts in WordPress Content Editor
The days of using a handful of keyboards shortcuts are almost over. You can just start using a block and get all the options like making a word/sentence bold or italic, insert images, or change text colors and set alignment.
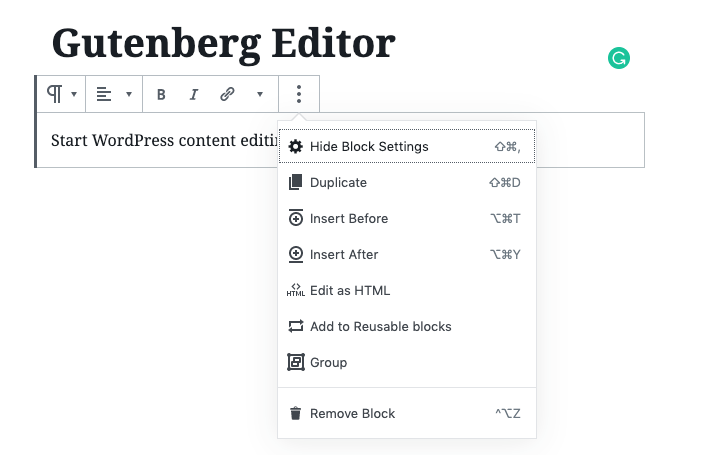
Gutenberg block editor makes it possible to stay with each paragraph you write, then put all the changes you need from one place. Hence, when you start writing, just put your mouse on it and you will see all the available options at hand.
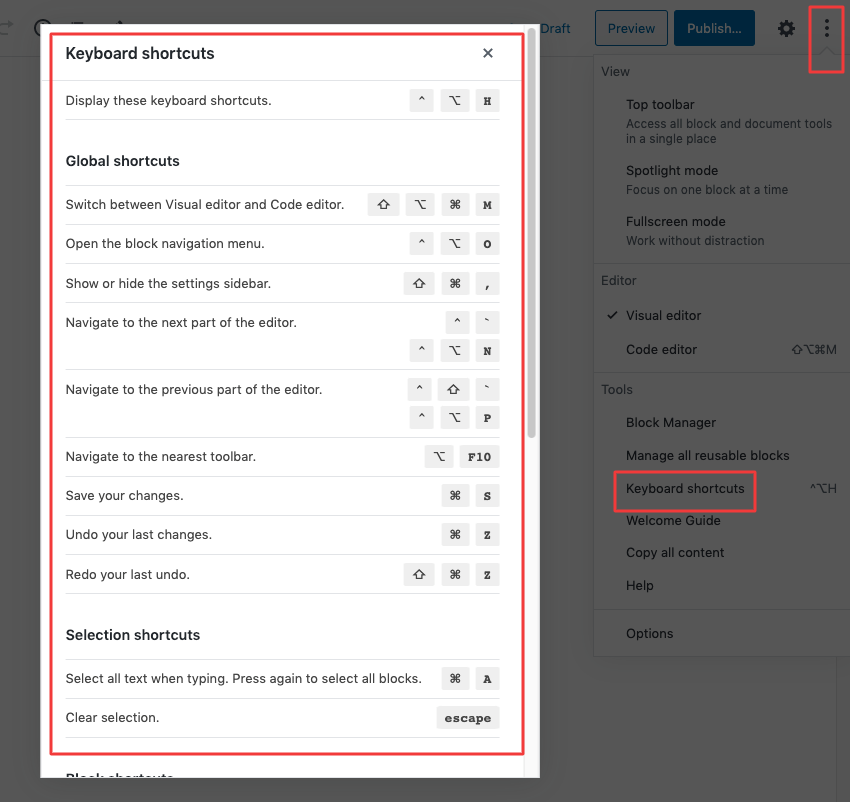
However, you may still like to use all the keyboard shortcuts at once in your editor. To find this option, follow the direction in the image above. Click the three-dot menu beside the settings button, then go to the “keyboard shortcuts”. On this page, you will see all the shortcuts according to your device.
5. Change the Editor Screen to Make Process Simpler

Rearranging the edit screen is more diversified with the new WordPress content editor. You will have three different option to arrange your editing bar. They are-
- Top Toolbar
- Spotlight Mode
- Fullscreen Mode
What you need to do is go to the three-dot menu, and select any types of editing bar. Moreover, you can select all of them at once. Isn't that fun?
6. Fix Your Line Spacing with Gutenberg
It's confusing to any new Gutenberg user to fix line spacing. Because every block is separate from one another. Therefore, when it comes to adding a new paragraph, the interface may look like having no option to do it.
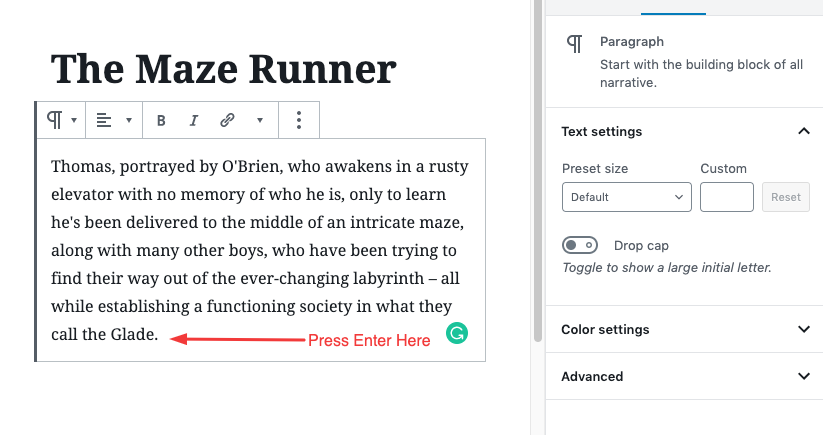
However, it's easier more than anything. Just hit “Enter” when you finish with a block. Then the next block editor will appear with a double space from the last one. Though, if you want single spacing, hit the Shift+Enter key together. That's it.
7. Inserting a Link to Anchor Text
The classic editor required a different option to insert links. But with the new WordPress content editor, you only need to find an anchor text. Select it, then copy-paste the link you want to insert. That's it you are done.
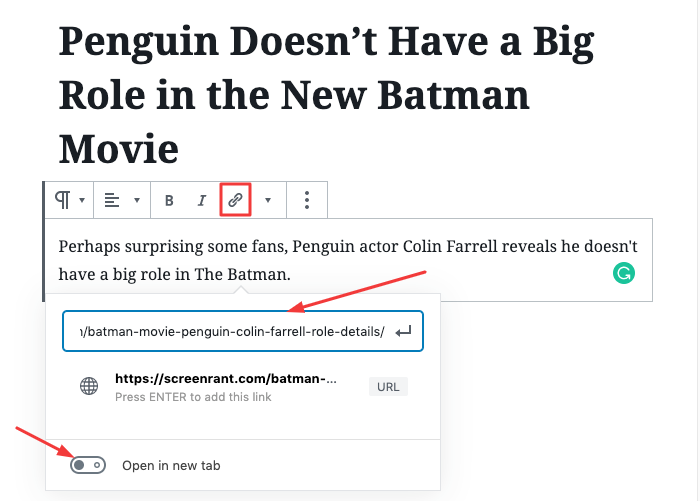
Hence, you may also like to follow the process shown in the image above. With this process, it's possible to turn on “Open in new” tab features that once clicked lead you to the page you've linked your post to.
8. Add Headings to Your Blog Post
Headings and sub-headings turn your post into a more oriented & organized piece of content. It can guide your reader through different steps of an article. well, to add headings with the new WordPress content editor, do the following.
Hover your mouse cursor over the first option in a block as shown in the image below. Now click on it to turn the paragraph into headings.
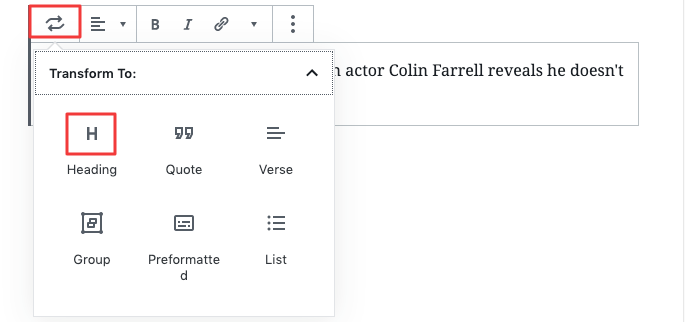
The editor has three separate heading options. Choose one following your post hierarchy.
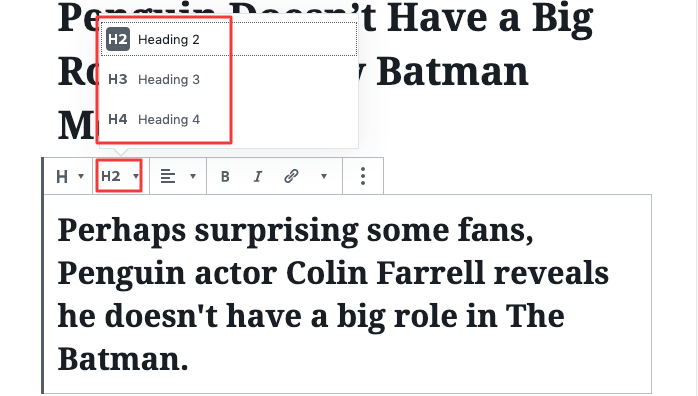
You can change your heading anytime you want. Furthermore, you are able to turn these headings into paragraphs following the same method.
9. Shift to a New Block Instantly
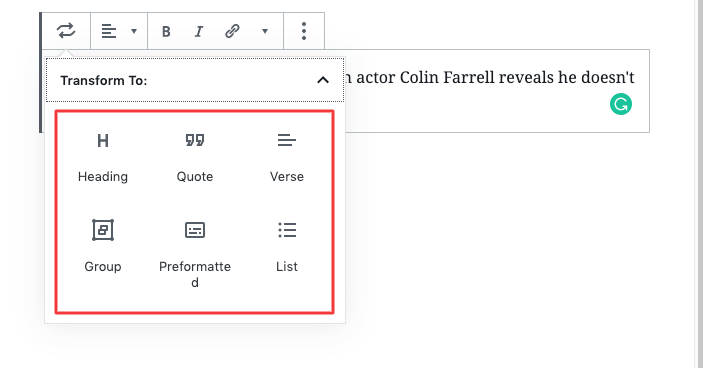
Following the same process of changing paragraphs into headings, you can transform your block to verse, arrange block groups, set quotations, and make list. It is a time-saving process. You won't be needing to insert any new element to compose different types of blocks.
10. Rearrange your Block with Easy Drag and Drop Button
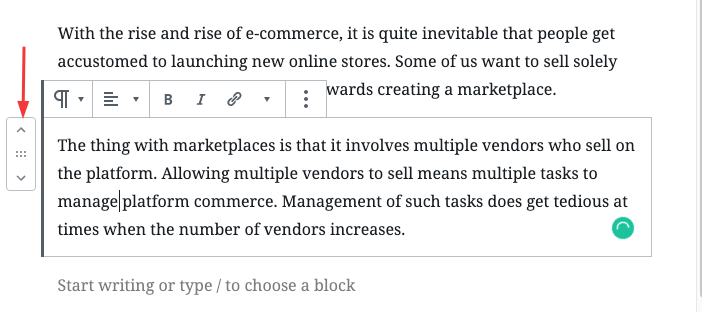
More often than not, we all need to rearrange some section in our blog. In such a situation, you must be familiar with the traditional process. You just copy that part and paste it in the selected section.
However, the new WordPress content editor has a “Drag and Drop” button. By clicking the upper or down-case, you can shift any block anywhere instantly. And if you need to go one block up or down then simply click on the upward and downward arrow respectively placed on the button.
11. Embed Youtube Videos to Your Content
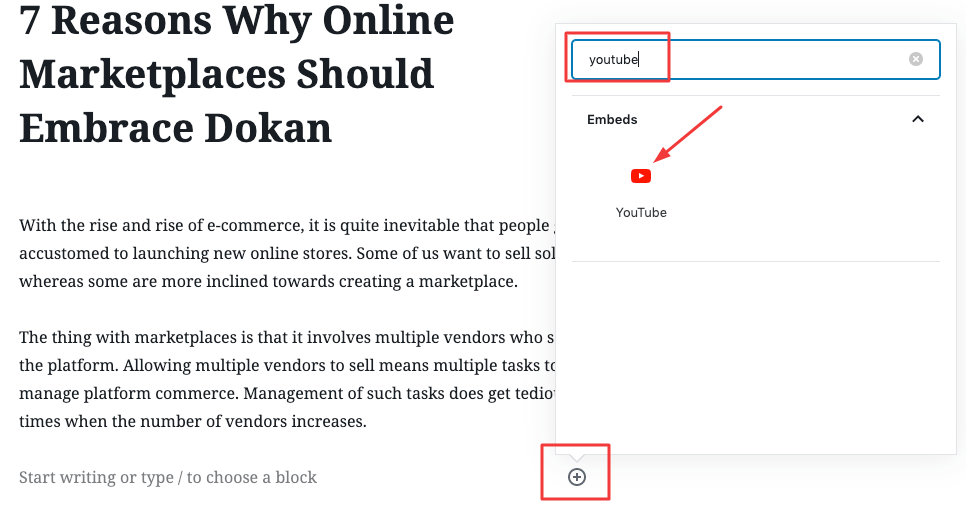
Embedding a YouTube video become more smooth and faster with the Gutenberg block editor. The process will save your time, and space on the hard drive. Whenever you need to use a video in your content, you can utilize this option.
To do this, click the plus (+) icon, then search for “YouTube” and click on it. Now paste the youtube link in the URL box and hit “Embed”.
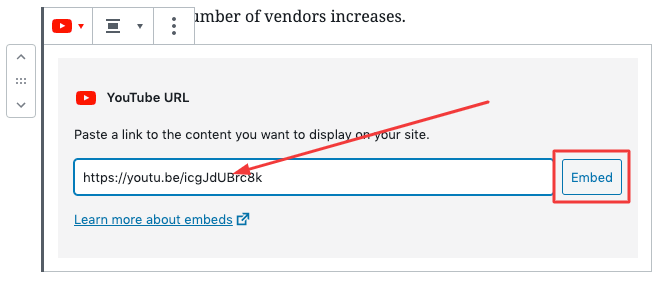
Now your video will appear like the image below. What it needs for your visitor is only hit the play button.

12. Customize Your Text Settings in WordPress Content Editor
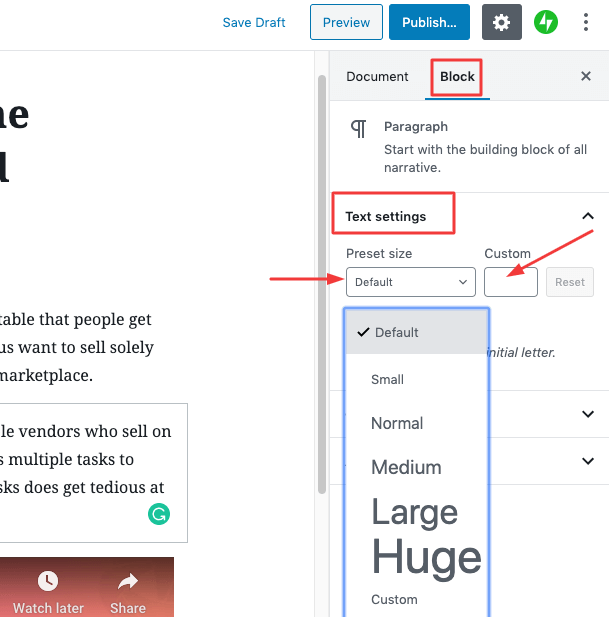
The new WordPress block editor comes with four different presets to customize your text settings. Hence, you can change the text settings manually. The process is quite easy. Start writing with a post. On the right sidebar, click on the block. Then you will see all the options to change your default font size at ease.
13. Create Column Post By Using Column Blocks
You can turn your WordPress content layouts into separate columns as the magazines do. The new Gutenberg block editor comes with a built-in column block. As it is not a common feature, you can find it following the search option that you've used to embed the youtube link.
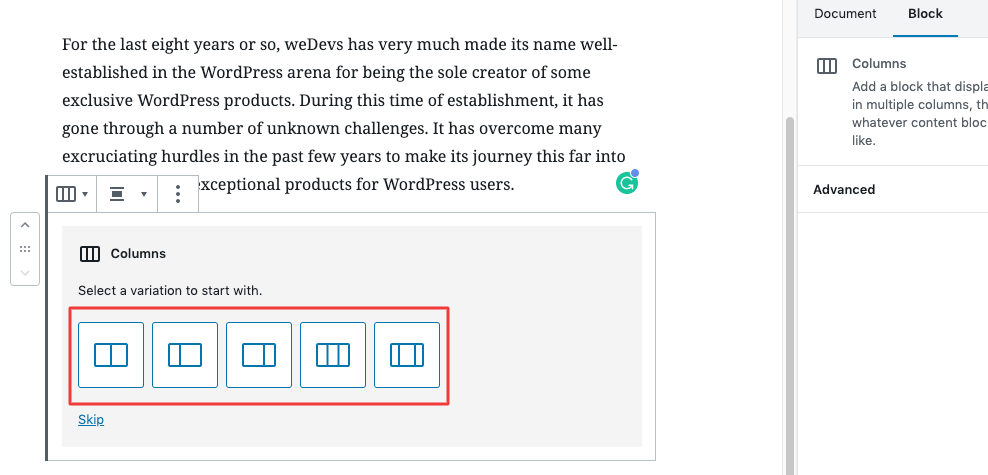
After you've selected the block, choose the column design you want. And start composing your article or blog right on.
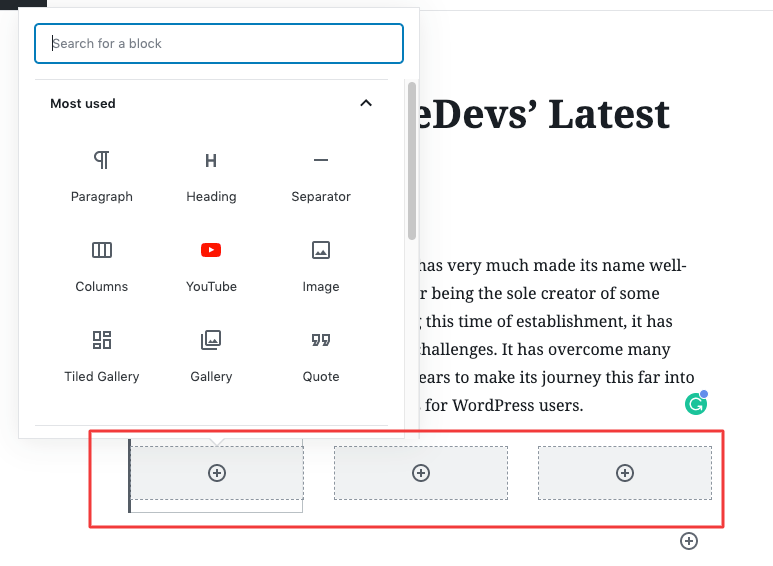
After you've added a column, you can start with a fresh block. Just delete the column block and continue with your single column again.
14. Add Images Next to Your Text
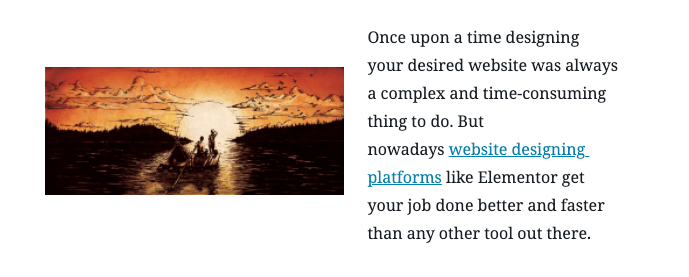
The classic editor has several limitations. One of the remarkable ones is that it was hard to add text beside any image you have inserted. But, the new WordPress content editor has a built-in “Media & Text” block.
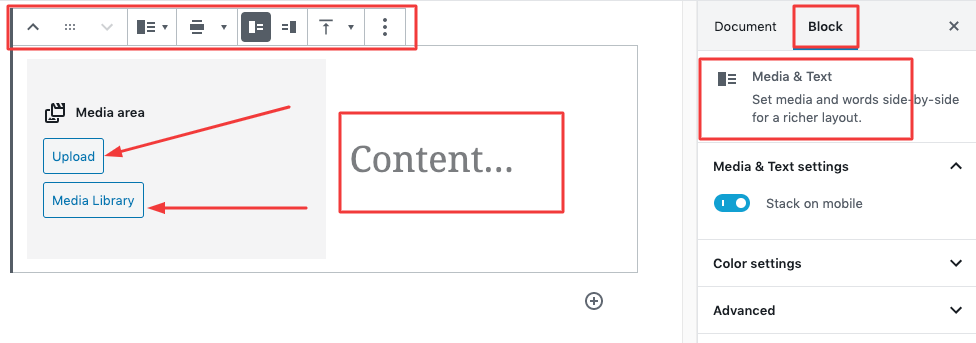
Find this block using the plus (+) button. Upload media files or using any of your existing images from the library. Pull and drag to fix alignments of images and other settings.
15. Create a Re-usable block for Using It As Shortcuts
Sometimes you need to follow a particular post format for a specific blog type or category. You may need to post similar content in your blog in the future. So whenever you post new content with this similar form or structure like the CTA button, column layouts, etc, then creating the same block over and over would be a waste of time and hassle.
But you don't need to be worried. Gutenberg comes with this exciting feature of adding previously used blocks as re-usable blocks hassle-free. Hence, you can save a block template for future use for any number of times you need it.
Here's what you should do to create a re-usable block template.
Put your cursor outside of any block. Then select all of your blocks at a time. Use the keyboard shortcut (Command+A). Now, you can find the three-dot icon. Click on it, and press “add to reusable blocks”.
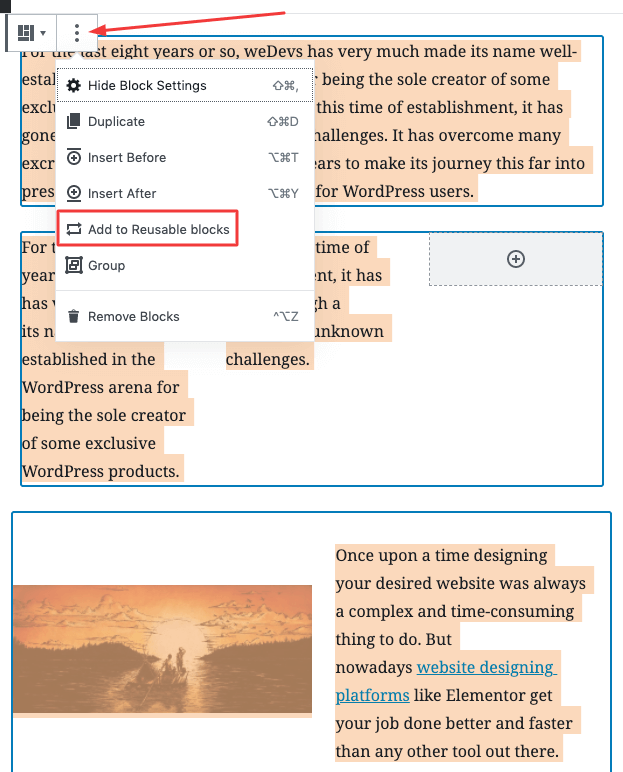
Now you can use all of your saved block templates. Plus you can manage them through your other block settings.
16. Creating Tables with WordPress Content Editor
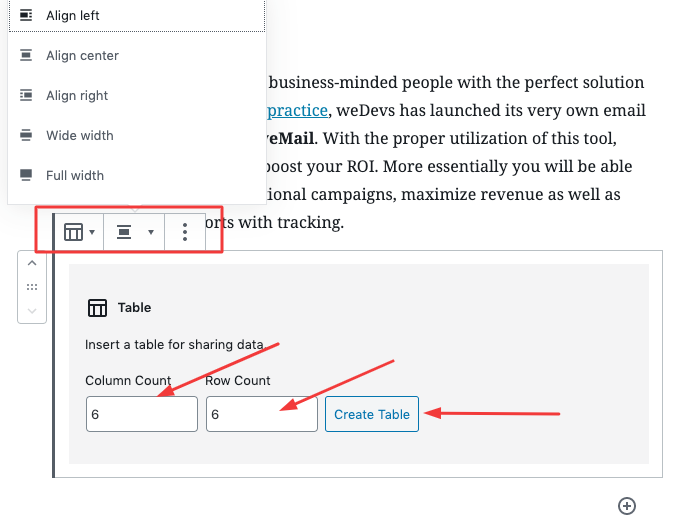
The new Gutenberg editor has a “Table” blocks to help you create a simple table promptly. The process is quite simple. It's similar to adding any block element like YouTube or Column in your editor.
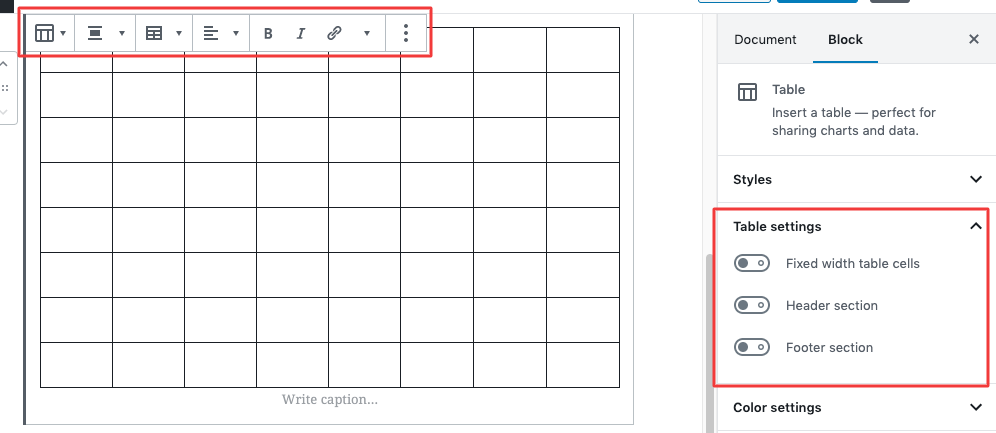
After you add it, you can select how many columns and row you want in your table. Therefore, you can also set the alignment and change settings as per your requirement.
17. Add CTA or Any Types of Button
It's an immensely helpful feature in the WordPress block editor. Adding a button is necessary to some of your posts especially when you are trying to promote any page or product. And, if you have an online store, highlighted buttons are used to generate conversions.
Follow the process below to add a button in your blog with Gutenberg.
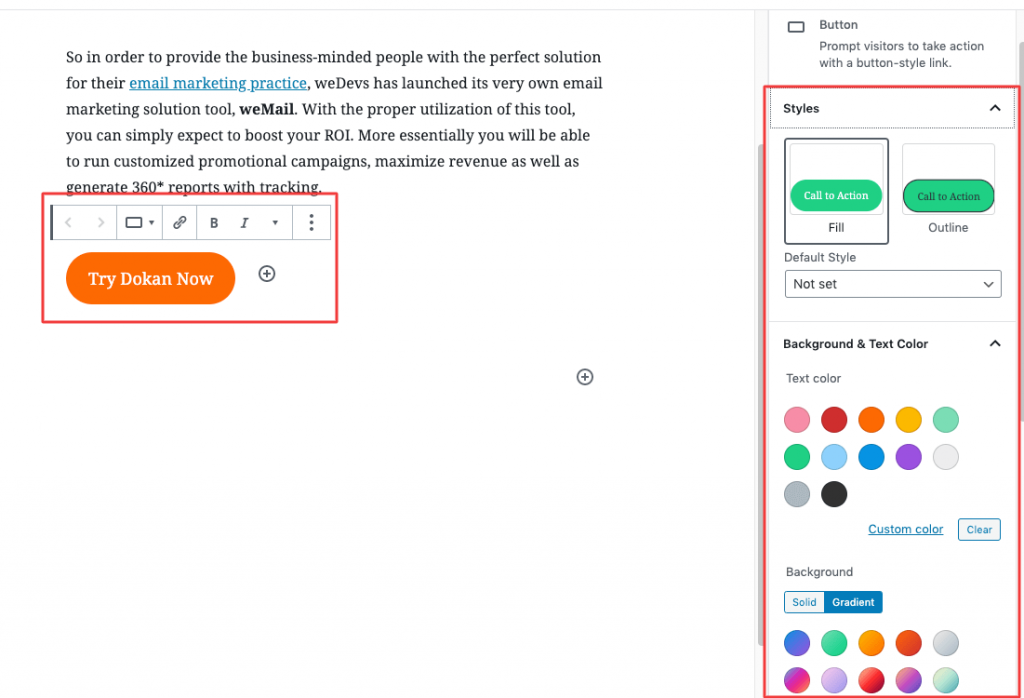
Add the button in the first place. Then choose background and text color. Set the styles and alignment. Then add a direct link to your sales page or anywhere you want to redirect your reader. Following the same process, you can add a button in columns too.
18. Change the Color of Your Text & Paragraph
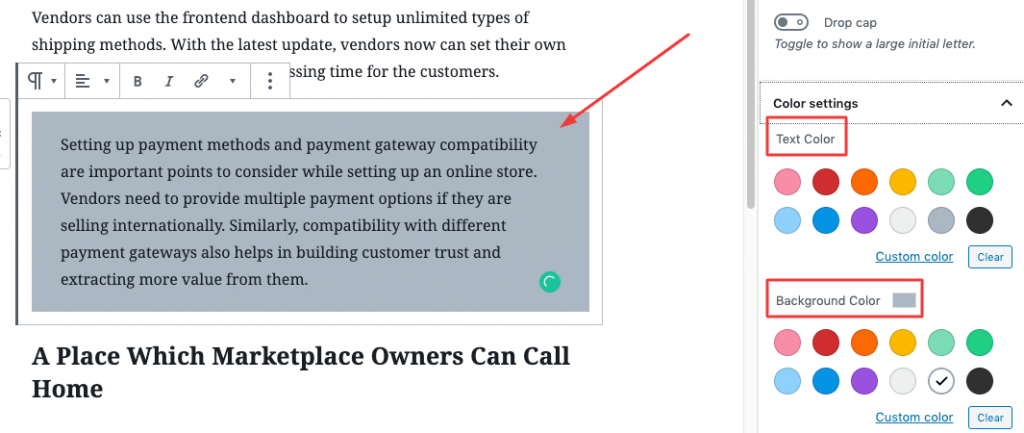
This feature adds uniqueness & diversity to your content design. Like the popular magazines or newspapers, you can change the background of a paragraph. Also, you can change your text colors. After selecting a block, you can find all the necessary settings of color in the right sidebar under the ‘Color settings' tab.
19. Edit the Post Slug/Link Quicker

Now with the new WordPress content editor, you don't need to go to your permalink settings to edit your post slug or link. While writing a blog post, you can continuously keep on updating it whenever you want it.
Hence, after publishing a post, it's not a wise decision to change URL settings. Remember one thing, you won't find this feature active unless you save a title for your post. So only after you save a title, you can edit the slug just above the title box as it can be seen above, and hit the save button.
20. Start HTML Editing with the Code Editor
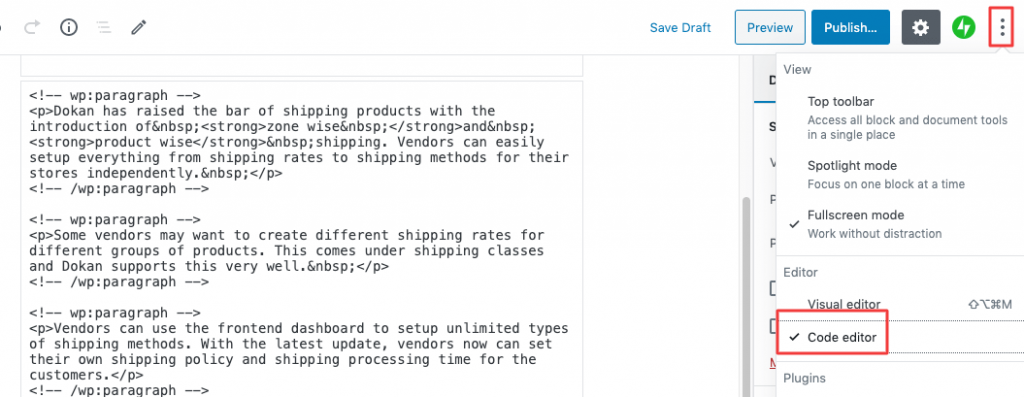
Yes, it's become handier when you can do HTML editing with more efficiency in the Gutenberg block editor. The built-in code editor block is an enhanced tool for those who want to custom the HTML of their content. To start the Code Editor, just go to the sidebar and then click on the three-dot menu. You will find the desired ‘Code editor' option right in the Editor section.
Final Thoughts On WordPress Content Editor
Well, that's it for now about how to properly utilize the content editor in WordPress. On the other hand, with these superb tips, you may just begin your latest endeavor with the new Gutenberg block editor as it truly consists of unlimited possibilities. You can find and discover new ways to utilize the exciting usabilities of these blocks while you edit or compose your posts.
On a separate note, you can add third party block plugins or page builders to extend the capabilities of your block editor further. This flexibility makes Gutenberg a more user-centric tool than ever.
So, tell us. Which WordPress content editor tips seems more helpful to you?