


How to Create a Blog Site: A to Z of Blogging in 2026
Writing for social media or blogs is fun. But having your own blog is much more than that. It means you get the entire control, the ability to show your creativity to the world, and the opportunity to increase your analytical ability.
You can even earn from it.
The good news? Creating a blog in 2026 is easier and more accessible than ever. Forget complex coding or expensive software – with WordPress and AI tools, you can be up and running in no time.
Keeping that in mind, today, in this blog, we will guide you on how to create a blog site in only 10 steps. So, without any further ado, let's get started!
Why You Should Create a Blog Site in 2026
If you have a passion for blogging, then you don't need any further motivation to create your own blog site. But the question is – “Would it be worth following the blogging passion in 2026?“
The simple answer is – Yes, it's still one of the most profitable ideas and proven ways to make money from home.
Now let us defend our answer!
- Increasing Readers: With over 600 million blogs on the internet and an ever-increasing number of readers, the blogging industry is a vibrant ecosystem. The global internet population is growing, and with it, the consumption of digital content. People seek blogs for information, entertainment, and advice, making it a prime time for aspiring bloggers to enter the market.
- Market Size: The digital content market, which includes blogging, is projected to grow significantly in the coming years. According to various reports, the global content marketing industry is expected to reach over $600 billion by 2024.
- Monetization Possibilities: Blogging offers numerous ways to generate income. The most popular monetization ways are to enable AdSense, affiliate marketing, subscription models, sponsored posts, etc.
- Earnings Potential: The income potential for bloggers varies widely based on niche, audience size, and monetization strategies. Some bloggers make a modest side income, while others earn six or seven figures annually. On average, established bloggers can earn anywhere from $1,000 to $10,000 per month.
- Flexibility and Independence: Blogging provides the freedom to work from anywhere and set your own schedule. So, if you want to take blogging as a side hustle, it's the best option to do that.
Now, if you're convinced that you should create a blog site to kickstart your own blogging business, let's jump to the next segment! There, we'll show you how to create a blog site with ease.
How to Create a Blog Site – 10 Easy Steps for Beginners
Setting up a blog online may sound intimidating. But trust us, you can do it easily on your own. We will show you the whole process of creating a blog site in only 10 steps.
Here are the steps:
- Choose Your Niche
- Register a Domain Name
- Buy a Hosting Plan
- Choose a Blogging Platform
- Get Your Site Live
- Install a Blogging Theme
- Make Your Content Plan
- Write Your First Blog
- Promote Your Blog Posts
- Monetize Your Blog
Now let's get into the details! No matter how little or how much you know about creating a website, just follow this tutorial and you'll be able to start a blog right away.
Step 01: Choose Your Niche
Choosing your niche is arguably the most crucial step in creating a successful blog. It's your sweet spot where your interests, expertise, and target audience intersect.
Here's how to find your niche:
- Identify Your Passions: What are you genuinely enthusiastic about? Do you love gardening, woodworking, or analyzing financial markets? Your passion will fuel your creativity and help you stay motivated in the long run.
- Consider Your Skills and Knowledge: What are you good at? Do you have a unique perspective or experience in a particular field? Leveraging your existing knowledge will make creating informative and valuable content much easier.
- Research Market Demand: Once you have some niche ideas, use keyword research tools to see if there's an audience for them. This will help you avoid pouring your heart into a topic with minimal readership.
- Look for Trends: Is there a growing interest in a particular topic? Capitalizing on an emerging trend can help you attract a dedicated audience early on.
- Check the Competition: While some competition is healthy, avoid oversaturated niches where it might be challenging to stand out.
- Think Long-Term: Will your chosen niche be relevant and interesting to you in the years to come?
Now you should be able to choose a perfect niche for your blog site. After choosing a niche, move on to the next step.
Step 02: Register a Domain Name
Your domain name is your blog's unique identity on the internet. It's the address people will type in their browser to find your site.
Here's what you need to know about registering a domain name:
- Choosing a Memorable Name: Your domain name should be easy to remember, spell, and pronounce. Ideally, it should reflect your blog's niche or brand.
- Domain Extensions: The most common domain extension is “.com,” but there are many others available, like “.blog,” “.info,” or even country-specific extensions like “.ca” for Canada. Choose an extension that complements your blog's focus or target audience.
- Availability Check: Before registering, use the domain registrar's search tool to check if your desired domain name is available.
- Renewal Fees: Domain names require annual renewal fees to maintain ownership. Factor this cost into your blogging budget.
Here are some additional tips for registering a domain name:
- Keep it Short and Sweet: A shorter domain name is easier to remember and type.
- Avoid Hyphens and Numbers: These can make your domain name look less professional.
- Think Long-Term: Choose a domain name you won't regret down the line.
- Consider Brandability: Your domain name should be conducive to building a recognizable brand for your blog.
By following these tips, you can register a domain name that perfectly suits your blog's identity and helps you establish a strong online presence.
Step 03: Buy a Hosting Plan
Once you’ve registered your domain name, the next step is to buy a hosting plan, which stores your blog’s files and makes them accessible online.
Before buying a hosting plan, you need to know the types of hosting plans. Mainly, there are 4 types of hosting:
- Shared Hosting: Affordable and ideal for beginners.
- VPS Hosting: More resources and control for growing blogs.
- Dedicated Hosting: Entire server for large, high-traffic blogs.
- Managed Hosting: Provider handles technical aspects.
After choosing the hosting type, select a hosting provider and buy a plan for you. You can check this blog to know about the most reliable hosting providers.
15 Best Hosting Providers for WordPress
Step 04: Choose a Blogging Platform
There are lots of blogging platforms like WordPress, Blogger, Tumblr, etc. So, choosing the right platform may seem a bit confusing. But if we take some facts into account, it'll be clear which one is the best.
There are more than 82 million active users of WordPress. The reasons behind the huge popularity of WordPress mainly are –
- It’s free for everyone
- The setup is very easy
- Easily customizable with 13000+ themes (free & paid) and 60000+ free plugins
- They have a quality support forum
The other blogging platforms (e.g., Blogger, Tumblr, Blogspot) also let you create your blog for free, but there are some serious limitations as well.
- You won't have full control over your own blog, the platform will have
- Your web address will include the platform URL (eg., sampleblog.tumblr.com or sampleblog.blogspot.com)
- You won't be allowed to advertise on your blog
Choosing WordPress as your blogging platform will be the best decision for you. Initially, WordPress was created for blogging. In terms of blogging, WordPress is second to none.
Step 05: Get Your Site Live
If you don’t want to install WordPress manually, simply ask your hosting provider to install WordPress on your behalf and provide the credentials. They will happily do that for you.
However, if you want to install WordPress on your own, follow this procedure:
Log in to your control panel and look for an option or section related to website management or software installations.
Once you've located the installer, select WordPress from the list of available applications. Follow the prompts to begin the installation process. You need to provide some basic information, such as your desired website name, username, and password for the WordPress admin area.
After providing the necessary information, initiate the installation process. The installer will automatically set up WordPress on your hosting account, including creating the necessary databases and configuring the required files.
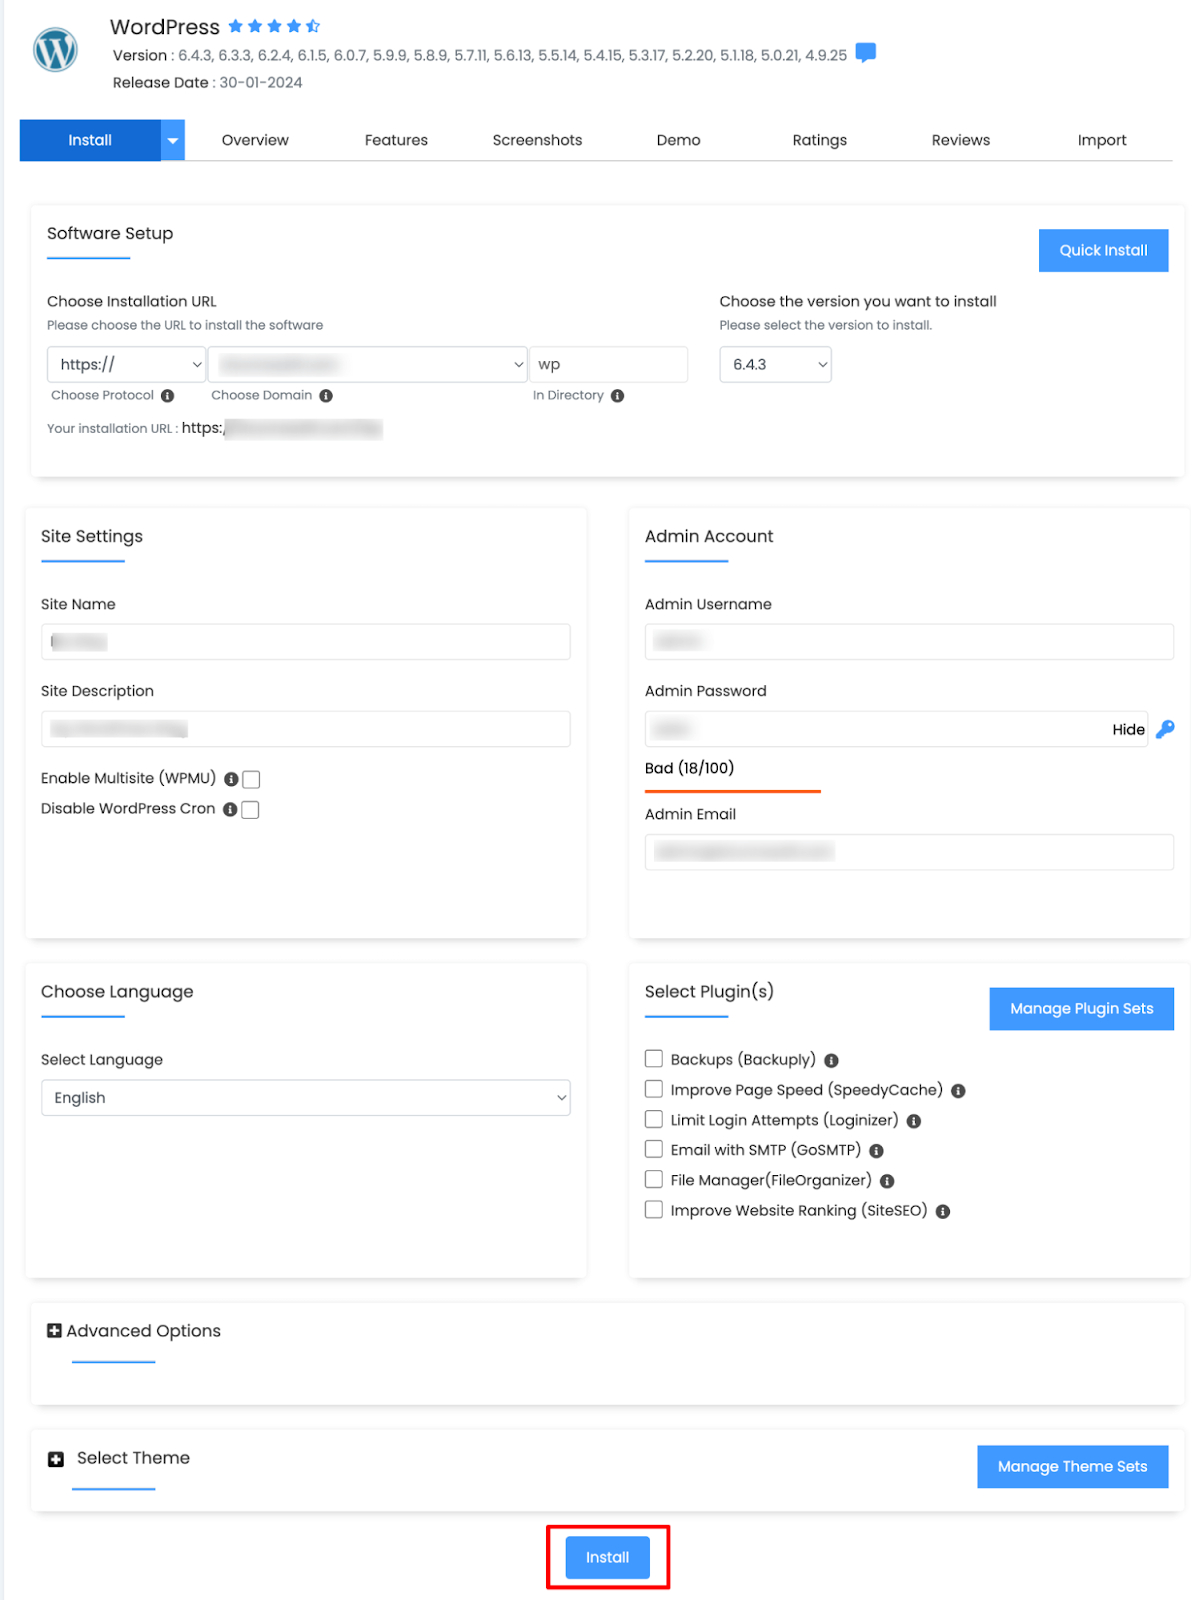
Once the installation is complete, you'll receive confirmation along with login details for your WordPress dashboard. This dashboard is where you'll manage your website's content, design, and functionality.
Step 06: Install a Blogging Theme
Since it's a blog site, you should choose a theme that is designed for blog sites.
You should look for a theme with a clean, responsive design that works well on all devices. Ensure it offers the features you need, such as customizable layouts, widget areas, and SEO optimization.
We have a dedicated blog post on the best WordPress themes for blog sites. You can choose a theme from this list.
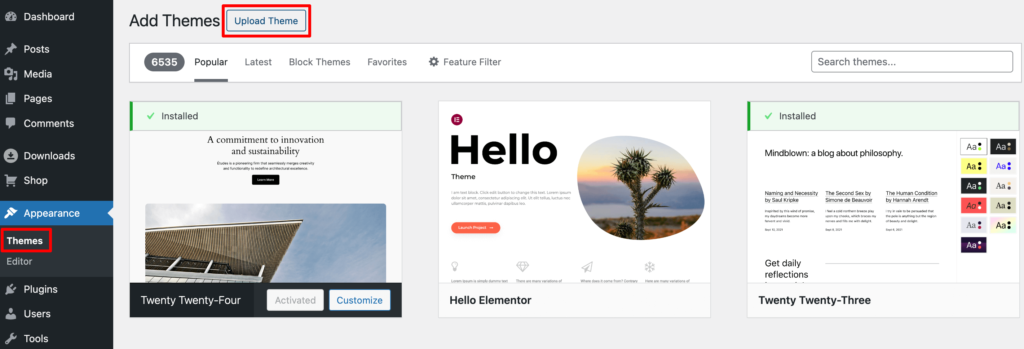
After choosing a theme, navigate to your WordPress Dashboard -> Appearance -> Themes -> Add New Theme. Then upload the theme or find your preferred theme from the search box. When the theme is ready, simply, install and activate the theme to use it on your site.
If you need any help to install a theme, you can check our blog to get your job done – The Ultimate Guide to WordPress Themes
Step 07: Make Your Content Plan
Your content plan is the roadmap that guides your blog's direction and ensures a consistent flow of valuable content for your audience.
Here's how to craft a winning content plan:
- Know Your Audience: Understanding your target reader's interests, needs, and pain points is crucial for creating content that resonates with them.
- Brainstorm Content Ideas: Once you know your audience, brainstorm a variety of blog post ideas that address their interests and provide solutions to their problems. Consider evergreen content (topics with long-lasting relevance) as well as seasonal or trending topics.
- Variety is Key: While focusing on your niche, incorporate different content formats to keep your audience engaged. This could include blog posts, listicles, how-to guides, infographics, interviews with industry experts, or even video content.
- Keyword Research: Use keyword research tools to identify relevant keywords that your target audience is searching for. Optimizing your content for these keywords can improve your blog's search engine ranking and drive organic traffic.
- Set a Schedule: Decide on a realistic and consistent publishing schedule. This could be weekly, bi-weekly, or monthly, depending on your resources and capacity.
- Content Calendar: Organize your content plan using a content calendar. This could be a simple spreadsheet or a dedicated content planning tool. Include details like post titles, target keywords, planned publishing dates, and any assigned tasks.
Step 08: Write Your First Blog
Now it's time to write and publish your first-ever blog post. To do that, go to your WordPress dashboard -> Posts -> Add New Post.
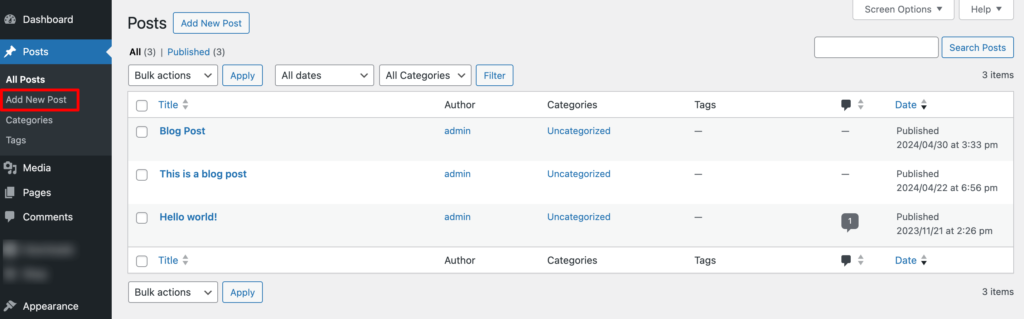
You can add the title of your post in the upper panel. The text panel below is for the main content. You can save your Draft, Preview it, or Publish it. All these options are available in the upper right panel.
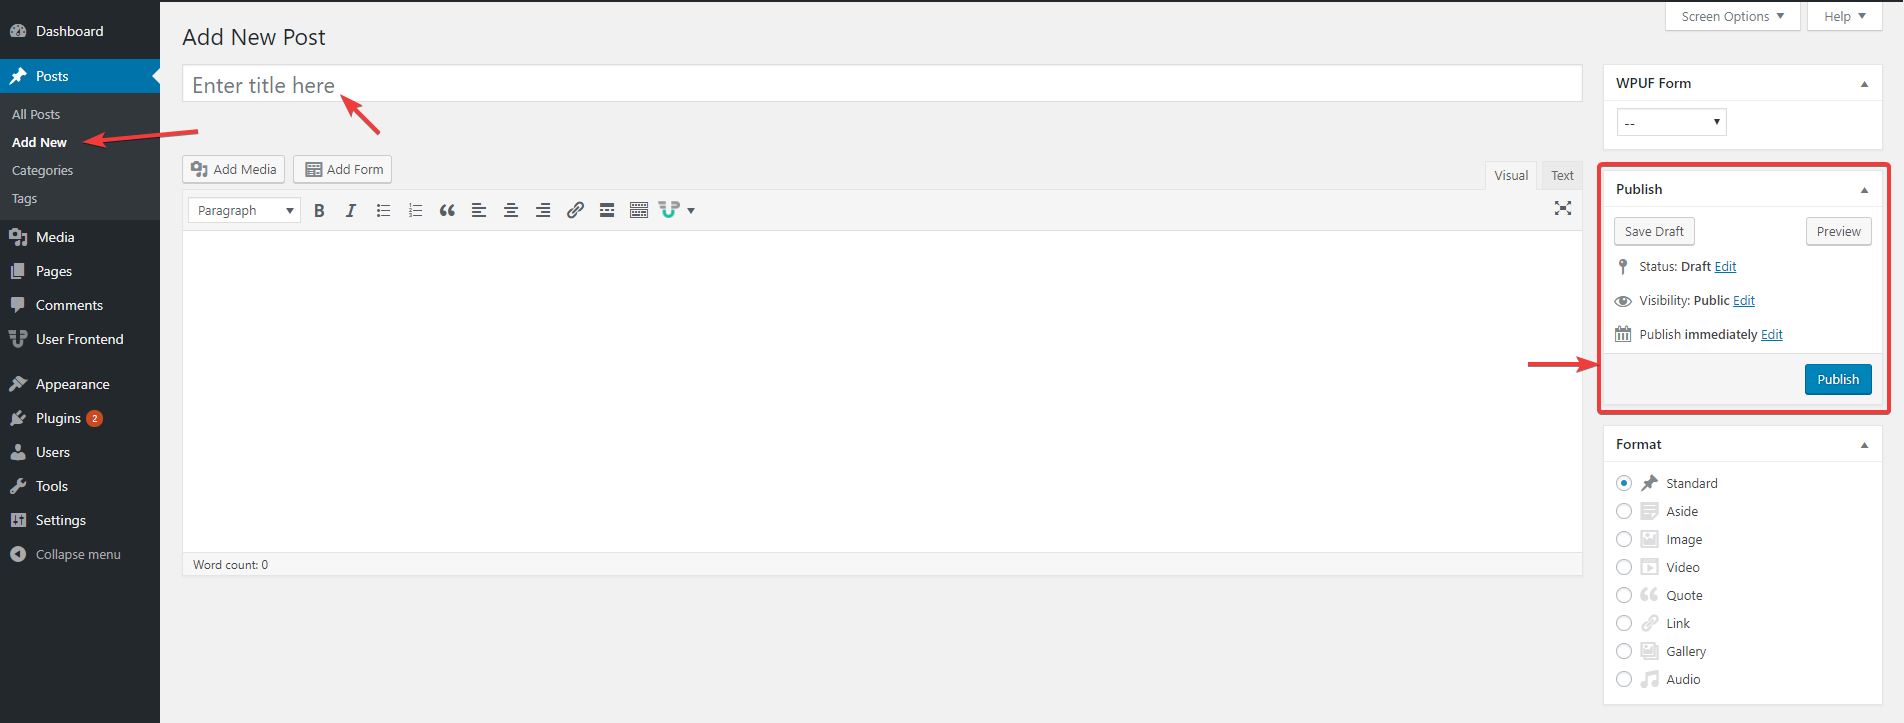
In addition, you can add pictures, audio or video files, links, blockquotes, and many other features to your post. To add a media file, just click on the Add Media button. Then, click Select Files to upload a file from your computer.

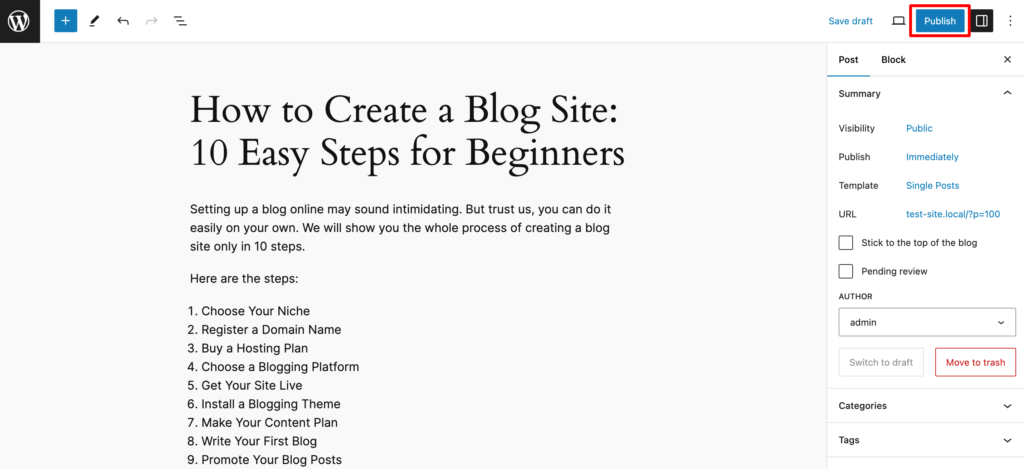
Then craft the whole blog post. Once you're done with the writing part, make sure you have also done the SEO part. Then simply click on the “Publish” button to publish your blog post.
Step 09: Promote Your Blog Posts
Creating fantastic content is just one piece of the puzzle. To truly thrive in the blogosphere, you need to actively promote your blog posts and reach your target audience.
Here are some effective strategies to get your content seen:
Social Media Sharing:
- Share your blog posts on relevant social media platforms like Facebook, Twitter, Pinterest, and Instagram.
- Tailor your posts to each platform's format and audience preferences.
- Use relevant hashtags to increase discoverability.
- Engage with comments and questions on your social media posts to build a community.
Email Marketing:
- Build an email list of your subscribers and send regular newsletters promoting your latest blog posts.
- Offer valuable incentives like exclusive content or discounts to encourage signups.
- Segment your email list for targeted promotions based on subscriber interests.
Guest Blogging:
- Contribute guest posts to other established blogs in your niche.
- Include a link back to your blog in your author bio to drive traffic.
- Guest blogging allows you to tap into a new audience and establish yourself as an expert.
Step 10: Monetize Your Blog
Once your blog gains traction and attracts a loyal audience, you can explore various strategies to monetize your efforts and potentially turn your blog into a source of income.
Here are some popular methods to consider:
- Display Advertising: This is a classic approach where you allow advertisers to display ads on your blog. You can earn revenue through pay-per-click (PPC) models, where you get paid every time someone clicks on an ad, or cost-per-thousand-impressions (CPM), where you earn based on the number of times the ad is displayed. Popular ad networks include Google AdSense and Media.net.
- Affiliate Marketing: Promote other companies' products or services on your blog. You'll earn a commission for every sale generated through your unique affiliate link. This method works well if you can recommend products relevant to your niche and audience.
- Offer Sponsored Content: Partner with brands to create sponsored content that promotes their products or services to your audience. Ensure sponsored content aligns with your niche and offers value to your readers.
Monetization takes time and effort, so don't get discouraged if you don't see immediate results. Focus on creating valuable content, building a loyal audience, and experimenting with different monetization strategies to find what works best for your blog.
Common FAQs on How to Make a Blog Site
Search engines treat newborn blogs like seedlings. With consistent posting and basic SEO, most blogs start seeing meaningful traffic within 3 to 6 months. Faster if you promote actively on social platforms or communities.
Not at all. WordPress themes and page builders handle the heavy lifting. A sprinkle of curiosity helps, but you won’t need to wrestle with code unless you want to add fancy customizations later.
Three to five well-crafted articles are enough to lift the curtain. More is welcome, but don’t wait for perfection to arrive wearing a tuxedo. Publish early, refine as you grow.
Once a week is a comfortable rhythm for most new bloggers. Consistency beats speed. A steady drumbeat keeps readers returning and helps search engines learn your posting pattern.
A security plugin, regular updates, strong passwords, and automated backups are your digital guardrails. Think of it as installing locks, lights, and a fireproof box for your online house.
How to Create a Blog Site – Ending Note
Now that you know how to start a blog, we hope you'll share your knowledge and ideas with the world through your own blog. To make your blog successful, here are some tips you can follow –
- Try to optimize your posts for search engines.
- Spread words among your friends about your site.
- Make interesting posts on a regular basis.
- Share them on social media.
- Try avoiding plagiarism, write in your own way.
A contact form can add great value to your blog or website. You can follow these 4 easy steps to create a form with WordPress Form Builder. It'll help you to engage more audiences and make a positive impact on them.
Long story short, quality, and quantity both are important. If you create quality posts, you'll surely grow your audience over time. Besides that, people love writings that are easily understandable. So, keep writing, and have a great journey with your own blog.